I’ve recently added a 1953 vintage Zenith K412 radio to my collection! Zenith named it “The Crest”, but collectors usually refer to it as “owl eyes”, for obvious reasons. This seems to be quite a popular radio among collectors, and I’ve wanted one since the first time I saw one. The ones I’ve seen for sale were all either out of my price range or were junk. The main problem with the K412 was that the handle was underdesigned, and those examples with intact handles command a premium price. Because the antenna is located in the handle itself, there is no steel reinforcement, only the plastic molded shell and a flimsy plastic cover.
The “owl eyes”, in addition to being an unusual looking radio, is one of the smallest tube radios of its day -- only about 4.5” high with the handle folded down. It uses (4) low filament-voltage tubes, and comes on instantly. Many radios of the era used this 4-tube design, but provided for true portability with huge, onboard batteries, which made them considerably heftier than this one, which is designed to run on line voltage only. It is an incredibly cute little radio!
Greg Mercurio on the Radio Attic website had this one up for sale for some time, but I thought it was overpriced, and had a poorly-repaired broken handle to boot. Aside from that, it looked very nice to me! One day, I was browsing around on a different website, and I was surprised to see that Greg was advertising the exact same radio for sale. The interesting difference was that in addition to the hefty price tag, there was also an option to “make an offer”. Hmmm…
After thinking about it for another week or so, I made what I thought was a reasonable offer. To my delight (and consternation!) my offer was accepted without the slightest hint of protest. “Oh no!” I thought, “I wonder what else is wrong with it?”
When it arrived, I was relieved to find that the closer I looked at it, the more delighted I was with the radio. Yes, the handle had been broken, and very sloppily and incompetently repaired, but the rest of the radio was unbelievably clean! This has to be the cleanest 50+ year old radio that I’ve ever seen -- inside and out! As far as I can tell it is completely original, has very few hours on it, and even has the original Zenith tubes. It plays beautifully! But that handle…
I didn’t even dare try to pick the radio up by the handle. The two ends of the break did not even line up, and the glue joint was loose, and flexed back-and-forth sickeningly. Plus there was glue schmeared all about the vicinity of the joint, and beyond. I decided to try and re-do the repair.
I disassembled the handle, removed the loopstick antenna, and found that the repair had been made with some kind of epoxy, which doesn’t adhere very well to plastic. They used gobs of the glue, nearly filling the inside of the right side of the handle -- what a mess! Fortunately, the fact that the epoxy didn’t stick very well made it at least reasonably possible to remove it. This had to be done “mechanically”, as any solvents that would dissolve the glue would also dissolve the plastic. I got most of the glue out by prying and scraping with a tiny screwdriver. In order to clean every last bit of it from the actual break surfaces, I used an exacto knife and an jeweler's loupe. All of this effort went surprisingly well, and the broken ends now fit tightly together.
Though the case of this radio is bakelite, I suspected that the handle was an injection-molded thermoplastic, and was a perfect candidate for solvent welding. I took a small artist’s brush and some fairly “hot” lacquer thinner, and applied a small amount to an unexposed area of the handle, and sure enough, it softened the plastic quite readily. I would be able to “glue” the handle together using nothing but the solvent-action of the lacquer thinner. While this will not make an invisible joint, it will be an exceptionally close-fitting joint, and one that rivals the strength of the substrate.
I dipped the tiny artist’s brush into a small cup of the solvent, and applied a full, wet coat to the joint surface of one part, and then the other part. I repeated this about half a dozen times, as the solvent evaporates quite rapidly, and it has to have time to soften the joint surfaces. I applied one last coat to one of the pieces, quickly aligned the two broken ends, and pressed them firmly together. I held them in this position for several minutes, and afterward set the assembly aside for more thorough drying.
The re-repair was a complete success “structurally”, with the formerly broken ends now properly aligned and tightly bonded, but there was still the matter of all the smeared cement from the first repair. I decided that it would need to be polished out. That’s the other advantage of the handle being thermoplastic rather than bakelite: less likelihood of breaking through the thin bakelite surface, into the porous substrate. The handle was made from a more “homogenous” material, and could be wet-sanded and polished out without fear of losing the surface finish.
Starting with 400 grit wet-or-dry sandpaper, used wet, I proceeded to 500, 600, and 3M’s “Ultra” wet-or-dry. This removed all of the glue residue, some incidental scratches, and smoothed the interface between the broken ends. The satin finish left by the “ultra” needed further polishing. For that, I used “Micro-mesh” abrasive cloth, starting with the 4000 grit, proceeding to 6000, 8000, and finishing up with 12,000 grit. This brought the handle’s surface back to its original finish, but I wound up having to re-paint some of the “Z E N I T H” lettering. I used gloss-white Rust-oleum, thinned out with mineral spirits, a 15/0 artist’s brush, and the jeweler’s loupe to restore the lettering.
I’m quite pleased with the results of the re-repair. The break line is still visible, though not very noticeable, and the handle has been restored to nearly its original strength (though I will still “handle” it very carefully).
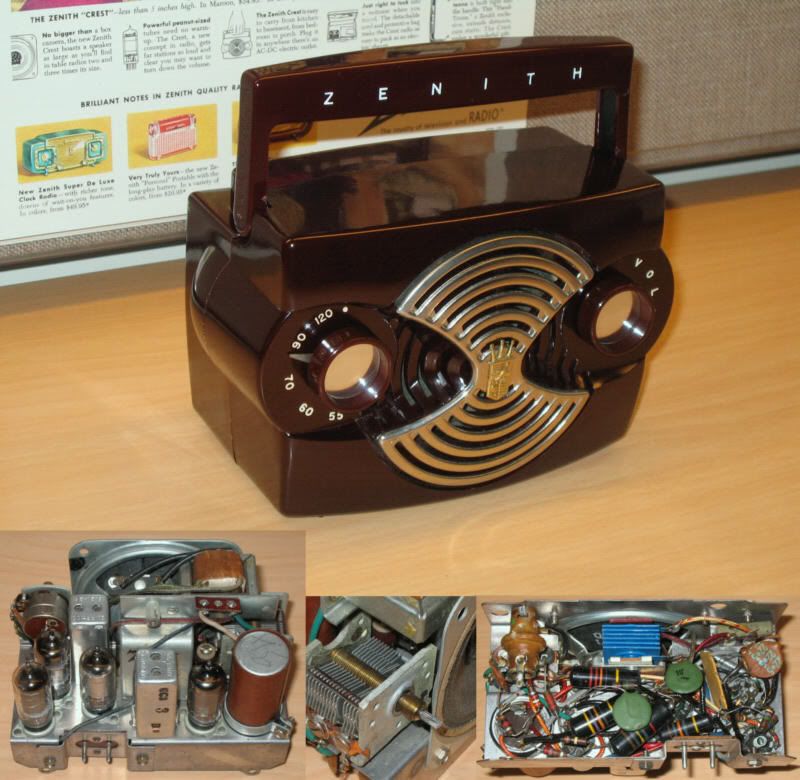
From the picture, you can see that a bevy of “Black Beauties” (black plastic-molded paper capacitors) lurks beneath the chassis, as well as one of those infamous selenium rectifiers. Though the radio sings perfectly right now, I need to replace these aged parts (and the 3-section electrolytic as well) to avert an eventual catastrophe. It shouldn’t be too difficult. Though there’s not a lot of room beneath the chassis, everything is readily accessible, and the new parts will be considerably smaller than the parts they are replacing.
Hope you enjoyed the story of the Owl Eyes radio! (Sorry it was so long!)
Paula