
|
|
|
#1
 08-08-2018, 11:14 PM
|
|||
|
|||
|
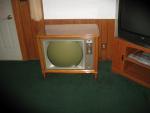
Predicta Debutante Restoration
I got this TV last fall and now that other people's projects are nearly all done, I'm starting on my own project. I messed with this TV just a little in February. Then the other people's projects for the nearly the last 5 months.
On with the show! Here is the TV as I got it. The 17" CRT tested very good!   The chassis number is a 11L43.  Here is what the chassis looked like after I pulled it from the cabinet:  And a few pictures after going to the car wash.  

|
|
#2
08-08-2018, 11:25 PM
|
|||
|
|||
|
I decided to make up all new networks like I did on my Seventeener II project.
I used my CAD program DeltaCad. I used the Seventeener II drawings a "seed" to come up with the ones I needed for this project. I etched my boards, then populated them. Then they were coated with 15 minute epoxy on both sides. Once cured, they were spray painted to approximate the original colors. 
Last edited by Crist Rigott; 09-23-2018 at 09:10 AM.
|
|
#3
08-08-2018, 11:42 PM
|
|||
|
|||
|
I decided not to re-stuff the electrolytic caps. Instead I used the method that Bob Andersen describes in his videos on his restoration of a Princess/Debutante. I still have to pull the main board, and when I do, I'll place the 3 electrolytic's from the small E-Cap.
First up were the 2 200uf 160V caps. I used some 220uf 250V 105 degrees Nichicon caps. They were placed on the terminal strip that is next to the Fusistor. One was a direct replacement on the terminal strip while the other came "from" the large 4 section E-Cap. While I was messing around with the terminal strip I replaced the 2 original diodes with 2 1N5408 diodes.   The other 3 that came "from" the large E-Cap was attached to the terminal strip located between the main board and the IF board.   I then removed several wires that were not needed and the "jumpered" the wires where they would have connected to each E-Cap terminal. 
|
|
#4
08-09-2018, 07:10 AM
|
||||
|
||||
|
Nice work so far. You have the motel version ID'd by the white cabinet, antenna delete, and instruction sticker. I have the regular brownish-grey consumer version. That model has always been my favorite Predicta because it's the last model offered in '59, and the cleanest design of them all. I love the expanse of glitter-woven cloth on the front too. Very "mid-century" looking.
Good luck with the resto!
|
|
#7
08-09-2018, 12:46 PM
|
||||
|
||||
|
Awesome work! I never knew there was a 1961 Predicta and that chassis is nearly identical to a Philco 23" console I have. That "cool chassis" design sure beat the hell out of the earlier "warm chassis" Predictas
__________________
"When resistors increase in value, they're worthless" -Dave G
|
|
#8
08-09-2018, 04:25 PM
|
||||
|
||||
|
Quote:
|
|
#9
08-09-2018, 05:12 PM
|
||||
|
||||
|
Wasn't the Continental (AKA danish modern) model introduced in 1960 ? It used essentially the same chassis as the 17" models but with a better 21" CRT than the original 1958 models.
|
|
#10
08-09-2018, 05:36 PM
|
|||
|
|||
|
I then did the IF board. It was simple to remove. After a good cleaning, all the resistors were replaced with 1W. I then added solder to each ground stud to beef them up. I also checked each coil. All was good.
After the board was installed, I wrapped each wire around its stud 1 or 2 turns. Then cut off the excess wire leaving a small 3/32 end sticking out. This is to aid in removing the wire in the future. Then each one was soldered.   
Last edited by Crist Rigott; 08-09-2018 at 05:48 PM.
|
| Audiokarma |
|
#11
08-09-2018, 05:38 PM
|
||||
|
||||
|
Quote:
Last edited by decojoe67; 08-10-2018 at 08:07 AM.
|
|
#12
08-10-2018, 05:17 PM
|
|||
|
|||
|
Today I worked on getting the main board removed. I labeled each wire with the "L" designation and then unwound the wire wrap. Then unsoldered the ground links. Once removed I cleaned up the excess solder on the ground studs and cleaned off the board real good.
On to recapping. 
|
|
#14
08-10-2018, 08:29 PM
|
||||
|
||||
|
Quote:
__________________
Tom C. Zenith: The quality stays in EVEN after the name falls off! What I want. --> http://www.videokarma.org/showpost.p...62&postcount=4
|
|
#15
08-10-2018, 08:33 PM
|
|||
|
|||
|
Quote:
The car wash gets the initial cleaning done. For the "final" cleaning as to what you see here, this is what I do. After the board was removed from the chassis, a good look see inspection was done to determine the condition of the board. Both boards were in great shape. Then I head over to the sink and turn on lukewarm water. Then I spray the board with "Scrubbing Bubbles" bathroom cleaner. I let it foam for a few seconds, then I use a 1" chip brush I get from Harbor Freight, to gently, but completely, brush the entire board. Getting in between the components. You'll be amazed at how brown the foam will get. Probably from smoking all those years. Then it is completely rinsed off and the process is repeated. Once rinsed off, I shoot contact cleaner into the pots, tube sockets, adjustable coils, and elsewhere I think it needs it. Then into the oven again for about an hour or out in the Texas hot sun. Last edited by Crist Rigott; 08-10-2018 at 09:21 PM.
|
| Audiokarma |
 |
| Thread Tools | |
| Display Modes | |
|
|


 Linear Mode

