
|
|
|
#61
 06-10-2012, 08:21 AM
|
|||
|
|||
|
thanks for the complement , iv seen what work you guys do here ,and how your projects turn out and all i can say is wow,the level of detail is something. and the hours you guys put into them, like last big one iv been watching from miniman82 they turn out better than they were when they was new ,so i can say im in a learning phase myself being here.

|
|
#62
06-10-2012, 09:14 AM
|
|||
|
|||
|
Quote:
Anyway, not to wander off of topic or divert any of the deserved praise to you, nice job! I wish I had your skill...
|
|
#63
06-10-2012, 09:21 AM
|
||||
|
||||
|
Another Aside here.
I collect films. I have a title in the collection called, The Shy Guy. It's an educational film made in 1950 that stars Dick York, who was on the TV series, Bewitched, in the '60's. In the film, he is very shy about making friends in a new school, and builds RADIOS at home in his spare time. Look for it on YouTube. The 'dad' charactor reminds me of Ward Cleaver, and guess who sponsored this production... Look for their bottles.
|
|
#64
06-10-2012, 01:01 PM
|
|||
|
|||
|
oh yeah i like the big army trucks,and most of the older army equitment ,me and some of my freinds used to spend the week, spring & fall at place called knob creek kentucky twice a yr they had big mechine gun range shooting, and lots of military stuff there radio equitment any surplus you wanted,but the more people found out about it ,it became less fun to go down there. it got to crowded and they had to start upping the security there to keep the new people that was showing up there in line,it kinda took the fun out of it.
|
|
#65
06-10-2012, 06:40 PM
|
|||
|
|||
|
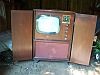
here is what got done tonight ,after this its time to clean the garage monday its getting bad in there .
Last edited by snelson903; 10-14-2012 at 06:54 AM.
|
| Audiokarma |
|
#66
06-10-2012, 06:45 PM
|
|||
|
|||
|
the legs are temp. just get it back on its own feet for now. after i clean up the garage im going to remove all the other panels and replace them,and also add somemore framing to the top to pervent any future warping or bowing of the top ,and hand sand all the frt molding work. then hopefully stain and clear coat it .and be done with that part.
Last edited by snelson903; 10-14-2012 at 06:59 AM.
|
|
#68
06-10-2012, 07:09 PM
|
|||
|
|||
|
i was thinking about it tonight ,out of all the tv's i have picked up in the last two months why did i start on the worst one ,i still have that color roundie magi that probley only needs recaping havent even touched it,and the cabnet is in perfect shape on that one. then i remembered i was planning on parting out this zenith ,but i just cant let it go in the fire i guess.
|
|
#69
06-10-2012, 08:14 PM
|
||||
|
||||
|
Far out, that cabinet is starting to come together well all the work you've put into it has paid off. I'm totally useless when it comes to wood work of any kind so find it rather amazing when seeing beaten up/water damaged cabinets being restored like this. You certainly have a big restoration project on your hands there so I commend you for taking this on. Excellent work
 I'll be following this thread for sure. I'll be following this thread for sure.  And this set is not a 'POS' either! And this set is not a 'POS' either!  Cheers Glen
__________________
Visit my Vintage TV & Radio Page - http://nzvintagetvradio.blogspot.com/ My YouTube Link - http://www.youtube.com/user/glenz1975?feature=mhsn
|
|
#70
06-10-2012, 08:37 PM
|
||||
|
||||
|
That bottom came out awesome! You're replacing other panels, too? Wow... haven't seen a cabinet get this much of a resto since Polaraman redid his Sylvania roundie years ago!
Good luck with the rest!
__________________
Charlie Trahan He who dies with the most toys still dies.
|
| Audiokarma |
|
#71
06-10-2012, 08:56 PM
|
||||
|
||||
|
It's not a POS, and when you get it done, it will still be a Zenith.
I don't even have a color Zenith now.
|
|
#72
06-10-2012, 10:29 PM
|
|||
|
|||
|
yeah i figured i came this far ,i might as well do the other three panels dont look like it will take much to replace plus when i stain it, it will all match. the inside will not be seen anyway the stain will help protect the wood on the inside plus i get to see how close the stain will look.
|
|
#73
06-10-2012, 11:38 PM
|
||||
|
||||
|
Wow!..I've been gone a long time for all this to have happened in my absence.
A few of my opinions on the restoration so far.... Great job on the bottom. I'd have painted both sides of the new bottom the same shade of maroon-ish red that the inside of the cabinet is painted for better originality. Also unless you are convinced that the bottom metal service panel will rust again you really should not have painted it....It was originally bare metal and part of the reason it was bare was to connect to the metal grounding strap(seen in one of the photos of the original bottom) which connected it to the chassis so it could serve as an electromagnetic shield. It may work fine without the bottom acting as a shield, but I would not chance it in any of my sets. Also I cringed when I read your comment about using a sledge-hammer and chisel on the CRT safety glass. Sledge hammer + CRT = IMPLOSION in my book. EVEN on the bonded tubes that have cateracts it is a VERY bad move to chisel off the safety glass....There are several methods to remove a bonded safety glass intact so that it can be reattached in a better way. All that said I believe that yours is a non-bonded type. and thus the safety glass may be fine as is. I would take some windex and paper towels and clean the face of the CRT, and check if there appears to be any noticeable dirt in-between. If not leave well enough alone. If there is dirt check if the only thing holding the safety glass on is a rubber gasket. If so then it is a non-bonded type and is fairly easy to remove. To remove it I recommend prying with your fingers, but if the rubber is degraded into glue then you may need to cut the rubber with an exacto-knife to remove the glass intact and clean off the rubber with Goof-off. Once the glass is off clean the inside and face of the tube as spotless as you can and re-attach the glass. There are several methods. Some make a new gasket from whether stripping or some such. Some use 1/8 inch thick 1/4 wide double sided foam tape around the perimeter to hold the glass on. Some use short strips of said foam tape as spacers and use packing tape to prevent dirt and air from getting between the glass and the CRT, and others still use the tape as spacers, but use silicone caulk to seal the glass back on. be careful not to get tape or caulk too near to the viewable area as if it obstructs the viewable area it will annoy the crud out of you and if the mask does not hide your reattachment of the glass it will look really shoddy and ugly. Unless the plywood is badly warped and or delaminated why go to the effort of changing the side and top panels? If they are just loose from the frame reglue them and refinish. If the veneer is gouged use a damp towel and a clothes iron to try to steam the wood level, and if that fails wood filler or putting fresh veneer on should work well. You don't change every part on a chassis when new capacitors and a bit of trouble shooting are all that is needed for it to be good as new so why completely rebuild a cabinet that seems to only need body work?
__________________
Tom C. Zenith: The quality stays in EVEN after the name falls off! What I want. --> http://www.videokarma.org/showpost.p...62&postcount=4
|
|
#74
06-11-2012, 02:06 AM
|
|||
|
|||
|
no the hammer and chissel thing thats my sence of humour ,its suppose to get a laugh ,i didnt think anyone would think i was really going to take a hammer and chissel to the picture tube. and yes when the chassis and everything is finish it will have a new grounding strap a one peace from the inspection cover to chassis tube to the metal tuner asembly if you notice how rusty the old strap is its not going to be reused.i have a nice flat new braided grounding strap that is far better than the orginal ,and for painting the inspection cover im sure the spots would comeback quickly ,when you buff off the pickeling coating it needs some protection ,when i attach the the new ground strap i will clean off the paint just in that area to ensure contact. the panels esp. the top one is in pretty bad shape it looks like it had something setting on it for a long time ,plus its overall thickness is more than the other's due to expaintion and seperation ,and under the top panel [ center ] they never made any real structure support ,so if you look at the time and effort that go into trying to save cheap vener press board it would be easyer to add more support frameing and replace the panels with new tight graind real wood so it would look like the fack vener wood pattern but be real wood ,then when that is finished i can stain the complete inside of the cabnet also.but keep in mind this tv is a plain jane and its always going to be a plain jane cabnet .plus this tv was not to far from becoming fire wood ,but hay i wanted see and learn about staining and finishing ,working with wood thats not a problem, restaining and finishing thats the time comsuming work ,and the orginal panels is not worth it .
Last edited by snelson903; 06-11-2012 at 04:08 AM.
|
|
#75
06-14-2012, 07:40 PM
|
||||
|
||||
|
Great job snelson! I am enjoying looking at your fine work and congatulate you for starting this project. You do great work! Any early round-screen color set like this deserves to be restored. I'll be following this thread with great interest. It shows that when you decide to start on a project, even a tough one, it can be done if you stick with it and have the motivation. Good luck in this venture!
Gilbert
__________________
I don't know anything about ignorance and I could care less about apathy. www.galaxymoonbeamnightsite.com
|
| Audiokarma |
 |
|
|


 Linear Mode

