
|
|
|
#31
 02-14-2010, 07:13 PM
|
|||
|
|||
|
whoo hoo...
dinked around with it a bit more (touched up the audio IF) the damper is fixed  no way I could get it to go out. the only slightly sensive tube now is the vert osc. I "may" go back to it but really its pretty solid, you have to move it around on purpose to make it go out. I will go thru my tube socket stash and see what I have. It is an easy one to replace (completly exposed) so I guess it makes since that I should do it while I have it out. a few other things I did to help the overall pic cleaned the tuner RF conncection (both the female on the tuner and the male from the IF strip) and polished up the surfaces with very fine sand paper. There was a good bit of oxidation. Same with the CRT cathode connecting pin, both the pin on the board and the female connector from the CRT head. Again lots of corrosion there. The biggest gain was cleaning the tuner, it was not so much noisey as just low signal strength. I did not bother to check the resistors in the tuner, not sure if I should bother with that. I am going to let it burn in for a while on the bench, if all goes well I will reinstall into the cabinet for a longer term burn in, then decide about stuff like repainting. does anyone know if the finish on decorative bars that go up the sides of the CRT head are painted or plated? Mine are pretty messed up with surface rust. I was thinking of stripping them and redoing but not sure if its paint or plate. same question on the base, it looks like steel that was maybe plated. 
|
|
#32
02-15-2010, 06:55 PM
|
|||
|
|||
|
replaced the vert out socket, should have done that in the 1st place, very easy. I 1st solder wicked 90% of the solder from around the pins, then busted up the plastic from the top so the pins were no longer locked together. then using a solder iron I just put light pressure from the bottom one each pin one at a time, they just popped out, clear of the board.
The replacement socket was an exact match pin and size, but better built. I used a round tool to ream the holes clean (just enough pressure to clean the remnants out of the way) and the new socket pops into place, the pins expand once its thru so it holds itself in. Use the solder iron again an its done. Nice a tight. I retest all the resistance measurements (this time with the tube in place and using very light pressure so as simulate actual use), all test good. I tap the chassis on the bench some to shake it up and knock any loose debris off, then go over it once more looking for bit of solder or any other stuff (trying avoid any FOD) plus that should be a good stress test. hook up the crt/tuner, plug in and voila works and all the damper and vert can be messed with with no problems at all. I need to check over on last tube a little 7 pin job, that is also easy to get at. If it is even slightly intermitant I will not hesitate to replace it as well. I hope to work on cleaning up the metal chassis this weekend, will prob use some navel jelly to get the surface rust out (the inside is rusty the outside is pretty good, not perfect), then have to figure out if I should try to paint the inside or just leave it bare. I figure it should not rust given it will be inside. Still pondering taking it to a paint buddy to strip and repaint the red cabinet, and what to do about the rusty brass plated uprights. Most likely will just reassemble and enjoy as is (well after getting the dirt dobber nest out).
|
|
#33
02-15-2010, 10:49 PM
|
||||
|
||||
|
Quote:
I have rusty metal arms too. I got as far as sanding down the pitted brass plating, but that's it. I might just use some metallic paint. It should prevent rust and can always be stripped and replated down the road. Here's some pictures if you're interested. http://www.flickr.com/photos/7003980...585480/detail/
|
|
#34
02-15-2010, 11:09 PM
|
|||
|
|||
|
That's inspirational, was that a particular brand/color paint?
I don't have a dud, I wonder if hawkeye has one so I dont have to spend extra just to find and send one. My crt is fine, but I also would like a spare. How the heck to you reattache the anode to the crt? right now I just have an extenstion wire up to it for testing, I could not see how to get it back on without removing the shell (and is that difficult?).
|
|
#35
02-15-2010, 11:36 PM
|
||||
|
||||
|
Quote:
 I gave up on it about a year ago. Since then I've picked up a spare chassis and CRT. I'll get back to it someday. I gave up on it about a year ago. Since then I've picked up a spare chassis and CRT. I'll get back to it someday.I used Rustoleum protective gloss enamel #7762 'sunrise red'. I don't think it's quite right though - maybe a touch darker like #7765 'regal red'  I did remove the shell. The only thing I had trouble with is removing the two little screws that hold the brass cover plate on. I've heard folks often have trouble with the spring that's underneath too. That's a NOS 17DAP4 I picked up (my original CRT is fine too). I'm pretty sure it's a very good substitute for the original 17DRP4. You can get either one here.
|
| Audiokarma |
|
#37
02-16-2010, 02:47 PM
|
||||
|
||||
|
Quote:
|
|
#39
02-20-2010, 07:44 PM
|
|||
|
|||
|
got it all back together, looks great, a little sync buzz that is some what tuneable. I prob should have checked the alignment curve while it was out but I just wanted to get it back togehter. I picked up some new feet for it, the orig were long gone. I could not get the anode back on, no way, so I decided to pop the shell off. Wow, what a pita... no problem getting it off but putting the retaining spring back on almost got the best of me.
At least while it was off I cleaned the CRT face and the back side of the plastic mask. Lotsa brown gunk came off the CRT screen. Anybody have exp with polishing up plastic? this has some fine scratches that make it less than perfectly clear. Overall it has a very decent pic, good lineairity, interlace, and focus. The CRT is a little brighter on the bottom 1/3 so dark scenes are more grey toward the bottom. Also if bold bright print is on the screen the horz before and after the print is darker.
|
|
#40
02-20-2010, 07:53 PM
|
||||
|
||||
|
Quote:

__________________
Charlie Trahan He who dies with the most toys still dies.
|
| Audiokarma |
|
#42
02-20-2010, 09:20 PM
|
||||
|
||||
|
I used Novus plastic polish to spruce up my CRT cover on my predicta. I was amazed at the job it did. I have enjoyed this thread, nice job.
|
|
#43
02-20-2010, 09:23 PM
|
|||
|
|||
|
Thanks Dan I will look for it. Is that a on line purchase?
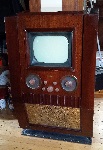
here is a pic it looks a lot better than this, those interference lines are not real, must be the camera. Last edited by DaveWM; 03-18-2013 at 12:07 PM.
|
|
#44
02-20-2010, 09:30 PM
|
||||
|
||||
|
Lookin' good. Turning off the flash on your camera will give better screen shots (might need to put the camera on a tripod).
I'll second the vote for using Novus plastic polish #2 on the cover. Available from http://www.tubesandmore.com/ and probably lots of other sources. Don't bother with #3 (too abrasive) and #1 (too feeble, almost like water). #2 will bring just about any plastic to a great shine all on its own. Phil Nelson
|
 |
|
|


 Linear Mode

