
|
|
|
|
|
#1
 10-27-2018, 05:06 PM
|
||||
|
||||
|
Dug through the parts bin and pulled out the screws, original hoses and check valve for the VsV and reinstalled everything back up to the Sol-Vac solenoid. Ran a vacuum check to see if the CeC was properly actuating the solenoid and then plugged the hose until the sol-vac is replaced.
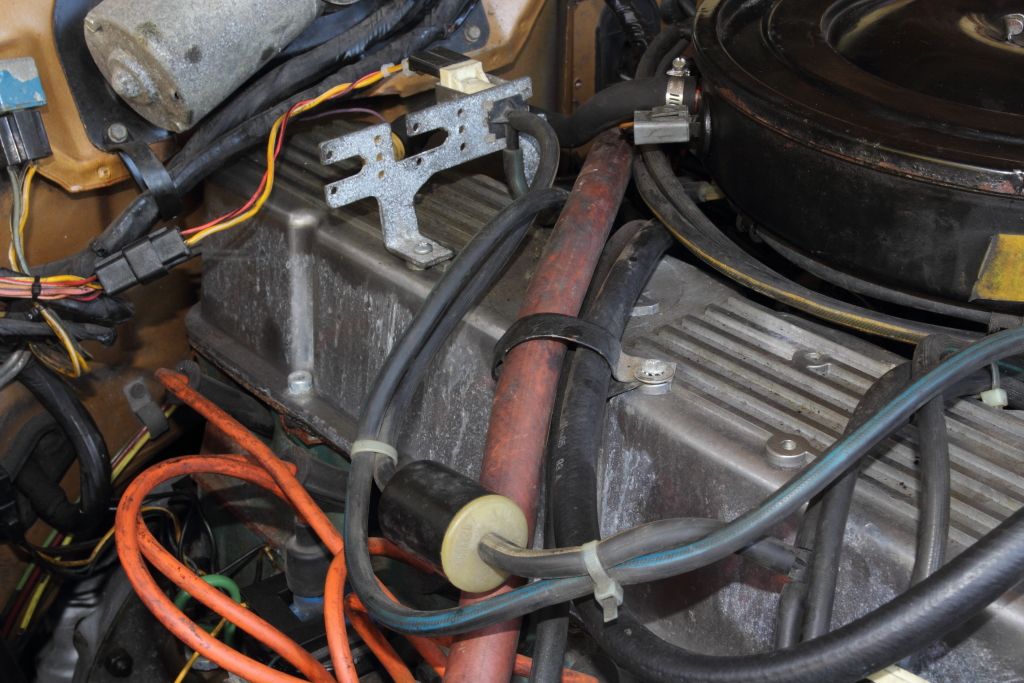 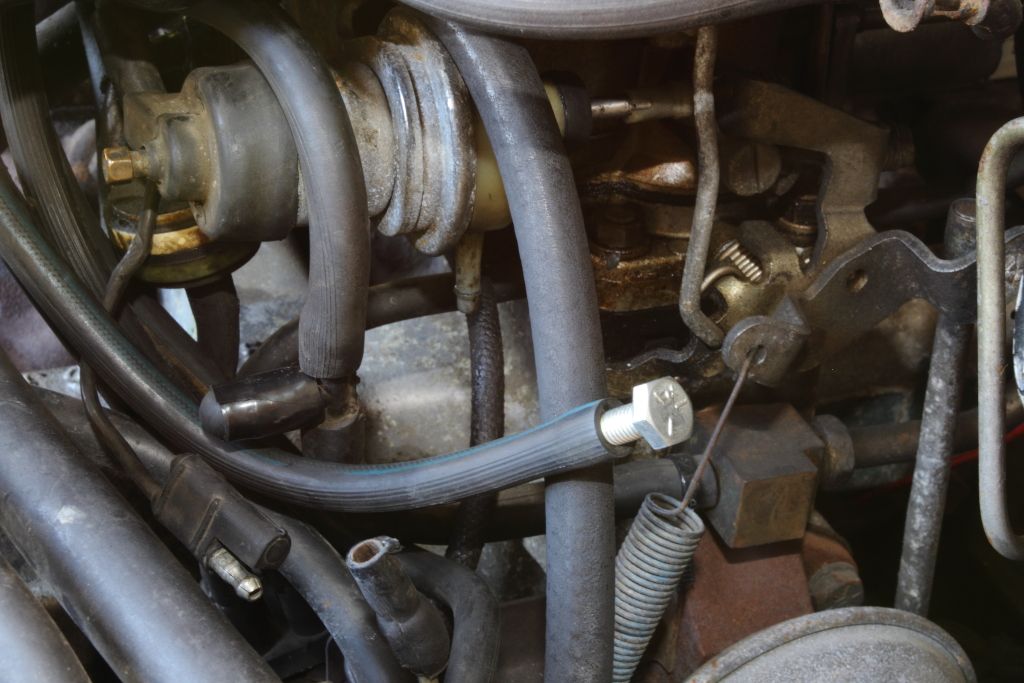 So that now leaves one last plugged vacuum line (which you can see above I taped shut because the rubber plug has cracked and was leaking) which I can only assume is for the cruise control. I went back into the bin again and was unable to locate the vacuum reservoir. I can only assume it was misplaced but at least replacements are easy to source. I did however find a length of vacuum line that was about two feet long and while it's not the original T-shaped bracket the cruise control kits came with there was a similar looking L-shaped metal bracket but it did not fit where we saw the one above pictured and the hose was not long enough to reach that side of the car. It had to of been located somewhere near the throttle linkage as Madman suggested. I had to step back and look at what I HAD and what I was MISSING. Looking directly above the linkage is the firewall with a mouse chewed bulkhead seal. Next to it is a ground point....and another unsealed hole through the firewall.....Hmmmmm... 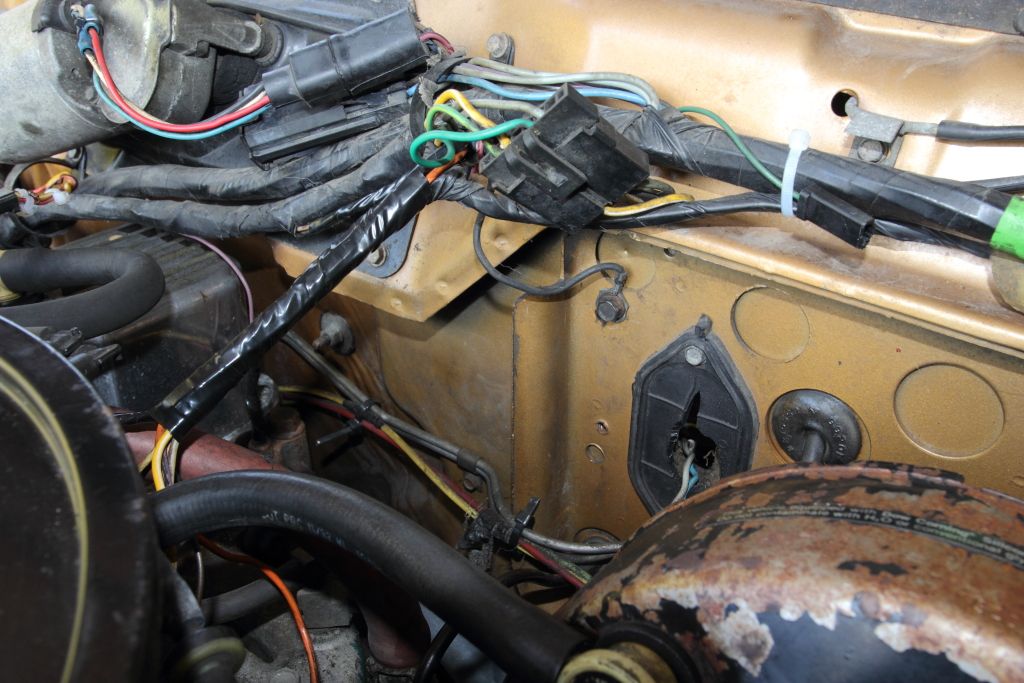 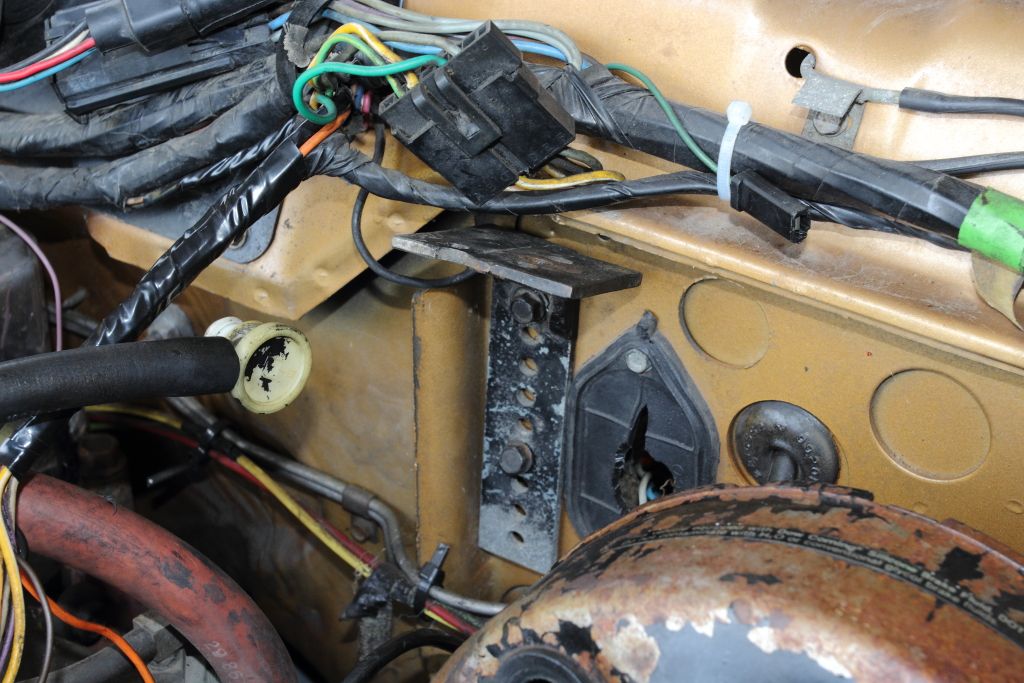 Aha! The bracket mounted here as an aftermarket/dealer installation! The other screw was in the parts bin. 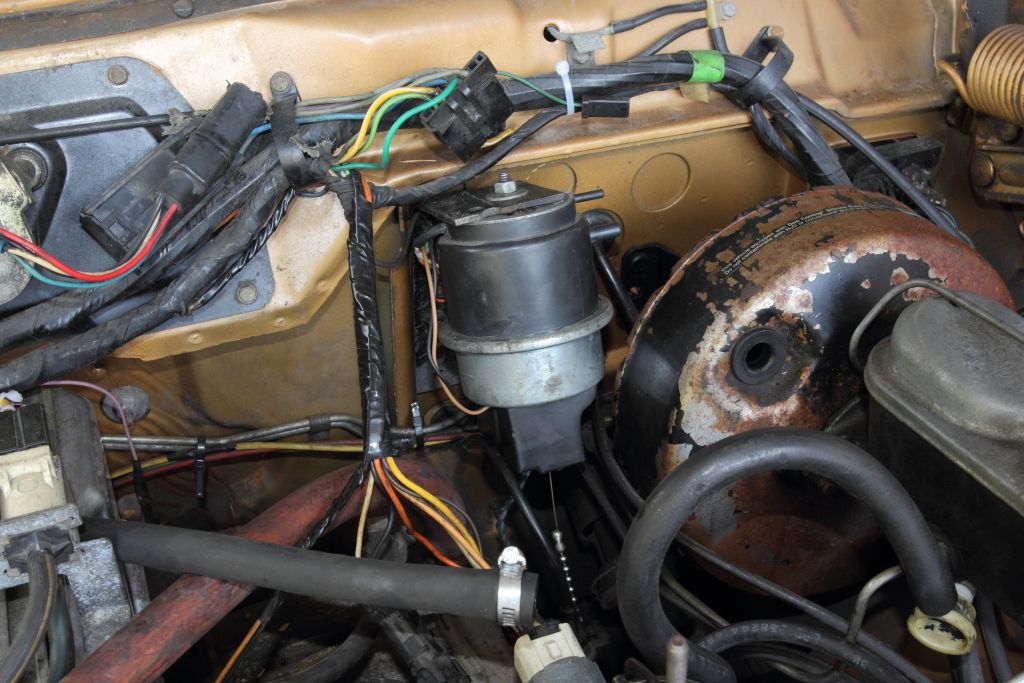 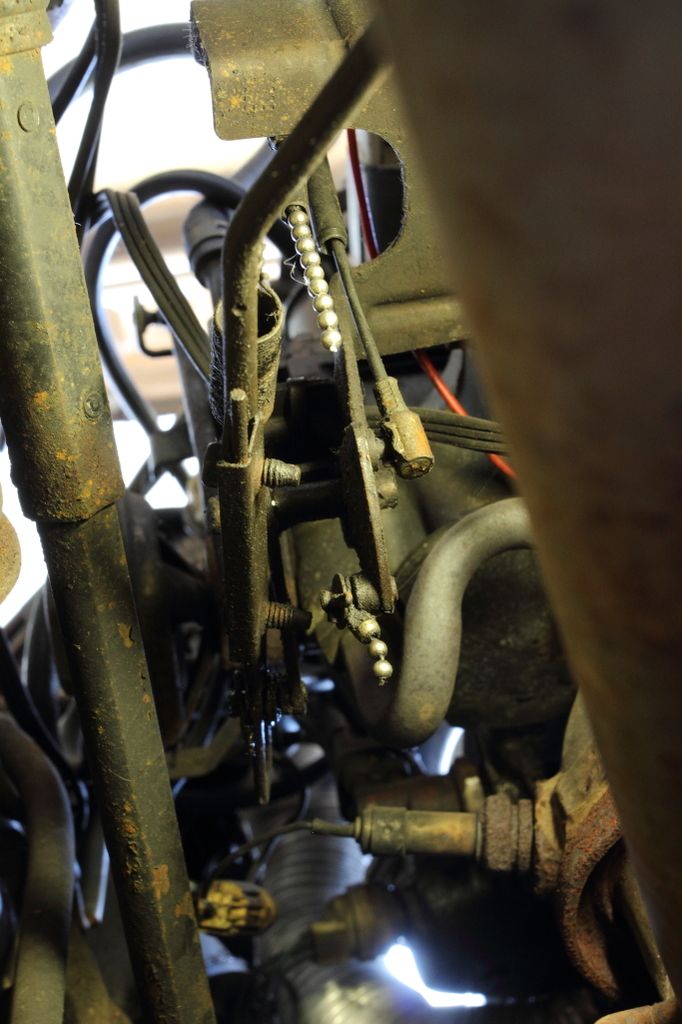 Okay, so now the actuator is reinstalled where it should be, the linkage is where it should be (but needs to be replaced) and the vacuum hose routes to where a vacuum reservoir would of normally been, which is right next to the plugged vacuum line. So now we have all the vacuum lines and mysterious cabling figured out. 
Last edited by MIPS; 10-27-2018 at 05:19 PM. 
|
|
#2
10-27-2018, 09:05 PM
|
||||
|
||||
|
Ah ha! I love being right ^_^
That's a really janky looking bracket. I wonder if maybe this car had the cruise thing all the way over on the passenger side, and someone replaced it with this unit and made a bracket for it. Alternatively, it could just be that way from the factory/dealer. We are talking about the company that uses radioshack toggle switches on the dashboard. Anyhow, just buy one of those ball chain connector thingies and put the two halves of the chain together. It's like a light chain, except the slightly larger diameter ball chain.
|
|
#3
10-27-2018, 10:45 PM
|
||||
|
||||
|
I'll just replace the entire ball chain with a new piece as it looks to be repaired once already.
I'm just more baffled by how inconsistent the service manual is on the cruise control. I can see in other google images the actuator has a vacuum reservoir but the Popular Mechanics article doesn't indicate one as part of the kit. Likewise I was expecting the large diameter hose to be manifold vacuum. Wrong. It's the smaller diameter vacuum port. The larger diameter hose runs inside the car and to the brake release switch which until now I didn't completely recognize as having a vacuum port on it, since it's bolted to the brake pedal. 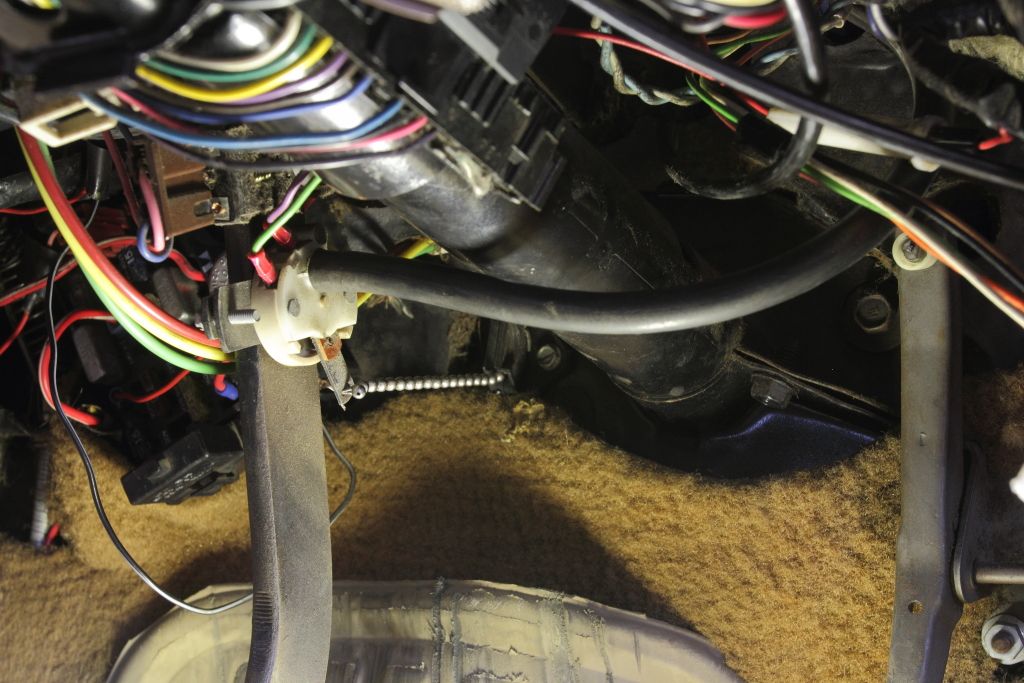 Worse yet I still cannot tell if this was aftermarket or dealer. As mentioned the kit and AMC's package are the same thing. All the parts cross-reference even though for example AMC lists a different inline speed sensor while Dana and Popular Mechanics list what I have now which is a magnet strapped to the driveshaft while the speed transducer is bolted next to it. Whatever. If it works it works. Last edited by MIPS; 10-28-2018 at 02:36 PM.
|
|
#5
02-11-2019, 11:53 PM
|
||||
|
||||
|
By accident I discovered what the actual name and part number is for the original AMC diagnostic unit I mentioned earlier in the thread.
CEC Fuel Feedback System Tester - Model ET-501 - Manufactured by the Owatonna Tool Company (More commonly know today as OTC) 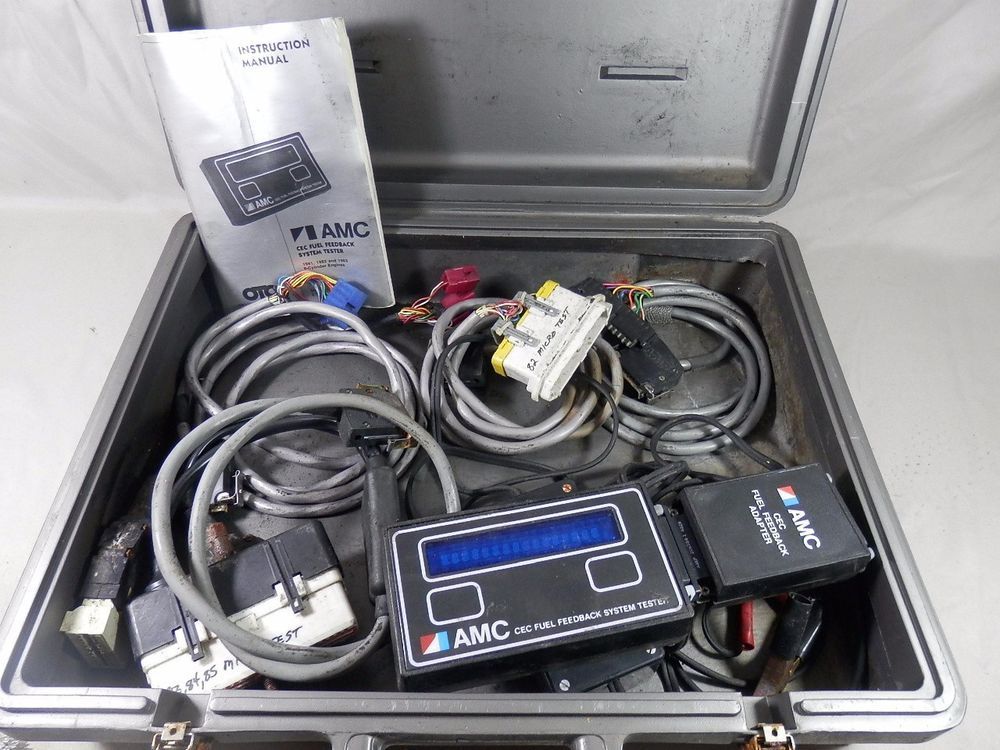 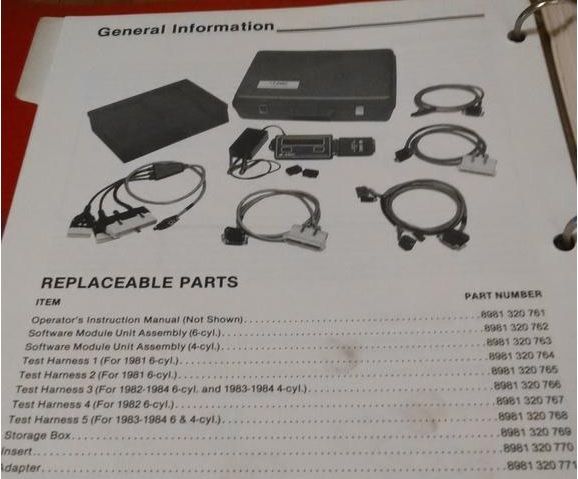 It's a small box with a VFD screen. Not pictured was the grey carrying case that held it, the documentation and about a half dozen other cables used to test the various other computers the Eagle/Concorde Jeep used. Of course at the same time the opinion on the use of these things is out there. Some people want $500CAD for the whole kit, others want $60USD for the module and nothing else, plus no shipping out of Buttstown, IL. There's forum threads talking about how it's a great tool while others don't even get to that point and tell you to rip that parasite off your carb before it saps any more life out of the engine. It's like listening to mac people. Some of the crap they spout is amazingly stupid.
|
| Audiokarma |
|
#6
02-13-2019, 12:23 AM
|
||||
|
||||
|
Quote:
Ah, ignorance. It only saps the life out of the engine if it's not working right! I'm assuming the CEC tester is basically just a glorified datastream reader? I wonder if that means the 'data' plug on the car actually does have serial data, and not just a bunch of outputs. Anyhow, I'm sure it's hackable... only problem is, you don't have much of a way of knowing what any given piece of data actually is.
|
|
#7
02-26-2019, 11:01 PM
|
||||
|
||||
|
Nope. No data bus at all.
If there is any data bus it's exclusive to a tester that plugs directly into the CeC and evaluates standalone. Anyways, the time has come to slosh the six month old gas out of the tank and get it insured for March. It badly needs a new battery and clamp. The current "Certified" brand unit is seven years old and fails every load test you can imagine. My problem however is the battery pan dimensions are weird. To spec, the pan fits a 25.4 x 15.4 x 21cm battery. I cannot use the stock 330 Cranking Amp battery that you can still find at Wal-Mart or Canadian Tire because it likely will not have the umph to start the car in -25, or keep all the goodies I'm cramming into this car alive for any period of time with the engine off. Plus for $30 less I could get a battery with 800 Cranking Amps and 40% more reserve capacity. Problem is all the replacement batteries I have found so far are 16.1cm wide. Lengthwise they all fit in the battery pan but the slightest amount of width prevents it from completely falling into the tray and being clamped down. What should I be doing about this?
|
|
#9
02-27-2019, 10:33 PM
|
||||
|
||||
|
Oh god, it uses a 56 battery. Never seen one. It looks similar to a Honda battery (51 or 51R), though just slightly bigger, but also shorter. Idk what kind of clamp setup you got. The problem you're having is that Honda batteries are abnormally skinny. My local Advance has a cheapie house brand 56 in stock, so it really should not be that hard for you to find one. Also, the specs on that one are: CCA: 550 / CA: 668.
You'd probably be able to fit a 51 or 51R (One has the terminal sides reversed) in your battery tray, but it has considerably less CCA. On the bright side, they should be readily available literally anywhere because so many Honda's use them. Otherwise, modify the battery tray to fit a larger, more common battery. That's about all I can offer. Last edited by MadMan; 02-27-2019 at 10:36 PM.
|
|
#10
02-28-2019, 08:16 PM
|
||||
|
||||
|
Photos for perspective.
Here is the battery tray. Facing the wheel well you have a chunk of metal that accepts the plastic foot of the battery. On the other side is a bolthole for the clamp that secures the other end down. The battery is further held in place with raised edges. 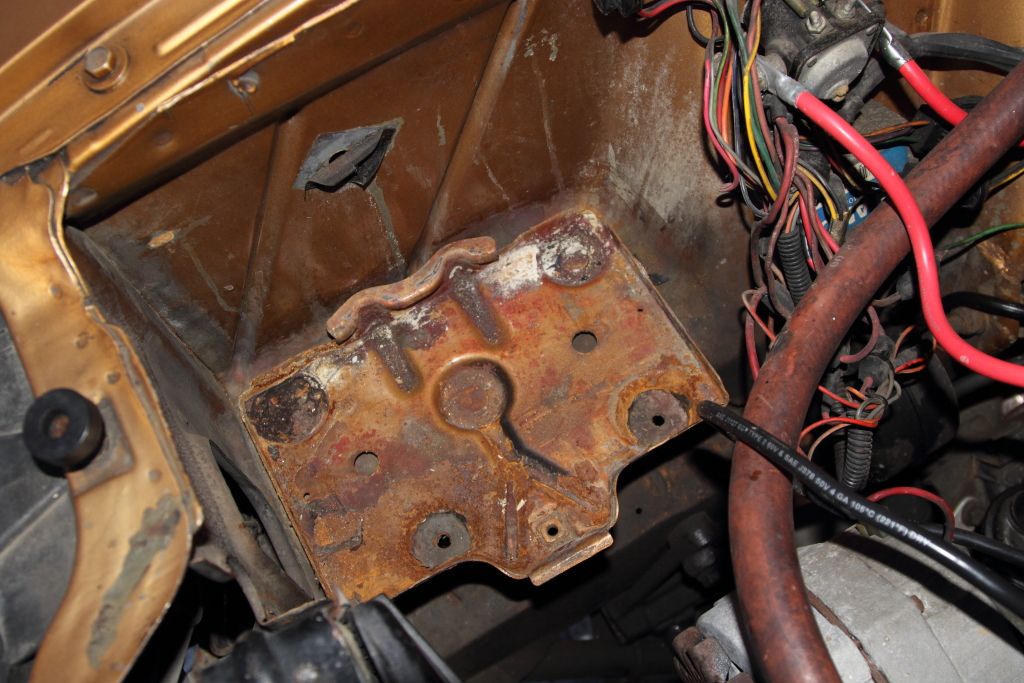 Now lets add a Group 124R battery. 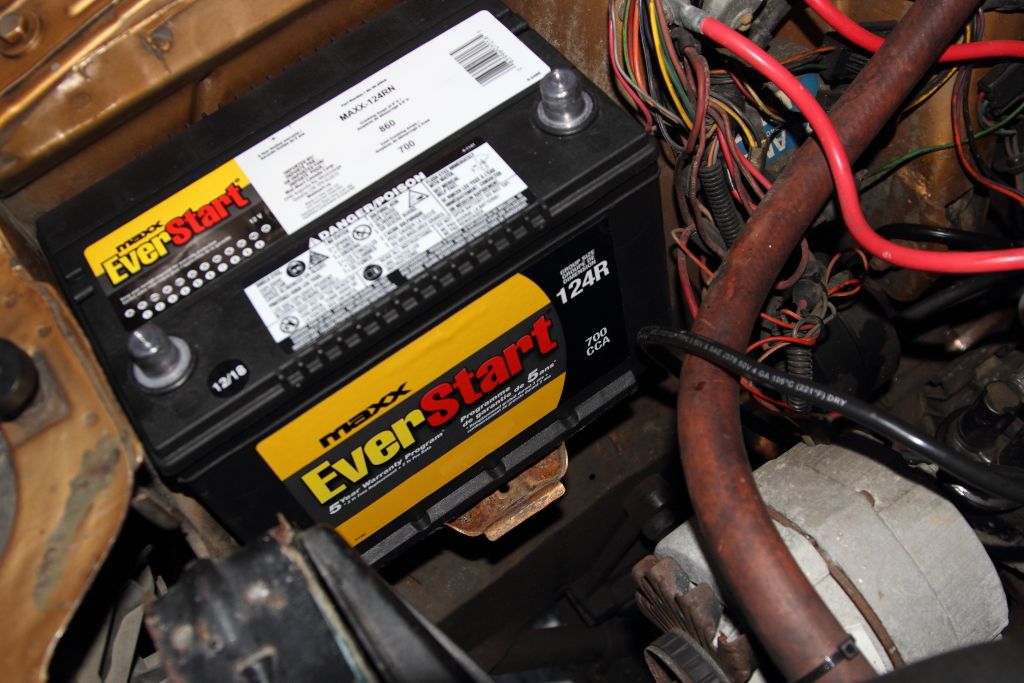 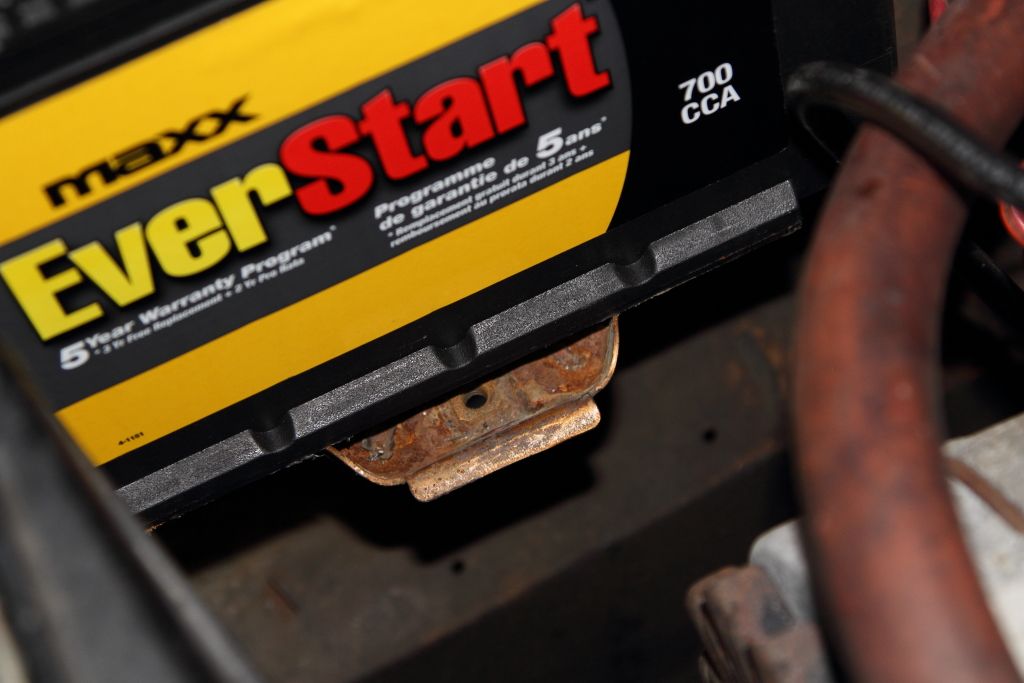 Again, length is perfect but you can't see it in the photo. It sits in the tray and cannot side back and fourth on hard braking or acceleration. The problem arises that it's oh-so-slightly too wide, so your options are either hook it into the back catch or hook into the clamp but it sits at an angle and not fully in the pan, nor is the bolt hole out far enough for me to still install the clamp and hope the battery doesn't care about sitting on an angle. A hard turn and you run the risk of it rolling out of the pan. 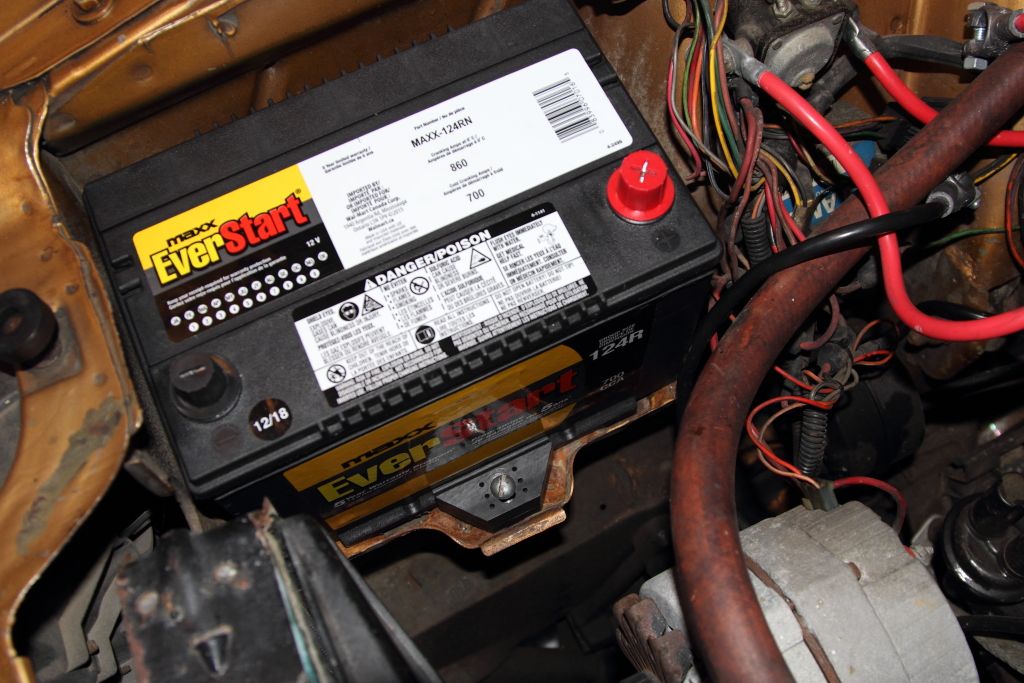 I'll keep poking at this. It's infuriating how annoyingly close this is. Edited: as a reminder for why I'm needing such a larger battery than the car needs, remember the accessories I'm adding: -Satellite radio* -Minidisc head unit* -Carphone -MDT 9100 computer terminal* -Onboard GPS -300W AC power inverter* *may be used for extended periods with the engine off If however someone has a better idea for a battery rating and my solution of just throwing more amps at it is no good, I'm open to suggestions. Last edited by MIPS; 02-28-2019 at 08:28 PM.
|
| Audiokarma |
|
#11
02-28-2019, 08:43 PM
|
||||
|
||||
|
It would cut down on storage space, but how about mounting the battery in the rear? (cables probably not super cheap, though...maybe you only need to run the positive to the front)
__________________
Bryan
|
|
#13
02-28-2019, 10:13 PM
|
||||
|
||||
|
Handful of goofy ideas:
Could you make an adapter tray? By that I mean a small tray that on the bottom fits securely in the stock tray and bolts/Lock into the stock tray, and on the top of the adapter has provisions to securely hold the battery you want to use. Have you considered adding a super capacitor booster box? Some folks have replaced their car batteries with smaller super capacitor banks and have demonstrated that they hold starting charge for many days, work in winter, and can sustain some accessories for some time with engine off... I'm not sure I'd trust one for replacing the battery in normal use especially in Canada and under your circumstances....But what if it was used only as a starting reserve(along side a regular battery)? You could add a high current diode in series with one of the leads to the cap bank to make it such that the car can charge but NOT discharge the cap bank. You could then add a high current starter relay in parallel with the diode... you could wire that relay to the start position of the ignition (to give you a jump every start) or to some emergency jump switch.... I've actually considered this for my car.
__________________
Tom C. Zenith: The quality stays in EVEN after the name falls off! What I want. --> http://www.videokarma.org/showpost.p...62&postcount=4
|
|
#14
02-28-2019, 10:22 PM
|
||||
|
||||
|
I'm assuming in the last picture, you have the ass end of the battery sitting on top of the metal chunk that holds the 'foot' of the battery. If the battery tray is welded to the car, you could buy a universal battery tie down. Like this, but the J-shaped bolts are sold separately with that one. You could drill 2 holes for the J bolts, and there you go. If it's not welded, get a universal battery tray.
Sitting at a slight angle is not a big deal. Not being held down is actually way more detrimental to a battery. I would be more concerned with the bottom of the battery sitting on the sharp metal edges of the battery tray for long periods of driving, it might cut into the bottom. Though they're usually pretty thick. If you wind up leaving it at a slight angle, I'd get a strip of wood, the thickness of the vertical walls of the battery tray, and maybe 3cm wide, just for the high side of the battery to sit on top of, so the sharp metal doesn't rub through the battery. If you want a more redneck solution, get one of those little ratchet straps, hook one end to somewhere on the fender side, behind the battery, throw it over the top of the battery, hook the other end to somewhere below, and tighten it. Is a 124R satisfactory for you? Or you still want more juice? Like Bryan said, you could put the battery in the trunk... or you could keep the battery under the hood and ADD a battery in the trunk / rear / whatever. There are certain issues, but simply having a second battery should be fine. You can get a heavy gauge cable for the positive run to under the hood, which are a little costly. If you wanted to do it more properly, they have a switching device that will automatically switch the car's charging/load to either battery, depending on which needs it, while the car is running. Not sure what it's called. Last edited by MadMan; 02-28-2019 at 10:29 PM.
|
|
#15
03-01-2019, 09:38 PM
|
||||
|
||||
|
Gentlemen! I present to you....
A booster seat. .3. 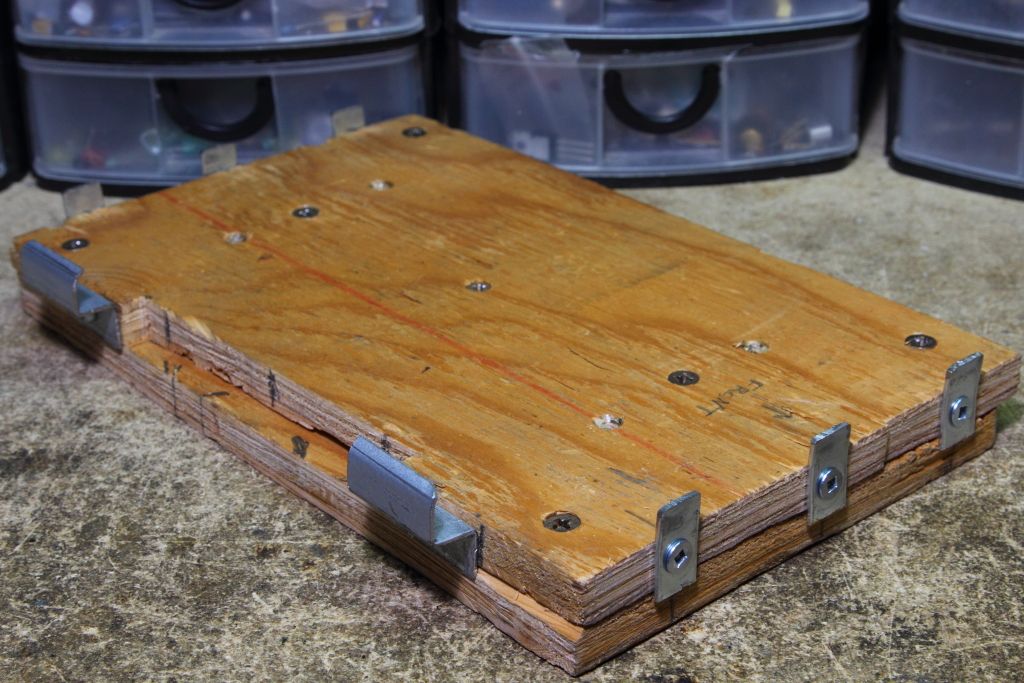 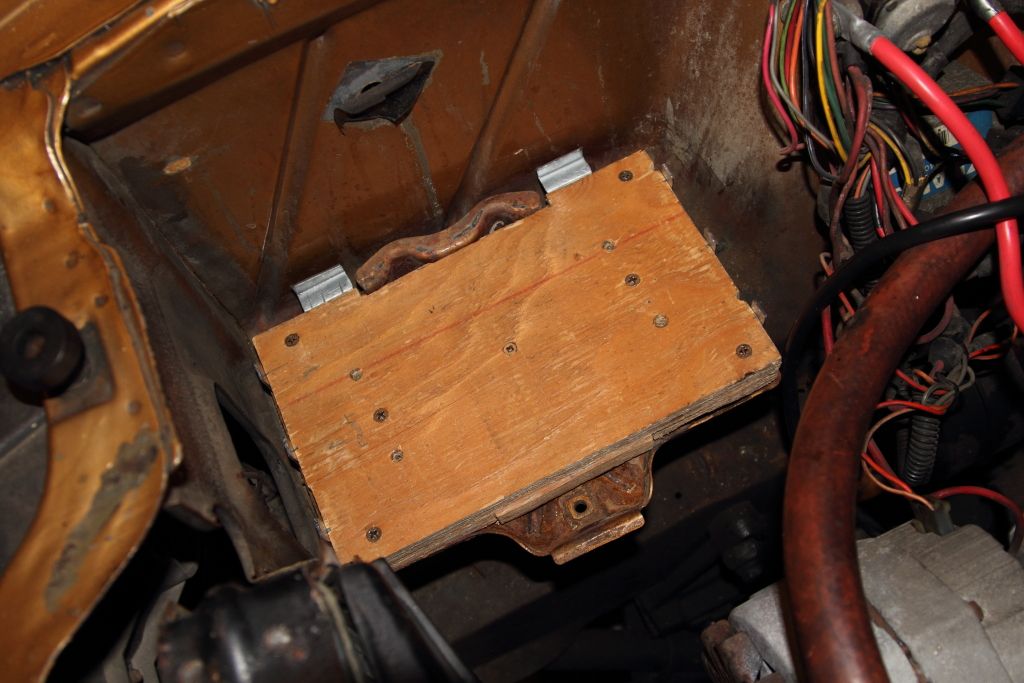 A sandwich of two sheets of plywood drops straight into the battery pan and raises it above the old flange and bracket. New brackets and flanging (with two inch long screws, so relax) hold the battery in place while the old clamp can still be used, albeit with a longer bolt. It should be ready to go tomorrow once it's painted to keep the weather out of the wood and I buy a boot for the positive battery cable.  Quote:
|
| Audiokarma |
 |
|
|


 Hybrid Mode
