
|
|
|
|
|
#1
 05-23-2019, 12:17 AM
|
||||
|
||||
|
That was basically my idea. If this is the cause of the timing advance issue when hot (and in ported vacuum mode) then bypassing it, setting the timing and then driving it while still hot should yield in a running engine. If it doesn't....that only leaves one thing left.

|
|
#2
06-16-2019, 12:29 AM
|
||||
|
||||
|
Finally found a #*$&@!? 1 1/4" wrench to replace that bastard CTO switch. God damn that thing is in an awful goddamn spot and requires removing a ton of vacuum lines, the fuel lines and the coolant temperature switch to finally reach it.
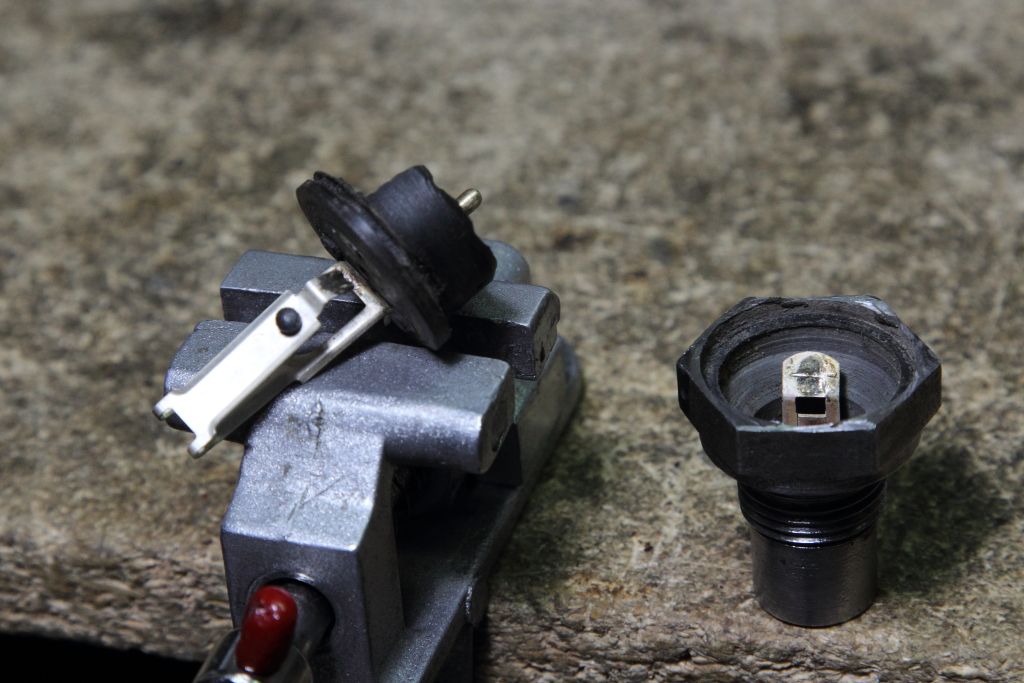
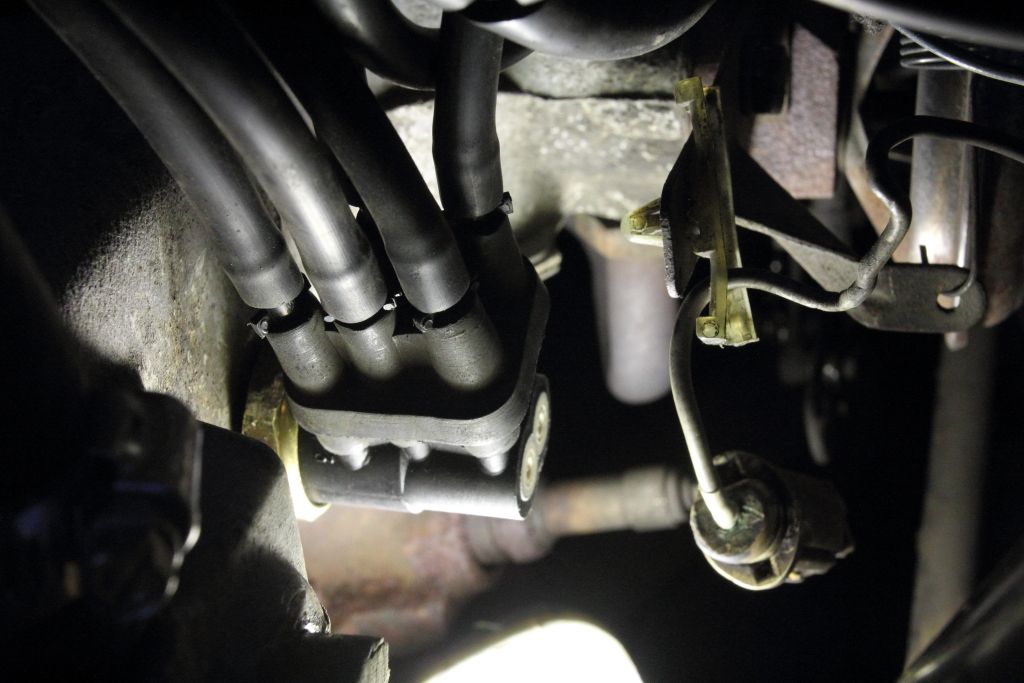 While I was in there I also investigated the Coolant Temperature Switch itself. Unlike the 83 and later this is a three wire device that controls the computer and the manifold heater. In my case it read open on both outputs both hot and cold, meaning that the manifold heater didn't work and the computer never went into Closed Loop because it thinks the engine is still cold. 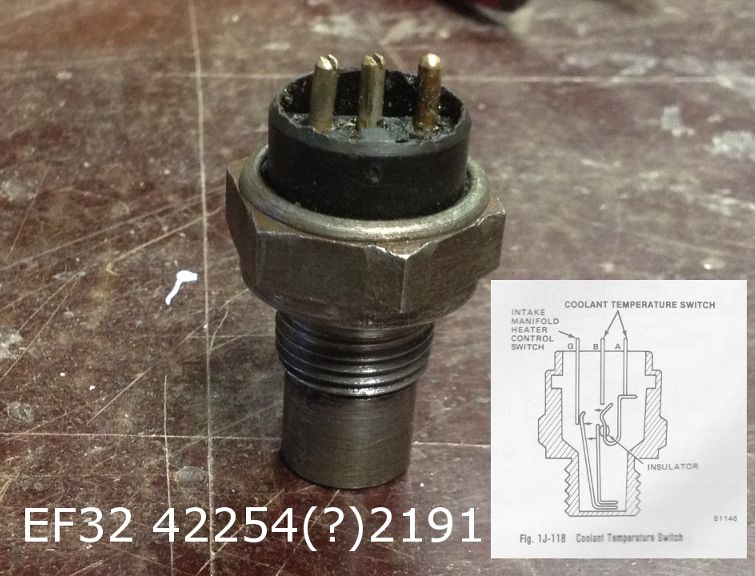 While the two internal switches are adjustable, removing the calibration pins found they had both corroded up. This switch after three weeks of looking is unobtanium so it will have to be dismantled, cleaned and recalibrated. Meanwhile I took advantage of the hot weather and drained coolant to remove the heater box and replace various foam gaskets that were buzzing or spraying foam everywhere every time I turned the heat on. In the process I discovered a leak in the heater core, so the car is gonna run for the next week or so without any air box at all because I'm not putting that thing back in, only to remove it next weekend. It's easy on the eagle, but still not enjoyable.
|
|
#3
06-17-2019, 01:18 AM
|
||||
|
||||
|
Unobtainium, indeed.
Isn't the 'intake manifold heater' that flimsy tube that comes up off the exhaust manifold to feed the air cleaner warm air when it's cold out? I never got those. It's like, let's use air from around the exhaust manifold when it's cold as balls outside, and the engine is cold, so we warm up the air charge to better carburate the gas. Except when the engine is cold, and it's cold as balls out, the exhaust manifolds are cold too, and won't warm up appreciably until the engine has been run a few minutes, but by that time, the engine is running already and warming up so what's the point? What I'm getting at is that I don't think it's entirely necessary. If you find a 2 pin temp switch that fits the hole and switches at the correct temp, you could just forget about the manifold heater thing. Last edited by MadMan; 06-17-2019 at 01:35 AM.
|
|
#4
06-17-2019, 08:57 AM
|
||||
|
||||
|
Nope, that's the heat stove. The idea there was that it warmed up the air cleaner and carburetor for improved cold running. The Thermal Air Cleaner switch uses a bimetallic diaphragm that opens once warm and simply drops a door over the inlet port once it's warmed up. The Manifold heater is an electric heater below the carburetor that helps the intake manifold warm up when cold, otherwise you run a risk of fuel droplets forming on the walls of the manifold. I ended up just rebuilding the whole thing. There's a how-to over at the Eagles Den forum.
Last edited by MIPS; 06-17-2019 at 07:39 PM.
|
|
#5
06-17-2019, 10:41 PM
|
||||
|
||||
|
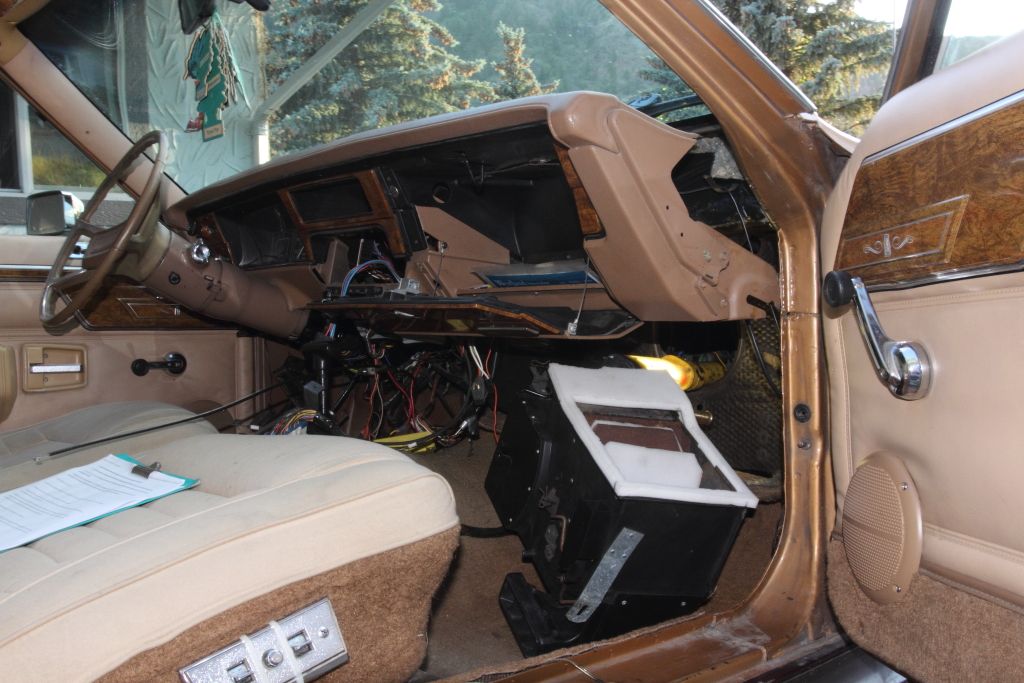
And today's challenge: refoam the heater box!
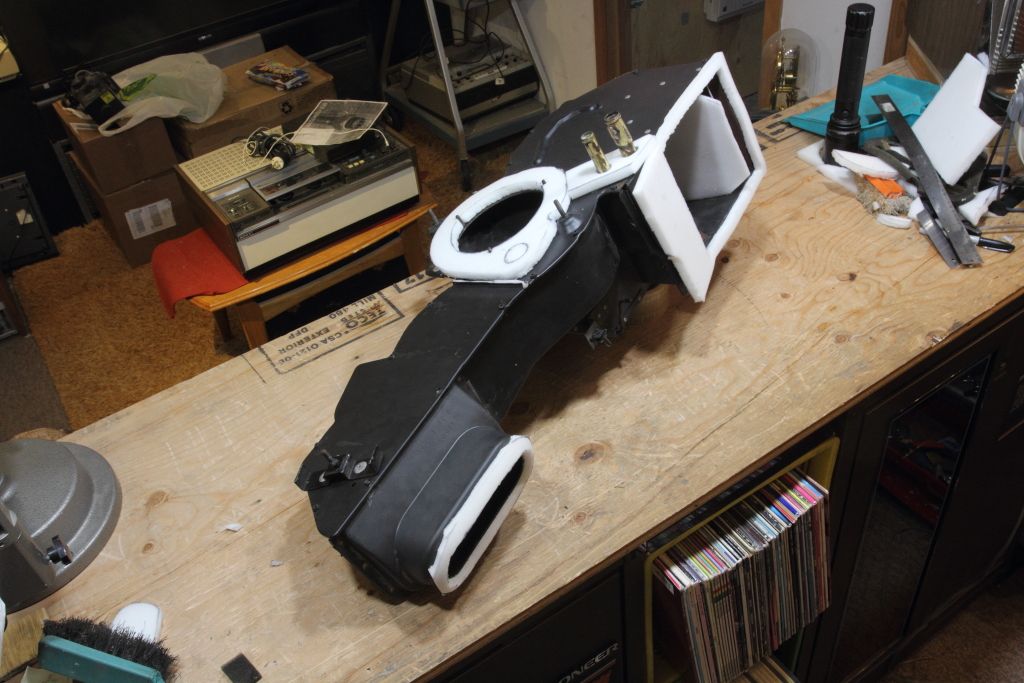 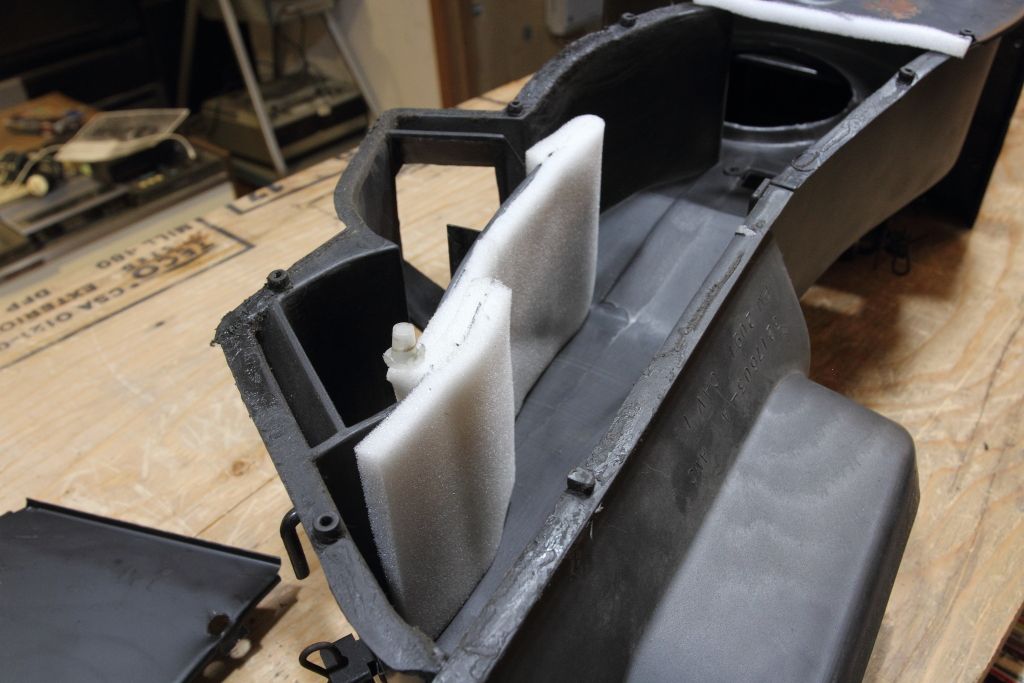 Okay, this was more the other part of the weekend, but things went so sideways I was not able to actually start cutting out the new foam bits until today. Initially I enjoyed how easily the dash moves out of the way and the hater box drops out but as soon as the core was removed it was apparent that small leaks were developing and that it might be a better idea to just replace the core now instead of a few years down the line. My options were one that Saturday afternoon locally for $170, or one from Rock Auto next Monday for $60 shipped. I chose the latter, so the car is all levels of dismantled as I wait for the core to arrive. While I was doing that I decided to run a fluid check and found that there was fluid layering in the brake reservoir. I think what happened was that while the lid and the mechanics book says to use DOT3, at some point the car had its brake system flushed and refilled with DOT5. So when the car had the brakes done during the rear diff rebuild they topped it up as per book spec and it was just floating on the top layer. 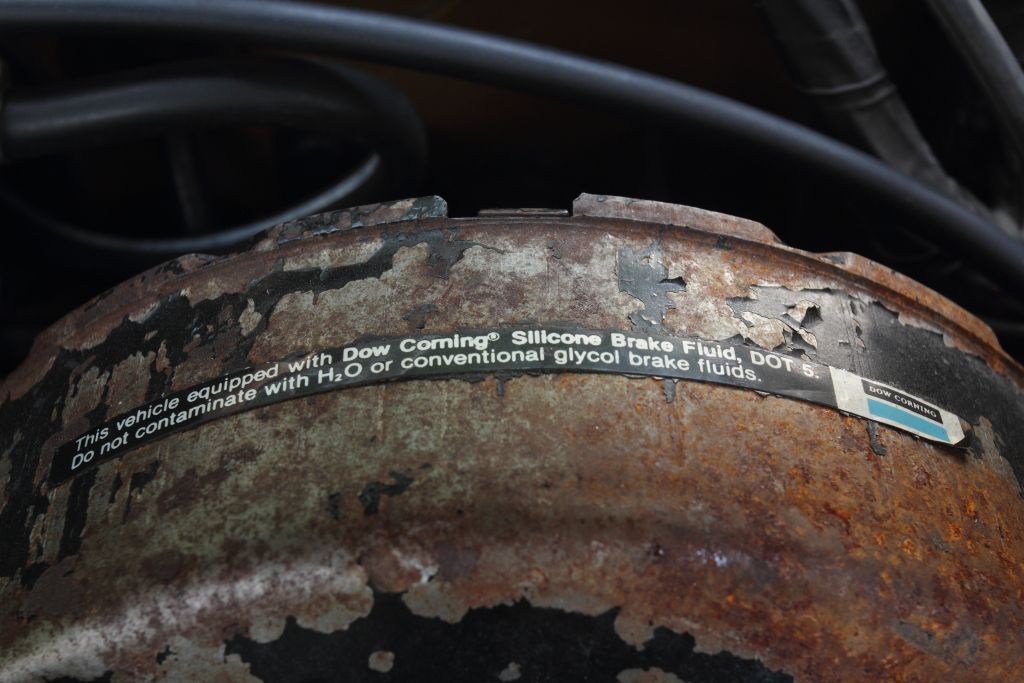  With the system now contaminated (which is VERY bad in this case as it can destroy everything) I had to pump out the reservoir (my hand vacuum pump comes with a nice kit for this so), fill it with new DOT3 and then bleed any remaining DOT 5 out of the master cylinder, lines and brake cylinders by bleeding each wheel and topping up the reservoir as new fluid was pumped in. Last edited by MIPS; 06-17-2019 at 10:45 PM.
|
| Audiokarma |
|
#9
06-19-2019, 09:13 PM
|
||||
|
||||
|
Quote:
For the last few years I've been noticing a Hornet Sportabout sitting in a driveway. The last time I rode by there it had sprouted a for sale sign. Ah, but the dear Mrs. dislikes wagons...
__________________
Bryan
|
|
#10
06-19-2019, 11:56 PM
|
||||
|
||||
|
Quote:
It's more frustrating that getting the thing requires lining up the oval defroster plenum port while not scraping the passenger door wall and dumping insulation into the box. Other than that it's a lot less painful than it looks. I got power seats but no Air conditioning, so I get heavy and slow moving seats but at least the dash comes out without a bunch of extra plumbing and a tray package.
|
| Audiokarma |
|
#11
06-19-2019, 07:54 AM
|
||||
|
||||
|
Let me guess: it is much harder to install than remove.
__________________
Tom C. Zenith: The quality stays in EVEN after the name falls off! What I want. --> http://www.videokarma.org/showpost.p...62&postcount=4
|
|
#13
06-20-2019, 02:17 PM
|
||||
|
||||
|
The configuration for this car is odd. It has power seats, heated rear window, hitch kit and the two-tone horn but no AC, lower tray package, dual map light dome lamp, or either the naturally aspirated or air pump air injection system for emissions control.
The more I look at this car and AMC's history, the more I realize how painfully obvious they were hurting for money. Look at the photos near the beginning of the thread, now look at a '72 model Hornet wagon from a decade earlier.  There's a FEW trim upgrades but otherwise there was pretty much nothing spent on modernizing the frame and body.
|
|
#14
06-20-2019, 10:59 PM
|
||||
|
||||
|
Quote:
|
|
#15
06-27-2019, 09:57 PM
|
||||
|
||||
|
Today the last part of the feedback system was replaced. The O2 sensor.
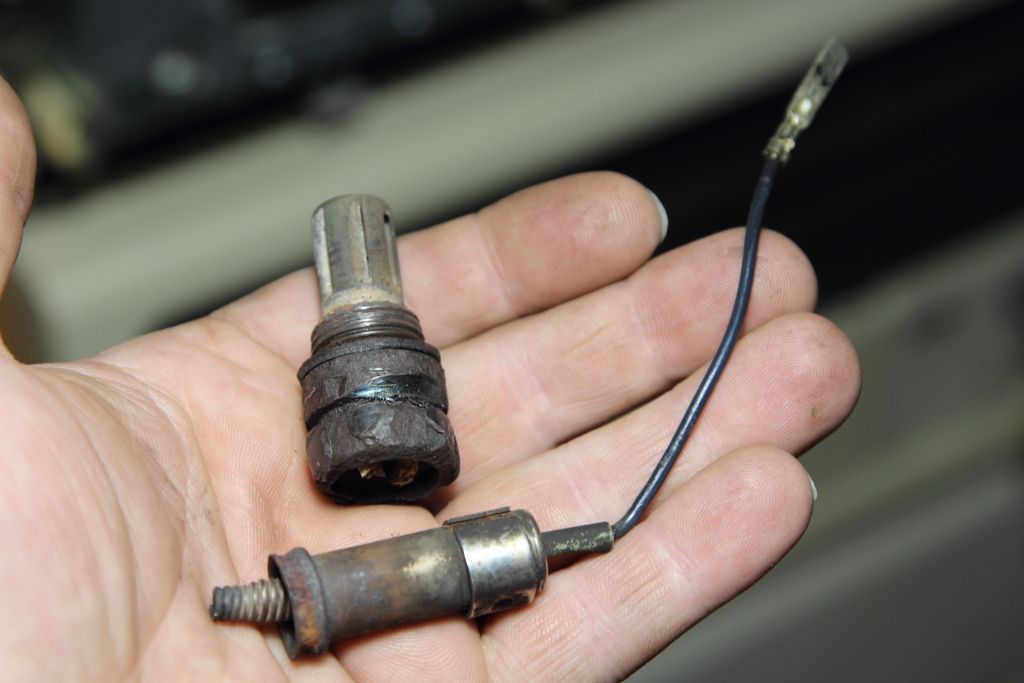 This has almost certainly not been changed in a long, long time. It was completely dead and basically welded into the exhaust manifold. It had to be cut in half before a socket could be put over it and a lot of swearing, pulling and work with an impact driver could get it out. While installing the new sensor the harness side connector also broke off. I didn't have a replacement on hand so for now I crimped on a spade connector and glued the two halves together with RTV. In the future I'll come back and redo it properly once I find the proper replacement one-wire harness plug. The new sensor was reinstalled with a stainless steel plate stamped with the odometer reading and date of installation. In future I need to track down the emissions service light timer form a Jeep and install that. 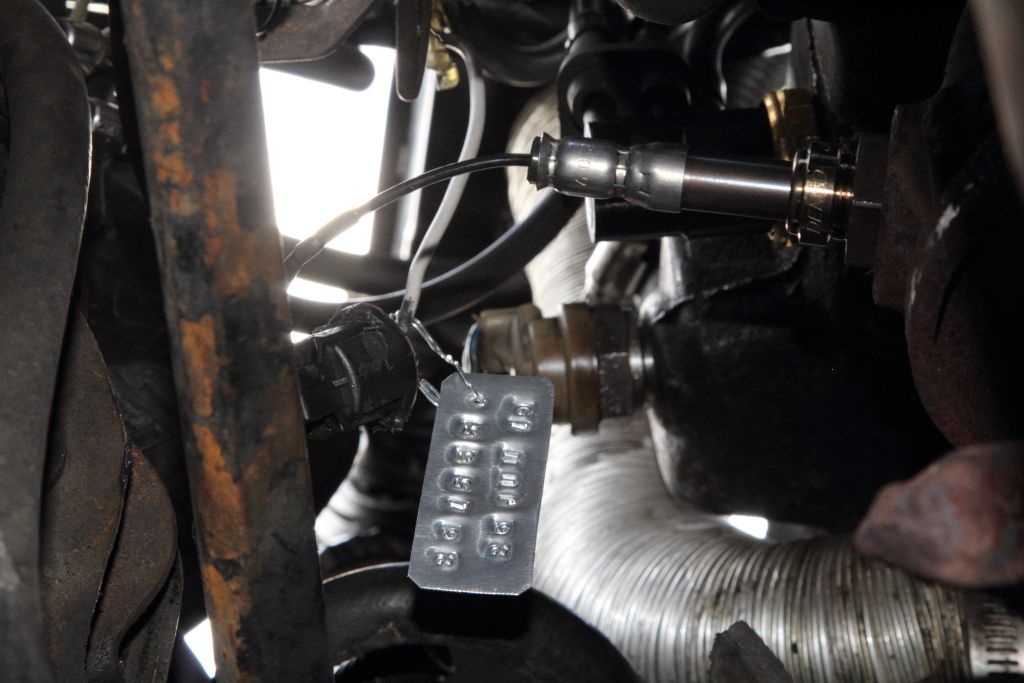 With the O2 sensor now working the engine warmed up and settled down to a SOLID idle. No more surging and sputtering and I was able to finally set the 500RPM curb as before I could not go below 600 before it would stall at stops. 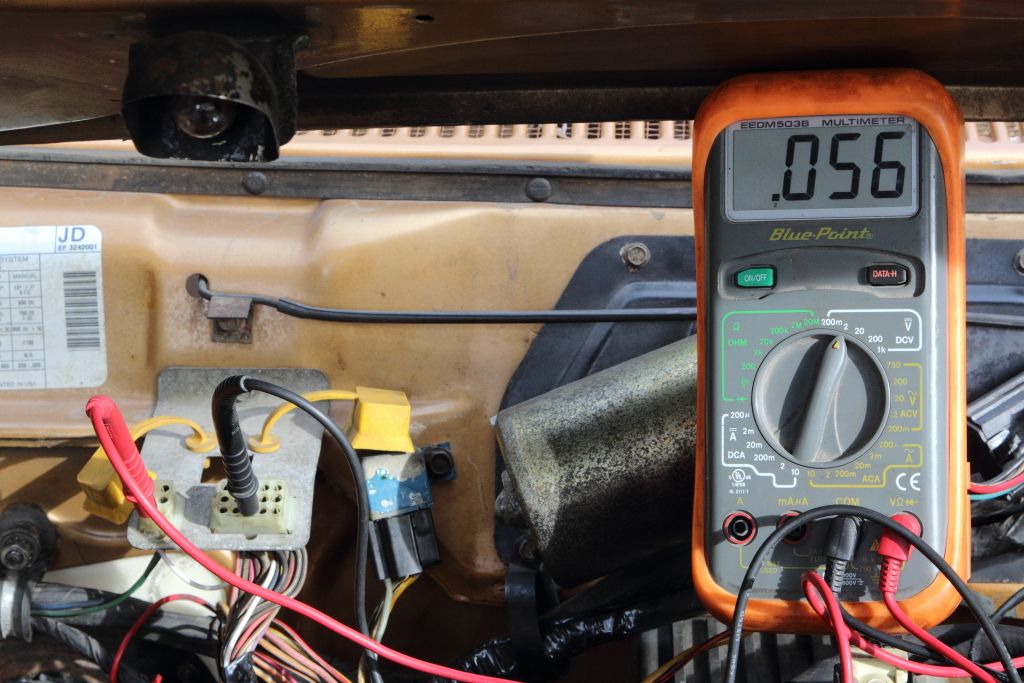 New problem though: during the carb rebuild we reset a number of adjustments to spec and this in turn nullified the factory set idle jet screw positioning, so the engine runs too lean. The above multimeter should read between .6 and .4v with an oscillation and constant stepper motor action. This will be another upcoming adjustment but otherwise all prerequisites required BEFORE you EVER touch the jet adjustments have been completed so it is now safe to perform this final tweak and not have any variables. Edited: Wait no, there's one last variable. An exhaust leak can cause a lean condition. Right now the entire length from the manifold to the back is a bit of a disaster or clamps, welds and whistling. It might be advisable to fix that first before proceeding. Last edited by MIPS; 06-27-2019 at 11:30 PM.
|
| Audiokarma |
 |
|
|


 Hybrid Mode
