
|
|
|
#46
 01-13-2018, 10:24 PM
|
|||
|
|||
|
Oops! Made a recapping error! Before I do an alignment I take small pieces of masking tape and ID the places I need to hook to during the alignment. In the Sams these consist of letters A thru F. All went well till finding test point F. Test point F is at the junction of R22, R20, and C13. When examining that spot I noticed that C13 wasn't at the junction! It was at the "bottom" of R20. I checked my notes and sure enough I soldered C13 to the wrong terminal. I soldered it to terminal 3 (counting L to R) instead of 4. I easily moved it to the right spot and labeled test pont F. I never would have caught that if I wasn't pre-labeling those test points. Excuse me while I go buy a couple of Lottery tickets!
 

|
|
#47
01-13-2018, 10:55 PM
|
|||
|
|||
|
The picture is getting better by just watching TV. Star Trek to be exact.

|
|
#48
01-16-2018, 12:55 PM
|
|||
|
|||
|
I'm done with the alignment and now on to some details.
I noticed this from the beginning. There some white horizontal lines that "flash" every so often. They are usually near the top of the screen. This happened before I did the retrace blanking mod. They increase in brightness with the "Brightness" knob. If the picture is just a little too dark, they almost disappear. I've cleaned all the tube sockets and their pins. Any ideas. Thanks. https://youtu.be/cFoYIfubVkY
|
|
#50
01-16-2018, 01:56 PM
|
|||
|
|||
|
Quote:
I haven't noticed the hum bar moving. It seems that it is always just below a white line.
|
| Audiokarma |
|
#51
01-16-2018, 05:52 PM
|
|||
|
|||
|
I injected the video directly into the Video Amp tube and I still get those same white lines.
|
|
#52
01-16-2018, 11:10 PM
|
|||
|
|||
|
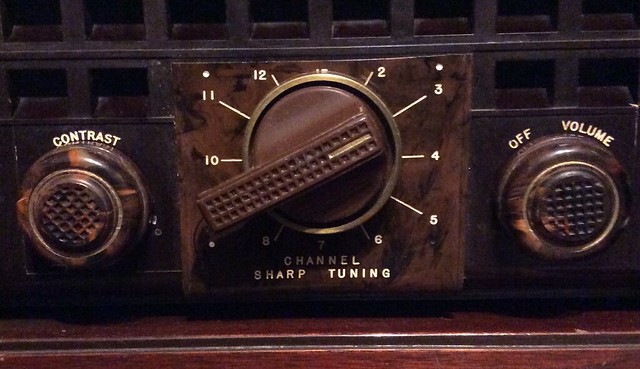
I'm starting on the cabinet now. I remember reading somewhere what it takes to remove the channel plate that is usually warped. Can anybody point me to where I read that? I don't want to break that Channel number plate!
Thanks.
|
|
#53
01-16-2018, 11:53 PM
|
|||
|
|||
|
I got the channel plate off with no problems.
|
|
#54
01-17-2018, 04:31 PM
|
||||
|
||||
|
Quote:
|
|
#55
01-17-2018, 04:37 PM
|
|||
|
|||
|
Quote:
|
| Audiokarma |
|
#56
01-20-2018, 08:25 AM
|
|||
|
|||
|
I've cleaned and polished the cabinet. Then I refilled the lettering on the front of the cabinet like Bob did on his video. I used some satin acrylic paint from Walmart and it turned out pretty good. Then I got to thinking that he used white on his black cabinet and I also used white on my brown cabinet. Looking at it now, I'm thinking I should have used perhaps a light tan or Khaki color. I scrapped the lines on the Channel Plate and they stayed a Khaki color. What color did Admiral use on their brown cabinets?

|
|
#57
01-20-2018, 02:56 PM
|
||||
|
||||
|
I looked closely at my original brown example and it looks like the lettering is a cream color rather than stark white. I would say redoing all the lettering in stark white would be acceptable though.
It seems the white dots on the channel plate must've been molding injection marks that were just filled along with the lettering at the factory.
|
|
#58
01-20-2018, 03:22 PM
|
||||
|
||||
|
It will probably fade/dirty to a cream eventually anyway.
__________________
Tom C. Zenith: The quality stays in EVEN after the name falls off! What I want. --> http://www.videokarma.org/showpost.p...62&postcount=4
|
 |
|
|


 Linear Mode

