
|
|
|
#16
 12-23-2021, 05:30 PM
|
||||
|
||||
|
It turns out my width issues were due to 1/2 of a 12SN7 going dead. Absolutely 0 emissions. I figure the cathode must be open.
Next up, I pulled the tuner for an overhaul. Now, I can see that it is a Sarkes Tarkian V5941 made in Indiana. It does not match the service info and the output wire is spliced into the set. That makes me wonder if it's a replacement? Maybe at the dealer when they replaced the HV caps? It could also very well be that the mixer tube really should be a 6AU6 and not as 6AG5 as shown in the tube layout? I tried looking up that tuner part# but came up empty.  

|
|
#17
12-24-2021, 12:34 PM
|
||||
|
||||
|
New caps have arrived for restuffing
  I also tried out some GoJo on the chassis. It does a fantastic job removing the baked on crud. The cleaned metal gives off a black residue though. As if it's immediately oxidizing on contact with air. The gray on the paper towel is the dirt. The black below it is from wiping a few minutes later. The paper towel also leaves very fine scratches on the metal. I've rub down the chassis with BoeShield T-9 once it's cleaned. 
|
|
#18
12-24-2021, 03:53 PM
|
||||
|
||||
|
You're sure making progress quickly Bob. We're lucky capacitors have gotten smaller over the years do we can restuff them. Are you going to do the wax paper ones as well?
If there is Sodium Hydroxide you will get the black oxidation afterwards. I don't know if there is any of it in Gojo though. I went hunting for information on that tuner and also came up empty. Can you make out what year is on the date code?
|
|
#19
12-24-2021, 07:30 PM
|
||||
|
||||
|
Quote:
Yes, I will be restuffing all the paper caps. Ah-ha, I be there is some sodium hydroxide in it. I think the month is Aug, but the year is smudged and illegible.
|
|
#20
12-29-2021, 03:03 PM
|
||||
|
||||
|
This chassis is so light I'm able to use this radio chassis stand while working on it.
 My plan is to restuff the caps and I went after the elctrolytics first. I had a heck of a time getting the covers off the electrolytics using a heat gun. They used a crazy amount of tar and I ended up tearing open the side opposite the printing. I'll either salvage these or make replicas 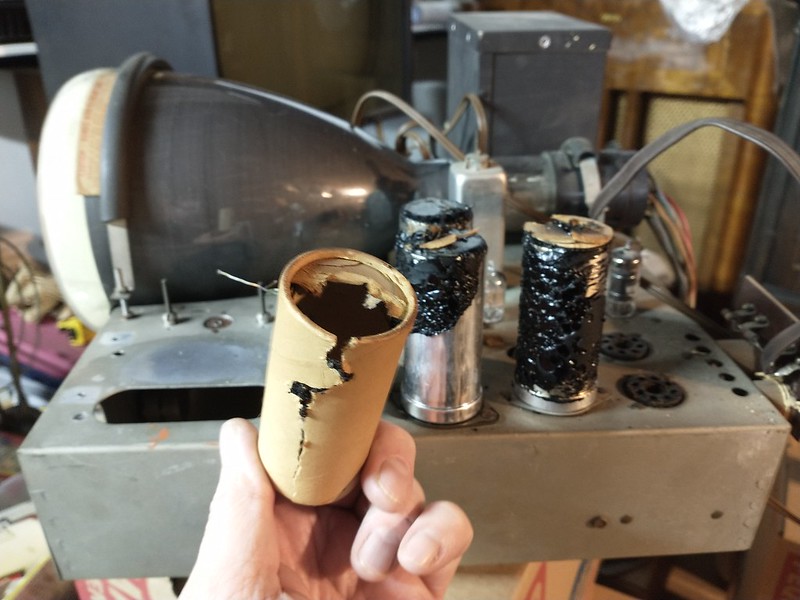 
|
| Audiokarma |
|
#21
01-06-2022, 01:39 PM
|
||||
|
||||
|
I managed to get all the cans cut open and restuffed using a mini hacksaw and a little pin vice drill.
 The image is somewhat improved but dim. I have not recapped the HV box yet. This is with a 6AG5 in the tuner. Will next try with a 6AU6 as was in the set when I got it.  I was planning on moving the speaker to the left side but discovered the mounting holes don't line up. Also they are not tapped. Clearly nothing was ever mounted on this side.  
|
|
#22
01-06-2022, 02:17 PM
|
||||
|
||||
|
I decided the mount the speaker on the left. It's obvious the wires were cut and extensions added. I just have it mounted in one hole for now.
There's a bit of undulation in the vertical . I figure some 60Hz ripple is sneaking in. 
|
|
#23
01-12-2022, 12:35 AM
|
||||
|
||||
|
Next up I worked on the RF HV supply. It is contained with the black metal box on top of the chassis. I needed to remove four nuts from below to unmount it. Luckily, there was enough slack in the wiring to tilt it back on work on it.
The variable capacitor adjusts the output voltage. I tweaked it to get 5kV as per the service info. 
|
|
#24
01-12-2022, 06:23 AM
|
||||
|
||||
|
Are those restuffs too?
|
|
#25
01-12-2022, 09:38 AM
|
||||
|
||||
|
No, that's the before picture. I didn't bother restuffing these caps since they're so hidden away.
|
| Audiokarma |
|
#27
01-12-2022, 02:55 PM
|
||||
|
||||
|
It helped get the HV up, but the raser size decreased. I suspect I have some resistors that are off in the HV divider string.
I'm going to go through and do all the restuff next. Heat gun to melt out the old cap. Brown hot glue to seal the ends. Satin wipe-on poly to seal it. 
|
|
#29
01-13-2022, 01:01 PM
|
||||
|
||||
|
Thanks. I like that I can reflow it with a heat gun if I mess up. I'm about half done with the paper caps. Then, I'll move on to the half dozen axial electrolytics. I think those are the most challenging.

|
|
#30
01-13-2022, 01:50 PM
|
|||
|
|||
|
Quote:
|
| Audiokarma |
 |
|
|


 Linear Mode

