
|
|
|
#1
 12-01-2010, 06:30 PM
|
||||
|
||||
|
Restoring RCA Victor 28T
This is an 8-tube 1941-42 set with broadcast and two short-wave bands. It has a TRF stage and push-pull output. The case was structurally strong but it looked as if a solvent had been spilled on top removing the finish. Also it had been hit on the front left curved corner punching in the veneer, so a full refinishing was required. Luckily a reproduction decal set is available for this radio. The grille cloth is torn and dirty. The dial glass is in good shape but for a small piece broken at the left edge. I will superglue the piece back but will attach a thin piece of wooden molding at left and right ends of the dial to camouflage the repair. It won't affect the dial markings. The knobs were incorrect so I ordered the right ones from Mike Koste of Gobs of Knobs. Luckily all the preset pushbuttons were there and OK.
 Damaged top and left end of dial glass broken.  Veneer punched in and fingernail damage around incorrect generic knobs.  The copper clad chassis was very dusty but otherwise looked good. The loop antenna board was delaminating so needed to be reglued and clamped flat. The heavy 6 x 9" field coil speaker tested good. All tubes except one 6SQ7 tested good.  Underchassis inspection revealed that RCA used yellow rubber-covered wiring for heater and other connections and most of this was crumbling; some was gummy. A lot of the other wiring is cloth-covered and OK. All of the paper caps needed to be replaced: one of them had a big hole burned through it! Another was a PHILCO cap; that and a couple of Philco tubes up top must be evidence of having been serviced by a Philco dealer at some point.  Nice big hole barbequed in that cap top left! .......Evidence of Philco dealer being in here....  A couple of the crumbling wires are shown along with lots of crumbs!  Almost all of the rubber-covered wire was replaced with new traditional-looking green cloth-covered wire. Most of this was in pretty tight quarters, and in one corner required unfastening and carefully moving to one side a scary-looking you-can't-get-this-no-more RF coil. This wire has plastic insulation inside the cloth covering. I sleeved rather than replaced a couple of wires that were hard to get at with heat-shrink tubing. All paper caps were replaced. The original can electrolytic was cut loose and left on top and new terminal strips went in for new underchassis electrolytics and new 10K and 2K 5-watt wirewounds to replace a big 12K 3-watt dogbone that had drifted high x 3. Line safety caps, a CL-90 inrush current limiter, and a new line cord completed the rewiring. Cleaned up the chassis topside using orange Goop hand cleaner with no pumice.    More fun to come! 
__________________
Reece Perfection is hard to reach with a screwdriver. Last edited by Reece; 07-05-2014 at 08:30 PM. 
|
|
#2
12-01-2010, 08:33 PM
|
||||
|
||||
|
Nice work! I can't wait to see how you tackle that cabinet.
I have a Philco 39-30 with rotting rubber insulation too. What a pain 
|
|
#3
12-02-2010, 12:06 AM
|
||||
|
||||
|
Just a reminder that the CL-90 can run pretty hot. Hard to tell by the photo how close it would be to the wood cabinet after the chassis is installed. Maybe a little too close to the one safety cap too. Might be better to mount it off by itself and a little deeper up the chassis. Just a thought.
__________________
 Do not attempt to adjust your set.
|
|
#4
12-02-2010, 02:43 PM
|
||||
|
||||
|
Yes, CL-90's get hot. The picture doesn't show it well, but that's a pretty deep chassis and I took the heat into account. Notice how the line cord and the phono input cable arc upwards indicating the chassis depth.
__________________
Reece Perfection is hard to reach with a screwdriver.
|
|
#5
12-02-2010, 03:35 PM
|
||||
|
||||
|
I had ohmed out all of the transformer windings so figured it was going to be OK. I brought it up slowly on the Voltac and when I got to 90 VAC the speaker started to crackle. Then it played at line voltage. There were stations on broadcast, and a few squeals on short-wave, this in the middle of the day. But there was considerable hum. The old bias cell was dead and tested about open. It's in the grid circuit of the 6SQ7 first audio so the grid was sort of open and picking up lots of hum. Just putting my finger close to the grid wiring increased it. Bridging the cell made it play without hum. I tried various experiments with resistors and caps and finally decided to leave the cell in but disconnected for looks, and replace it electrically with a cap. The set works fine and strong that way. Apparently thoughts and methods of providing bias changed over the years.
All controls were cleaned and lubed. The tuning capacitor was especially crackly: I blew it out with computer keyboard duster "air" and CRC Electronic Cleaner and then washed out the old grease from the ball bearings, replacing it with white grease. The bandswitch and toneswitch ball bearings and pawls got a little white grease, too. A little WD-40 went on the other bearings. I checked voltage on the downstream side of the CL-90 inrush current limiter at turn-on, with the set plugged into line voltage. Almost immediately the voltmeter reads 60 VAC; then it slowly climbs over the next 30 seconds to just below line voltage. The slow start and the slightly less voltage supplied is good for the old gal. The CL-90 gets hot during operation so it's dropping a couple of volts. The power transformer is loafing along, hardly gets warm at all after a long time on. The speaker voice coil was not rubbing, but doing the classic test -- hold the speaker near your ear and strike the back of the field pot with the heel of your other hand -- there was a buzz. This was traced to almost imperceptible tears in the corrugated surround. It looked as if a fine razor blade had made cuts in it, but was just due to paper deterioration. I thinned some fabric glue with water and painted the whole cone with it, with an extra coat around the surround. This strengthened it and resolved the problem. The fabric glue remains flexible so is ideal on the surround. I tried the set on 20 ft. of wire across my garage ceiling, not even on my outdoor high long wire, and got lots of shortwave in the middle of the day, with W W V booming in and thumping its thumps on that heavy speaker. After that I touched up the IF alignment and that of all three bands, and adjusted the preset buttons to local and regional stations.
__________________
Reece Perfection is hard to reach with a screwdriver.
|
| Audiokarma |
|
#6
12-03-2010, 08:19 AM
|
||||
|
||||
|
The cabinet presented some challenges. The first was the veneer and substrate punched in on the left front corner. I found that I could push this out from the inside and make it mesh almost perfectly with the rest of the veneer. I squirted plenty of wood glue into the splintered layers from the inside and clamped a dowel inside the set pushing against the "wound" and let it set for a day. When this was dry I applied a little wood filler on the outside and sanded it when dry. In the "before" picture the cabinet was sitting upright; in the "after" picture it was standing on end. The pencil points to the repair, which is practically unnoticeable even before refinishing.
 Now here's the cabinet stripped. There's a little veneer chip up top left that needs stain. I inserted a small piece of veneer as a repair and faked some shallow grain lines with a knife to blend in with the original top veneer, and used various stains and a fine brush to match the top coloring.  Next it was fine sanded, got a coat of sanding sealer, grain filler, more sanding, more sanding sealer, and some coats of lacquer all with fine sanding in between. Here it is with the black bands painted top and bottom like the original and at an intermediate coat of lacquer. I use acrylic artist's paint for the banding. That's water based so I let it dry for a day before more lacquer. The lacquer over it makes it shine. There are two bands of semi-burl walnut around the radio that I sprayed with toner to make them stand out a bit more as photos of the original finish show. I was pretty happy with the cabinet at this point.  Here's a closeup of the decals before the black base was painted, more lacquer to come afterwards. Notice how the finger gouges around the dials are gone. The knob is just sitting there to help me judge decal alignment.  The brass escutcheon around the preset pushbuttons was discolored so I stripped and steel wooled it. I knew it was too shiny so looked for a way to darken it a bit. All of the methods I researched required chemicals I didn't have and didn't want to order for just one piece. Then I read that a hard-boiled egg would work. I put such an egg in a ziplock bag with the escutcheon, then smashed the egg and left it overnight. It did darken. I put in another egg for a second night and was happy with the results. The egg stays in its corner of the bag not touching the brass. It's the sulfurous atmosphere from the egg that does the work. The brass then got a coat of lacquer. The radio still had the old worn station call letter tags which were white on a reddish-brown background. I reproduced them for my new preset station choices on the computer and printed them on photo paper. I couldn't find the exact grille cloth but I have seen other original pictures of this radio with different cloths, so I bought one that I thought would be appropriate from Radio Daze and installed it. Mike Koste had sent me the exact knobs and I polished them by chucking a 1/4" shaft in the drill and spinning the knobs in a rag with auto body polishing compound. This removes grime and scratches and makes them look new. After the lacquer cured for a couple of weeks I rubbed it out with rottenstone and mineral spirits. The old vs. the new.  It's a real hunky radio, and a great performer. That's a 12 inch / 30 cm ruler. 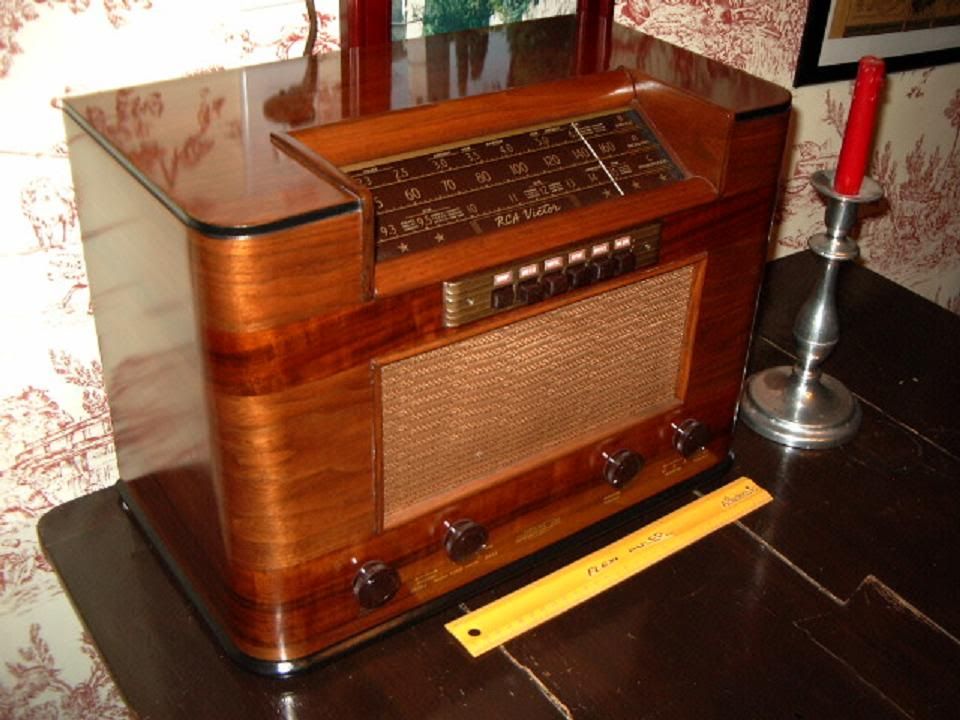
__________________
Reece Perfection is hard to reach with a screwdriver. Last edited by Reece; 07-05-2014 at 08:31 PM.
|
|
#7
12-03-2010, 11:08 AM
|
||||
|
||||
|
I have almost this same radio. Your set is lovely. Mine has had electrolytic capacitors tacked to defective electrolytics for nearly 40 years. It plays well, and has great sensitivity, but is beginning to hum again. Pretty good for a 40 year old temporary repair, eh?
I use the phono input for a small 45 changer that I have. Still sounds nice, too. I cant get over how nice that cabinet looks after what you showed when you started on it. My cabinet has a chip in the veneer on a corner, but, fortunately, I have the chip.
|
|
#8
12-03-2010, 12:01 PM
|
||||
|
||||
|
It looks amazing
 Nice trick with the egg. I've heard that suspending brass over a bowl of vinegar will darken it too. What did you use for grain filler ?
|
|
#11
12-03-2010, 08:16 PM
|
||||
|
||||
|
Thanks, everyone. I am probably the most happy with the appearance of this one of all the radios I've done so far. Bob, the grain filler was Bartley Paste Wood Filler, "Dark." I bought it some years ago from a woodworker's store. I also used it on that Firestone that I did this past spring. I really enjoyed doing that one because of all the reconstruction it needed. Oh, another way to darken brass I found out is to hang it from a tree limb and let the acid rain and air pollution work on it. I didn't have that kind of time...
__________________
Reece Perfection is hard to reach with a screwdriver.
|
|
#12
12-03-2010, 09:02 PM
|
||||
|
||||
|
That is one fine cabinet restoration. Congratulations on a beautiful job.
 The bias cell method was used in many cheap sets of the thirties to save money on parts needed to create bias voltage. I guess bean counters were plentiful in those days too. It surprises me that it is used in this model as I dont recall ever seeing it used in RCA sets but in many sets sold by Airline and other catalog brands. Im curious what your modifications were in replacing the bias cell. My method of replacement is the same as in the original circuit. Take the bias cell and go shopping for 1 ½ volt button cell watch batteries which can be found in various diameters and thickness. Look for one that will fit the cell cup. I use # A76 or LR44 which fits the cup nicely. To replace it start by bending back the soft metal (zinc I believe) edges of the cup and digging out the dried cell. Youll find it to be dried and crumbling. Clean the cup inside and out with a small piece of 4-0 steel wool until shiny and drop the battery in with the button facing up. I pack the cup with tin foil for better contact and to help center the battery. Then press the edges back down with a small screw driver tip to hold it in place being careful not to short the edges to the center button. The outer case of the battery is positive as is the cup of the bias cell. The center is the negative contact and you will usually have to adjust the clip to make better contact once the cell is put back in the wire holder. I have sets are still working fine after 15 years using this method. I also followed your Firestone restoration as well and it is beautiful. I have a deco Bosch console that needs veneer on top. I am curious about the glue and thinning ratios that were used in applying the veneer. I want to try your method of using heat to set the glue. Keep up the good work.
|
|
#13
12-04-2010, 06:42 AM
|
||||
|
||||
|
Thanks, Droptop. I read a lot about bias cells and some people I respect just say jump 'em, an "X"SQ7 will operate fine that way. Others say put a cap in place of the cell and then a 10 meg resistor from grid to ground. I couldn't hear any difference with just using a cap so that's the way I went. You've had excellent results using a watch battery. Every component can go bad, but I figure a cap will last longer than any cell and has no guts to leak out eventually.
Bias cells weren't used very long, from the mid thirties to about when this radio was made (and then The War came along and all domestic production ceased.) I don't think they were used at all from 1946 on. They had maybe a 10- or 15-cent price advantage over using a cap and resistor to obtain bias, and were supposed to be quieter than a resistor, but who could really tell on a consumer product playing Benny Goodman nice and loud. Yes, it is sort of surprising to see one this late in this high end (for a table set) of a radio. Using the iron-on method for veneer allows you to buy raw veneer with no backing, which is the least expensive. The veneer itself is fine but takes more work on your part than other types of veneer which have had a backing applied, etc. My post on the Firestone explains about how to flatten pieces with ripples in them before application. I only thinned the glue a little with water to make it brushable. I found that right out of the bottle it didn't spead well. You don't want it too thin as it might soak through. You want to try to keep any glue from the outer (visible) surface of the veneer as it wouldn't take stain properly there. Then I applied about three coats to each surface, the back of the veneer and the top of the radio plywood, letting them dry in between for an hour or more and finally dry overnight. You wouldn't have to apply the veneer the next day; you could wait until ready. The veneer will have a tendency to curl up on you as you apply the glue. I put mine on a piece of cardboard and held the edges with clothespins. Move the clothespins for the next gluing so every part gets glued.
__________________
Reece Perfection is hard to reach with a screwdriver.
|
|
#14
12-04-2010, 06:06 PM
|
||||
|
||||
|
That cabinet looks absolutely fantastic!
I take it from the description that a bias cell is a battery? I was completely ignorant of bias cells until you mentioned them. After looking at some images of Mallory bias cells I realized I have one in a junk box. I had thought it was a selenium or germanium rectifier since it came in a box of seleniums. John
|
|
#15
12-04-2010, 06:56 PM
|
||||
|
||||
|
Thank you, John. Yes, a bias cell is a small electrochemical device that provides negative bias to the grid of a tube. It is not called upon to pass any current, just keep the grid at a slight negative potential, so it can last for its shelf life. If I run across another one I think I'll try droptop's method of restuffing the old one.
__________________
Reece Perfection is hard to reach with a screwdriver.
|
| Audiokarma |
 |
|
|


 Linear Mode

