
|
|
|
|
|
#1
 01-11-2018, 01:12 PM
|
|||
|
|||
|
Also, don't forget that you capacitor checker leads could be adding to the value of these capacitors. They are very low in value. Try separating the leads and measure them again.
As Bob mentioned, I would be inclined to leave them alone. 
|
|
#2
01-12-2018, 05:09 PM
|
|||
|
|||
|
OK guys I left them alone. I appreciate your feedback.
|
|
#3
01-12-2018, 05:38 PM
|
|||
|
|||
|
Guys, I've got another problem! Some background first.
all through this recap and recarb, when I powered up the TV, the picture seemed weak. I had to twiddle the Contrast, Brightness, V. Hold, and H. Hold controls just right to get a picture. The picture was always a bit unstable. It would flicker and when I adjusted the Contrast control, the V. Hold would need readjusting. Though I think this might be a nature of the beast. As I went through the recap, the picture got just a little bit better. Then when I was finished with all the recapping, the picture was still a bit unstable but the flickering all but stopped. Then I changed the 8 resistors in the tuner. Now here's my problem. I have very good audio but no video. I have a raster but no video. No amount of twiddling the controls will produce a picture. I even tried another CRT with the same results. I replaced the 6AU6 Video Amp tube and even changed 6AL5 Video Detector tube and still no joy. I checked the 2 coils (Sams L14 and L15) or ( Riders, Wallace, and Admiral L9 and L10) and they checked good for continuity. Could this problem be caused by something in the tuner? I figured that with good audio, the tuner was doing its job. Any ideas as to where to look? In the meantime, I'll hook video directly to the Video Amp and see what I get. Thanks for your help. Here's a link to the Wallace schematic. Thanks to Phil Nelson. https://www.dropbox.com/s/vtr06fdq1z...opped.jpg?dl=0 Last edited by Crist Rigott; 01-13-2018 at 12:16 AM. Reason: Changed recapped to changed 8 resistors.....
|
|
#4
01-12-2018, 06:27 PM
|
|||
|
|||
|
OK, when I hook the video directly to the Video Amp tube, I get decent video.
Then I went back to the original set up and now I'm getting a very faint picture. I'm thinking that maybe I need to just do the IF/Video alignment. Can a problem with the tuner cause this problem? Just wondering. Last edited by Crist Rigott; 01-12-2018 at 06:33 PM.
|
|
#5
01-20-2018, 03:22 PM
|
||||
|
||||
|
It will probably fade/dirty to a cream eventually anyway.
__________________
Tom C. Zenith: The quality stays in EVEN after the name falls off! What I want. --> http://www.videokarma.org/showpost.p...62&postcount=4
|
| Audiokarma |
|
#8
01-20-2018, 10:05 PM
|
|||
|
|||
|
Guys,
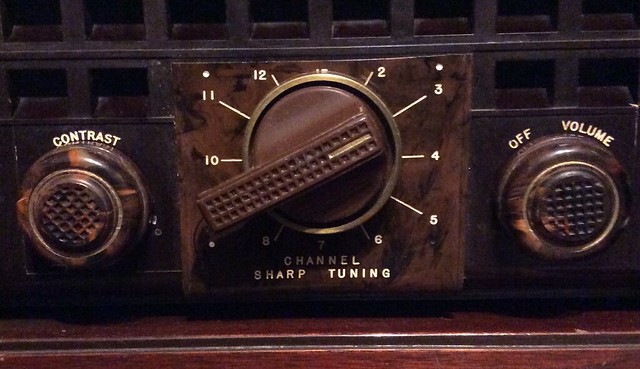
I really appreciate those photos. I have to agree it's cream color. A trip up to the local Walmart produced another bottle of paint. "Toasted Marshmallow" it is.  I redid the lettering on the cabinet and Channel Plate. After it dries tomorrow, I'll clean them both up and outline what I'm doing to mount the Channel Plate.  
|
|
#10
01-21-2018, 07:53 PM
|
|||
|
|||
|
Quote:
|
| Audiokarma |
|
#11
01-21-2018, 08:01 PM
|
|||
|
|||
|
Channel Plate.
I used my heat gun and gently heated and flattened out the plate the best I could. After trying to fit it back onto the cabinet, I could see that the plate had shrunken some. To get the plate to lie flat I filed the round mounting holes till it fit properly and centered over the hole in the cabinet. With the holes filed out I knew the brass retaining clips won't work. So I came up with the idea of using some #6 flat washers and some 1/8" model airplane fuel line. The fuel line is a tight fit over the mounting posts. The washers are just the right size to go over the posts and then the fuel line can press against the washers "pulling" the Channel Plate onto the cabinet. The pieces of fuel line were left long so if I had to remove them I could grab it with a pair of pliers.  
|
|
#12
01-21-2018, 08:08 PM
|
|||
|
|||
|
I then recreated the 3 labels. Two for the chassis and one for the back. Not an exact copy but real close!
 Once the 2 labels were applied the chassis was done!      
|
|
#13
01-21-2018, 08:12 PM
|
|||
|
|||
|
The cabinet parts were reassembled and the chassis slid home and screwed down tight!
   
|
 |
|
|


 Hybrid Mode
