
|
|
|
#136
 04-30-2019, 05:39 AM
|
||||
|
||||
|
We Have Color! Whoo Hoo
UPDATE, APRIL 29, 2019, DAY 272
On day 272 of this restoration, we have color! From Mike: Greetings! Please share my excitement in the event of first color on the old Westy! The color is not correct color yet, but it is color. This is a major milestone of progress in this endeavor of restoration. There is still much to do. I need to figure out what is going on with the proper phases to make the color correct. The dead color circuits turned out to be a failed filament in the bandpass amplifier tube. All tubes were tested several months ago and the 6BA6 tube was fine then but it evidently died soon after. No wonder the voltages checked OK but the signal was not passing. Cheers, Mike 
Last edited by etype2; 05-07-2019 at 11:28 PM. 
|
|
#137
04-30-2019, 07:19 AM
|
||||
|
||||
|
Sweet!
__________________
My TV page and YouTube channel Kyocera R-661, Yamaha RX-V2200 National Panasonic SA-5800 Sansui 1000a, 1000, SAX-200, 5050, 9090DB, 881, SR-636, SC-3000, AT-20 Pioneer SX-939, ER-420, SM-B201 Motorola SK77W-2Z tube console McIntosh MC2205, C26 
|
|
#138
04-30-2019, 08:47 AM
|
||||
|
||||
|
Good progress.
__________________
Tom C. Zenith: The quality stays in EVEN after the name falls off! What I want. --> http://www.videokarma.org/showpost.p...62&postcount=4
|
|
#139
05-03-2019, 12:00 PM
|
||||
|
||||
|
UPDATE, MAY 2, 2019, DAY 275
From Mike: “Greetings again. I have no images this time however I have improved the phases of the color by a fair margin. I have now learned that there are I.F. alignment issues that need to be addressed next. I spent the evening studying the schematics. I will be moving the chassis to the alignment bench next. I expect to find a real mess on the oscilloscope screen when I hook it up. Even though the monochrome picture has good detail and appears to display a good picture, the chroma signals are suffering where they enter the video amplifier. Regards, Mike”
|
|
#140
05-07-2019, 01:57 AM
|
||||
|
||||
|
UPDATE, MAY 6, 2019, DAY 279
From Mike tonight: Greetings. The alignment was a success! And it was a real mess. Remember, images are not in focus because they are being displayed on a 21FBP22 crt and the voltage from the Westy is not quite enough to reach the proper value. The images themselves are much clearer now, and the color is much better. The jig method is telling me what I need to know for now. Photo #1 The alignment curve before alignment. Photo #2 and 3 is after the alignment Photos 4,5,6 are real time antenna tv photos. Photo 7 is a color bar pattern. I am very happy with the results of this restoration so far. We are getting there. Cheers, Mike. Author: Looking at photo #3, half way up on the left is the CHROMA signal of 42.17 MHZ. Next in the middle of the waveform is the center of the 6 MHZ wide video signal of 44MHZ. Next, down half way on the right upper sideband is the 45.75 Video carrier and finally on the far right is the 47.25 MHZ trap for adjacent sound., as taught to me by Mike from the previous alignment of the 21CT55 chassis. What a difference from photo #1 and #3. Photo #2 is identical to #3 except flipped horizontally. A very nice textbook alignment waveform. 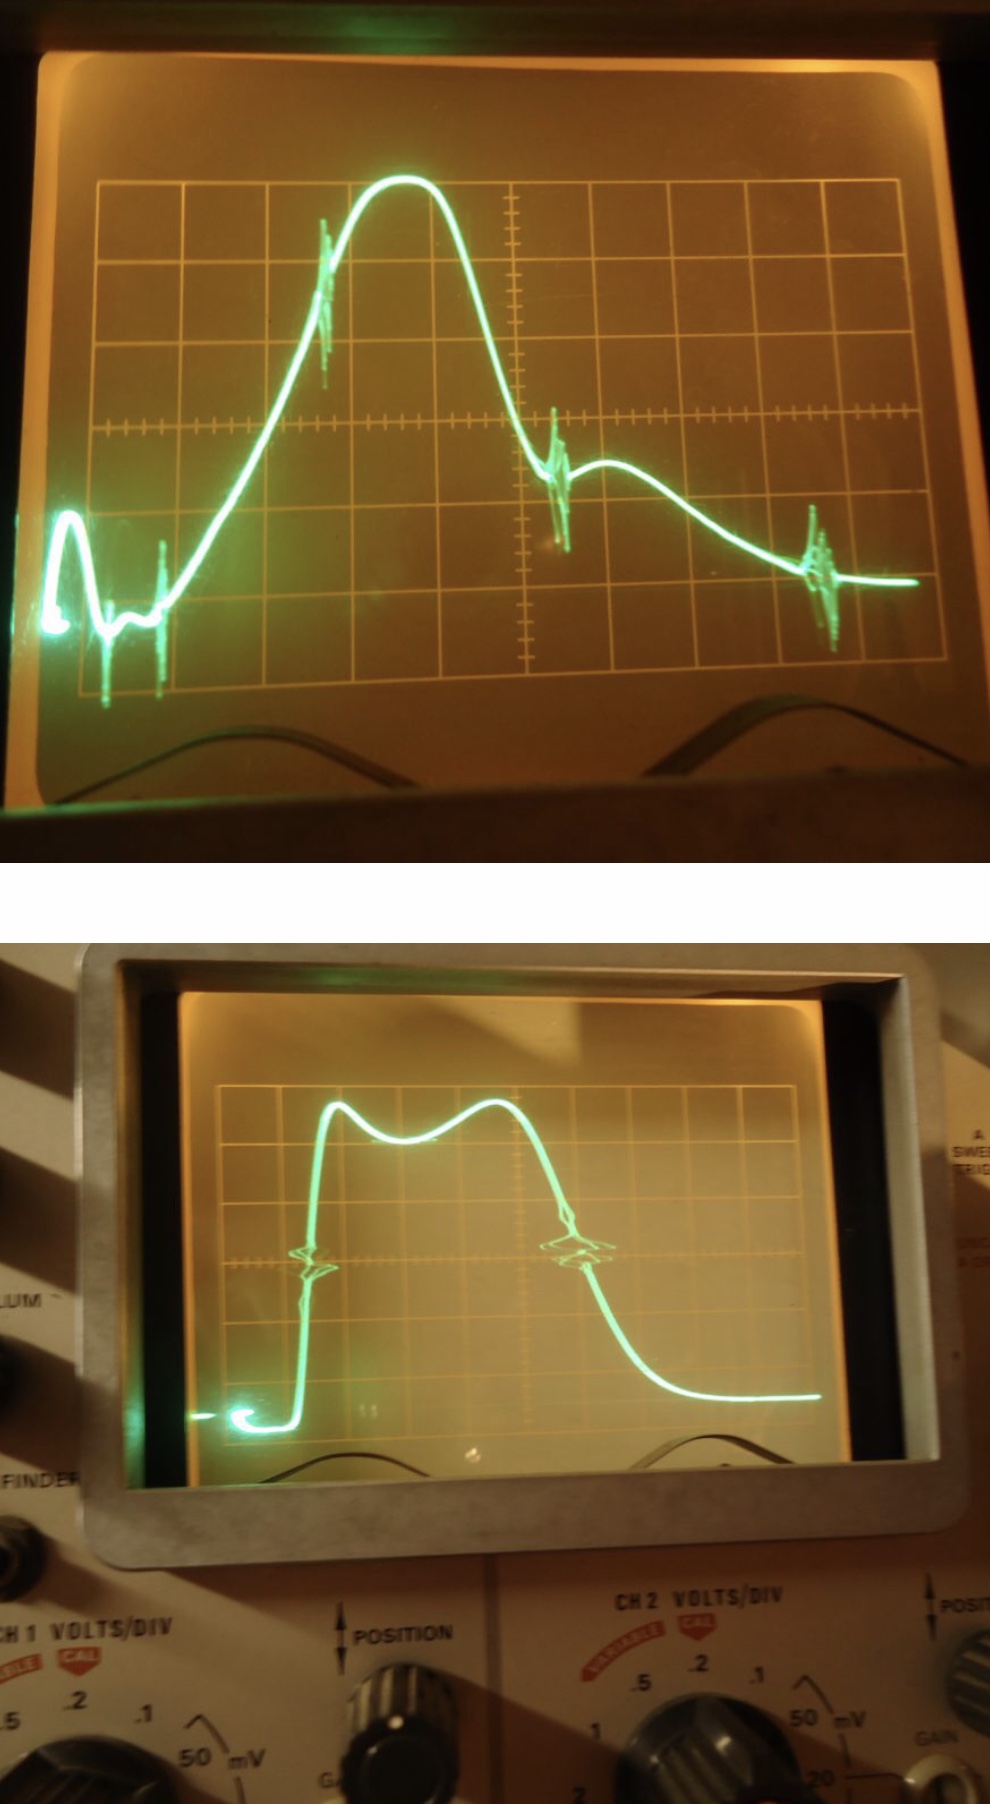   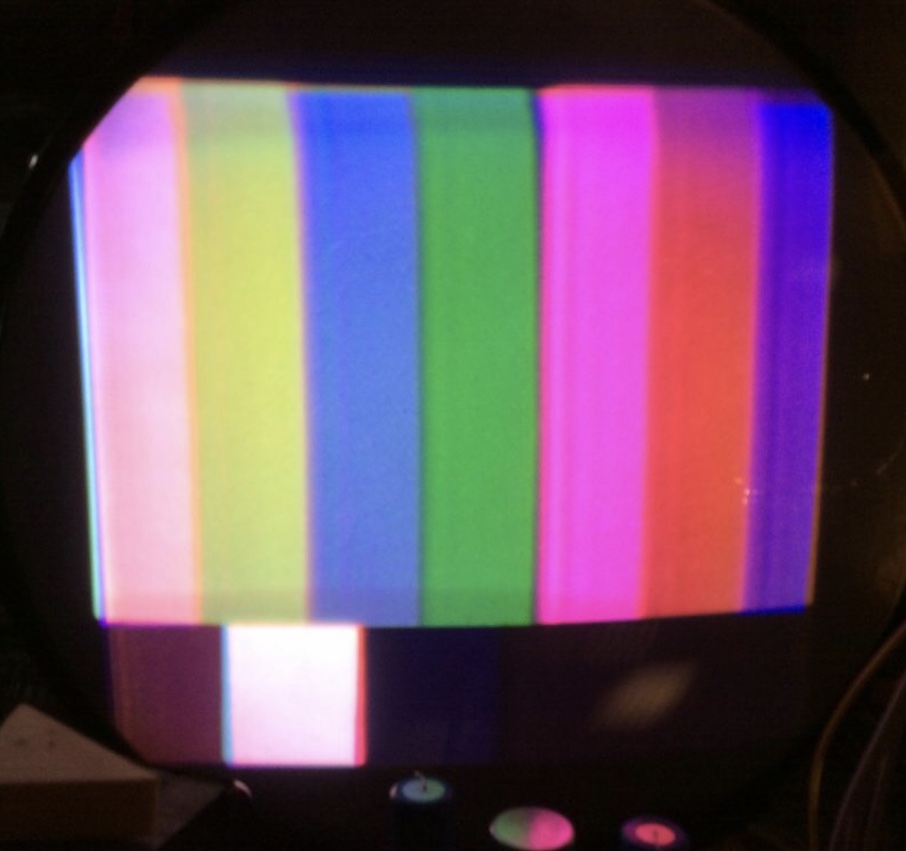
|
| Audiokarma |
|
#141
05-07-2019, 04:11 PM
|
||||
|
||||
|
Marshall,
I'll say Mike is getting there. Very fortunate to have him working on your Westy. -Steve D.
__________________
Please visit my CT-100, CTC-5, vintage color tv site: http://www.wtv-zone.com/Stevetek/
|
|
#142
05-07-2019, 06:45 PM
|
||||
|
||||
|
For sure Steve. It shouldn’t be too much longer, and the 15GP22 will be reinstalled.
|
|
#143
05-28-2019, 01:53 PM
|
||||
|
||||
|
UPDATE, MAY 27, 2019, DAY 301
On the way to this update, the rebuilt VCT was arcing so Mike installed a second, which was tested and found to be in good order. Just a note about the previous update, I believe the RCA 21CT55 has 6 IF stages. This Westy has 4 IF stages. Correct me if I’m in error. From Mike: “Greetings Marshall. Tonight I installed the replacement transformer that John Folsom sent me. I now have the expected approximate calculated 7 Kilovolts on the convergence pin for the CRT. Of course, that wire is still just hanging because we are jigged to a 21FBP22 instead of the 15GP22. But that is great news. There is a tracking problem with the gray scale and I need to look in to that. I know that my crt is not the best but it seems a bit more dramatic than I expect. So, that is the next issue to address. When that is corrected, I can finish my tuning of the chroma circuits for proper phase. My idea of installing a 3.58 MHZ crystal is not going to work in this chassis. The rest of the electronics continues to be very stable. Rock solid sync and monochrome picture. Also, soon it will be time to remove the 15GP22 from its storage and clean it up in preparation for a new aquadag. Regards, Mike”
|
|
#144
05-28-2019, 03:22 PM
|
||||
|
||||
|
One possible point of contribution to the grayscale issues is difference in phosphor efficiency of a 15G and a 21FB CRT. Phosphor efficiency changed substantially between the two.Circuits that were meant to balance colors on a 15G where colors were inefficient across the board, and the phosphor efficiency varried radically between the weak red and IIRC the strong blue probably are a ways off of optimum for later phosphors.
__________________
Tom C. Zenith: The quality stays in EVEN after the name falls off! What I want. --> http://www.videokarma.org/showpost.p...62&postcount=4
|
|
#145
05-28-2019, 04:00 PM
|
||||
|
||||
|
Quote:
Your restorer should not be messing with the gray-scale and color balance issues at ALL at the moment. He's liable to go about fixing a non-issue, thus making the situation worse. The entire point of the then all-new sulfide phosphors in the 21FBP22 was to get more equal beam currents between the three guns. The 15GP22 and 21AXP22 ran with a ratio of red gun current to blue gun current of ~4 or 5. The ratio of red gun current to blue gun current in a 21CYP22 is ~3. The ratio of red gun current to blue gun current in a 21FBP22 is only ~1.5. Of course this will vary a bit from sample to sample, but the point remains the same. Even a cursory glance at the datasheets for the two tubes in question would have revealed the difference. In fact, conversion instructions for converting 21AXP22 based sets to the 21CYP22 or 21FBP22, and instructions for converting the handful of 21CYP22 sets over to the new 21FBP22, very often included simple changes in the matrix circuitry for this very reason. Without them, proper setup is an exercise in futility. Redag the 15GP22 and put it in the set already.
|
| Audiokarma |
|
#146
06-07-2019, 01:40 PM
|
||||
|
||||
|
UPDATE JUNE 7, 2019, DAY 311
Hi Marshall. “I have checked some voltages and my conclusion is that my crt is just not tracking well. Your statement about the phosphor may have some merit but it is very hard to prove. It is time to prepare the 15GP22 for installation. The aquadag needs to be replaced. This process went very slow. I spent about 3 hours on this part. I used a lot of water and paper towels to soften the “still hardened” parts for removal. Here we go. Pix #1 Before dag removal. Some of the material is literally falling off. Pix #2 Removing the label that warns about high vacuum etc. A wet paper towel helps. The label will go back on later. Pix #3 A good picture of the old dag material falling off. Pix #4 and #5 show measurements I took so I know where the new material will go back on the bulb. Pix #6 All the dag material has been removed. Once again, Cheers.” Go here for full size images. https://visions4netjournal.com/westinghouse/ 
|
|
#148
06-15-2019, 10:42 AM
|
||||
|
||||
|
UPDATE, JUNE 14, 2019, DAY 315
From Mike: WEST22 Greetings. The crt is mostly re-assembled. I still need to clean up and install the magnetic shield which will come in the next stage of photos. Pix. 1 New aquadag on the CRT with original warning label that I removed and re-installed. That was a bit tricky! But it worked! Pix. 2 The ultor connection being re-established. Pix. 3 The insulator boot in place. Pix. 4 All parts clamped together including the adjustable purity gaus ring. I still have some work to do on the center convergence adjustment assembly that fits to the neck of the tube. One of the magnets is missing and I need to be creative about how I fix that. Some tech in the past replaced one of them with a 6/32 screw that was non magnetic. It never could have worked. I suspect the convergence problem he was troubleshooting was one of the ones that I have likely dealt with during this restoration. No way to know for sure though, just a hunch. More to come in West 23. Cheers, Mike Go here for full size images. https://visions4netjournal.com/westinghouse/ 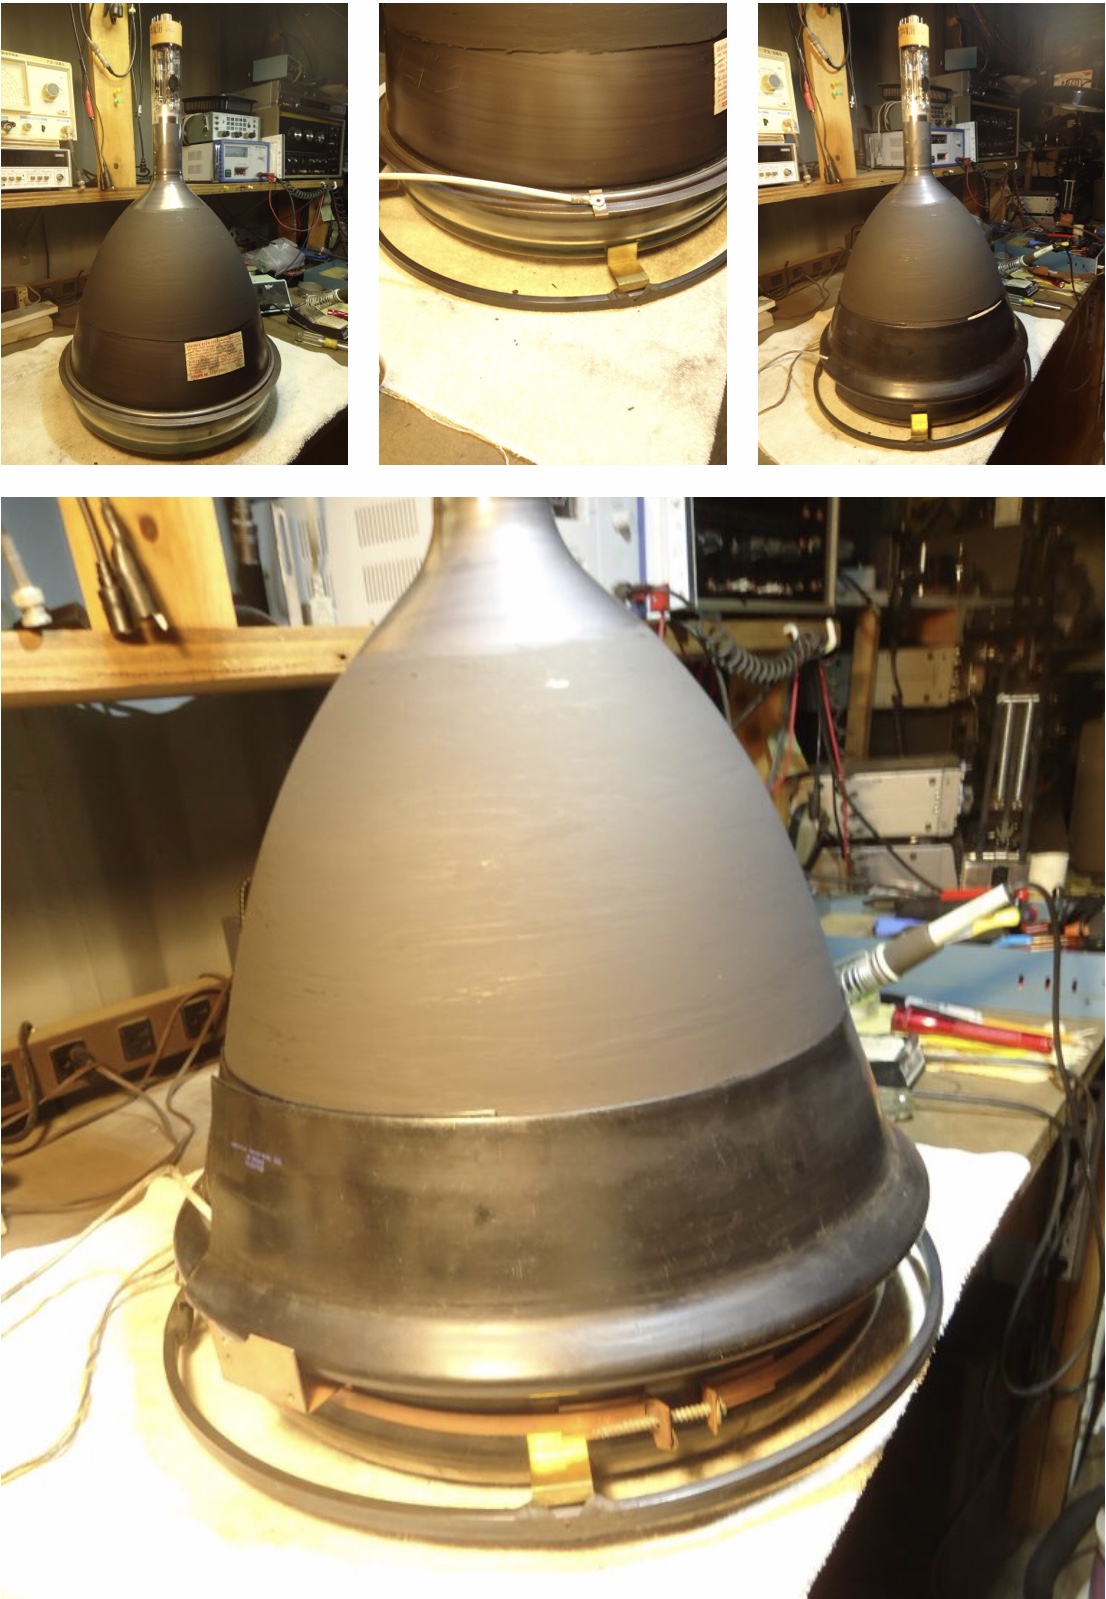
|
|
#149
06-20-2019, 03:39 AM
|
||||
|
||||
|
UPDATE, JUNE 19, 2019, DAY 320
From Mike: “Hi Marshall. This set of photos, hopefully are the last images from the jig tube setup. I will be cleaning up the hardware in preparation for the CRT install within the next few days. Special thanks to Bob Galanter for his photo of the properly assembled Westy CRT 15GP22. As it turns out, I am very happy about the photo that he sent. There were a couple of assemblies that were not installed properly by someone before me, and the photo allowed me to do some corrections. The main thing that I noticed, was that the brackets for the purity and convergence assembly were installed upside down. It was very interesting to discover that little nuance. Pix #1 Color bar pattern Pix # 2,3,4,5 Images from KMOH TV from Kingman over antenna TV.” Author: Thanks Bob, for your help. Once the 15GP22 is installed, we are not expecting the same resolution we see in the below screenshots for reasons we will discuss later. I hope I’m wrong, but we have yet to see a 15GP22 produce an image close to the quality of any 21 inch RCA color CRT from this era. Go here for full resolution images, https://visions4netjournal.com/westinghouse/ 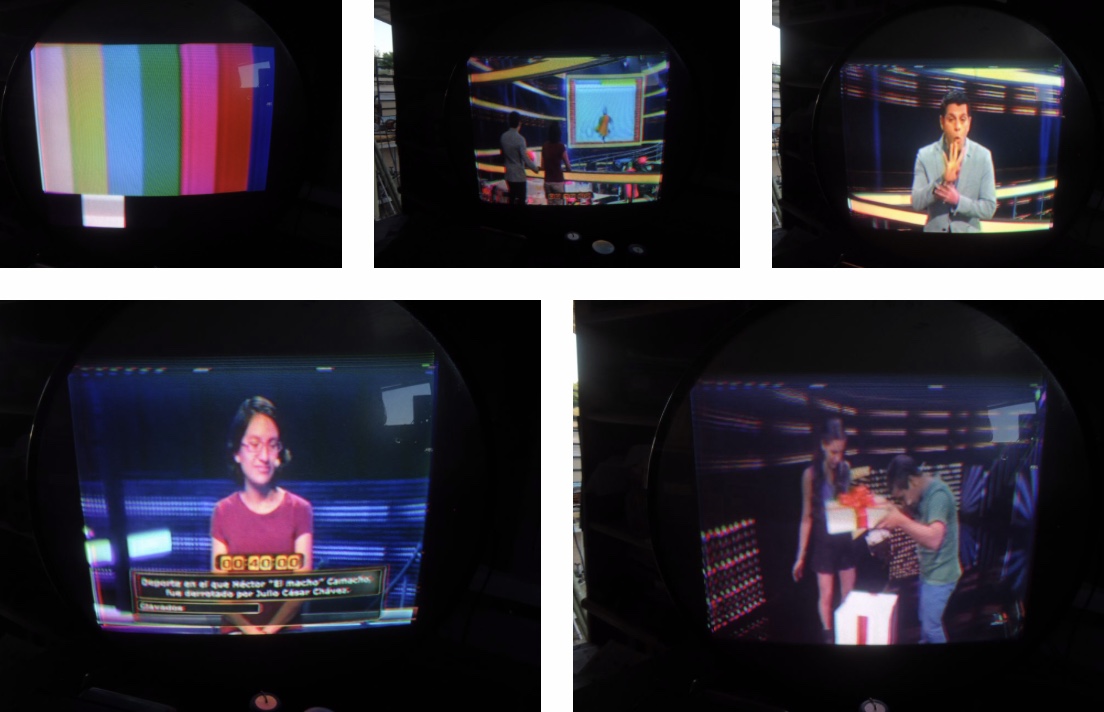
|
|
#150
06-23-2019, 02:38 PM
|
||||
|
||||
|
A Call For Help
UPDATE, JUNE 22, 2019, DAY 323
From Mike: A CALL FOR HELP. “I am in need of a gun magnet for the restoration of Marshall’s Westinghouse. Any chance you may have one from a parts set? These are the 6-32 threaded magnets that are about 2 inches long. I can make this if I have to but I would rather find the right part if it is available. I have contacted Bob Galanter and Steve McVoy but have not heard back from either source yet. I am nearing the end of this restoration. ( if there is any such thing), and I need that part before I can continue. Thanks in advance, Mike” Greetings again. I mounted the crt this evening. It is heavy with all its hardware. I felt a lot of different feelings all at once as I was handling this assembly. Anxiety, Fear, Hope, Joy, Satisfaction. LOL. I am still in need of the magnet for the static convergence before I can finish this project. The pictures are as follows. Pix #1 CRT assembly Pix #2 The convergence wire that will soon connect to the 15G tube is tied away from the horizontal output tube in order to prevent the heat from the tube causing damage to the insulation. The original lead was melted to the side of the tube which is why I have added this modification. I used electronic lacing string to accomplish this. It is very good quality and it is waxed which makes it very long term reliable. Pix #3 The high voltage cage showing the extra insulation around the 1B3 tubes to prevent arcing. I have also added insulation to the side of the cage where the convergence pot lives. This is very thick high voltage tape that is good to 20 KV per single wrap. Pix #4 Top view of the chassis before the crt install. Pix #5 Front view of the controls. Pix #6 CRT "Truck" installed. YAY! Pix #7 The socket that I used to jig the chassis to the 21FBP22 can now be removed. I will replace it with the new 15GP22 socket that I received from Steve McVoy. Cheers, Mike Go here for full size images. https://visions4netjournal.com/westinghouse/ 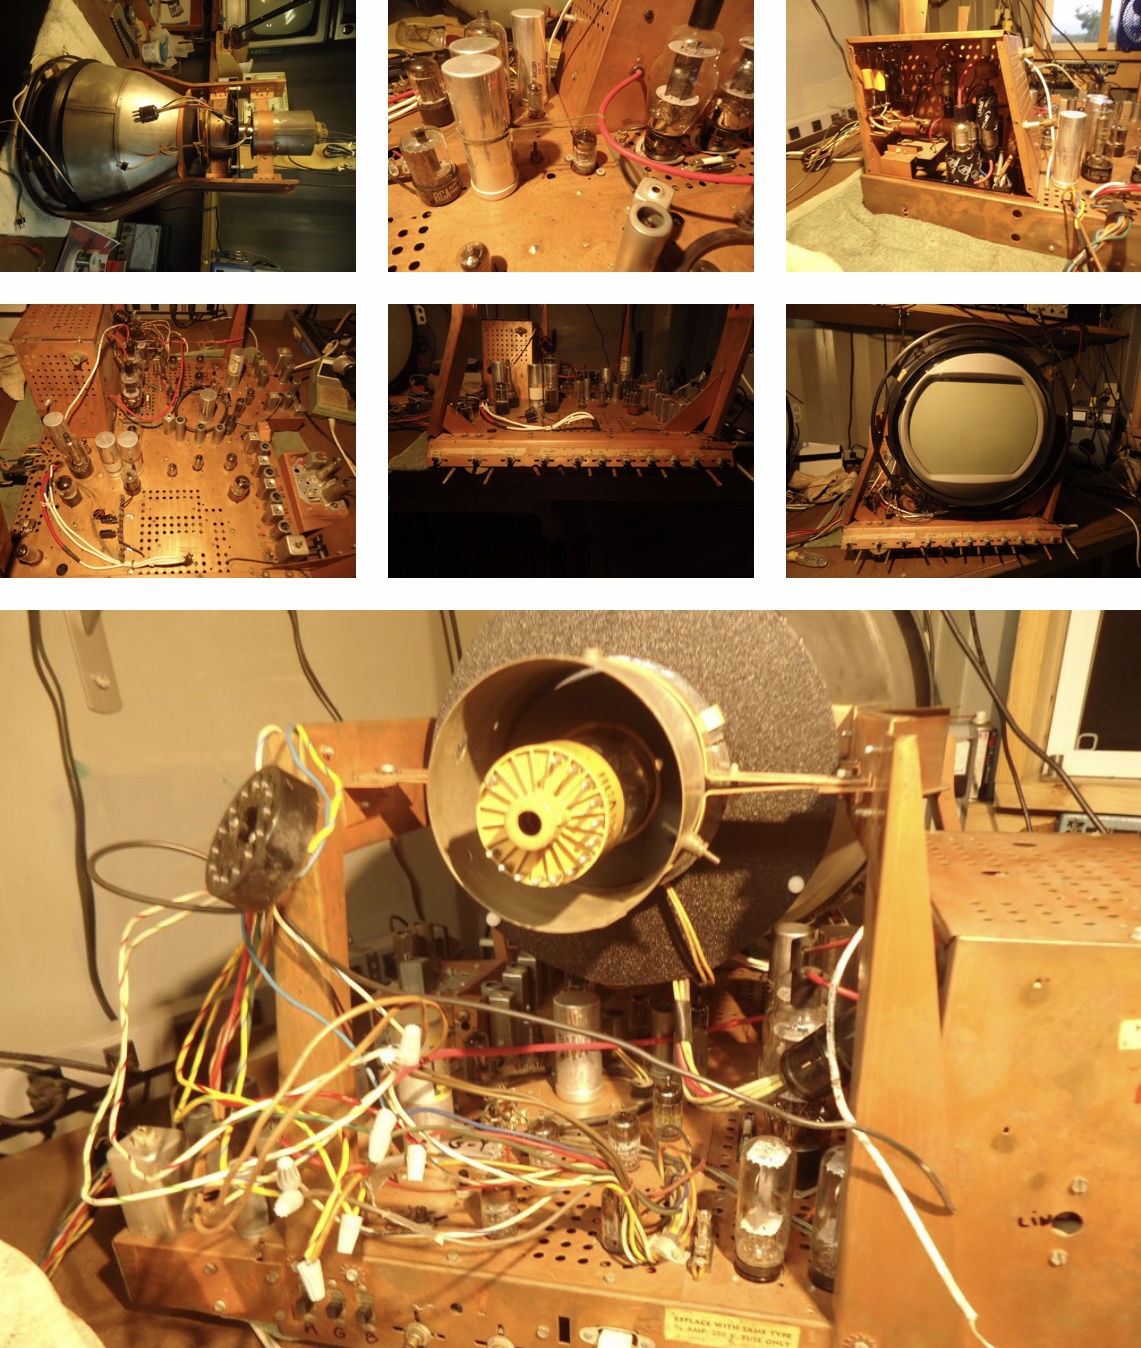
Last edited by etype2; 06-23-2019 at 02:42 PM.
|
| Audiokarma |
 |
|
|


 Personal website dedicated to Vintage Television


 Linear Mode

