
|
|
|
|
|
#1
 09-25-2011, 06:42 PM
|
||||
|
||||
|
DuMont RA-103 Chatham Cabinet Refinish
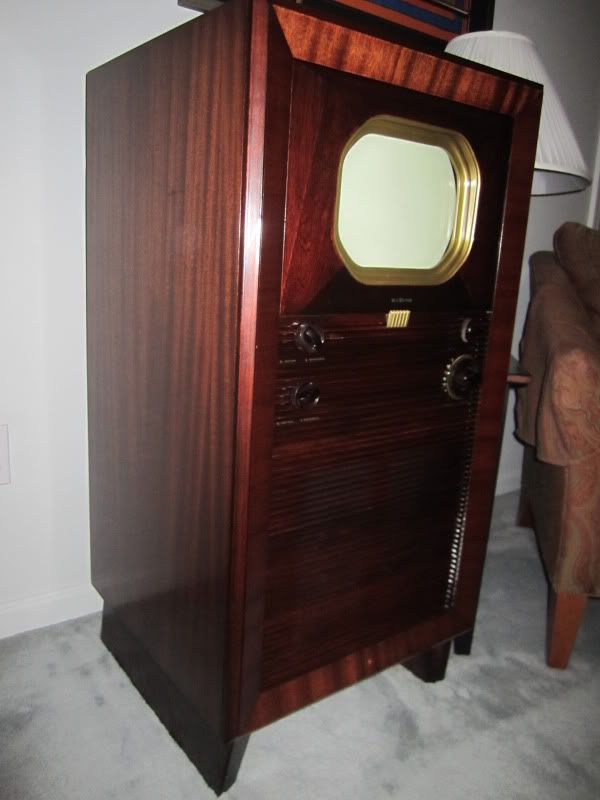
I've started my first cabinet refinish job, it's a DuMont Chatham! Let me give a disclaimer right up front- I have no wood working/refinishing experience at all. I did as much "internet reading" as I could before I started and this weekend while on a visit to the mother in law's home in the country I took the first steps. The cabinet was in pretty poor shape originally, I was not optimistic for a good looking outcome.
 I used a chemical stripper with methyl chloride to remove the old finish. The instructions called for applying the stripper, letting it sit for 15 minutes, and then scrape it off with a flat blade putty knife. I found the best results for me was to let the stripper sit and then use a stiff brush to work the finish off and then wipe the "goo" off with a rag.  After I removed as much finish as I could using the stripper I went to work on the cabinet with sand paper. I used 80 grit first to remove whatever leftover finish there was after stripping. I moved to 150 after that to smooth out the now rough surface the 80 left. After the 150 I moved on to 320 to finish. One thing I have read is that I skipped some grits in the progression and I will pick up the intermediate grits before the next cabinet refinish.  Now the cabinet is all stripped, repaired, and sanded. There was one section of the cabinet that I mistakenly blew right through the veneer with the 80 grit but I'll chalk that up to rookie learning experience. Now on to the solicitation for advice. I was thinking of using CrystaLac Wood Grain Filler to fill the grain. From there instructions I understand that I should stain first. Some other grain fillers say that you should fill first. I'm wondering if any one here has used clear grain and can give advice? Should my steps be: rub stain - grain fill - brush lacquer sanding sealer - spray lacquer? Any help or tips greatly appreciated. 
|
|
#2
09-25-2011, 07:16 PM
|
||||
|
||||
|
I use Constantine's wood filler for my radios. It is sold in a variety of tints, so I don't stain. I will mention that I have tried other wood fillers, both oil and water based, and none of them worked as well as the stuff Constantine's sells.
If it were my cabinet, I would start with filler, slopping on the stuff with the grain. When it gets a hazy finish, you can start to work with it. You use burlap to take it off, but what gets people is that they think you just wipe the filler off and that is that. You use the burlap to build up a cake of semi-dry wood filler onto it, and you use that cake to WORK the wood filler into the cabinet. I also use a kitchen scraper or credit card to strike some portions level as well. After filling, sand again and seal. I use a couple of light coats of shellac (I lacquer and shellac with spray cans, no brushing) for this purpose. Now lacquer can be applied. If any areas require opaque toners, I mask off the cabinet and lacquer the opaque toner areas first. Then you can lacquer the whole cabinet with either clear toners, or a clear topcoat. Since you'll be grain filling, I recommend that you do some wet sanding/polishing with rottenstone to get a mirror finish when you're done.
|
|
#4
09-26-2011, 06:05 AM
|
||||
|
||||
|
As far as the tints go, do you always use a tint that matches the wood type or do you go with something darker to accent the grain? Since this is not a clear wood filler do you stain after you apply the filler so that it can be stained along with the wood?
I'll go with you're recommendations and pick some of this up as soon as I can.
|
|
#6
09-26-2011, 01:48 PM
|
||||
|
||||
|
I'd recommend using lacquer rather than poly for the overcoats. Lacquer is what they originally used. Plus, lacquer is easily reversible if your first attempt isn't perfect. Poly is hard to remove with anything but a belt sander.
Just my $0.02. Phil Nelson
|
|
#7
09-26-2011, 01:52 PM
|
||||
|
||||
|
Ditto on the suggestions above. You might find my thread on restoring a Philco radio cabinet helpful: http://www.videokarma.org/showthread.php?t=247120
They do recommend you stain before the filler. Keep in mind that stain penetrates veneer much more than hard wood trim. That will leave the trim lighter and possibly splotchy. That's a big advantage of toner - it gives you a consistent color over different woods. The only grits I use on wood are 220 and 400. 80 is too coarse for thin veneer. After stripping, I use stripper wash and steel wool. That generally removes all the stripper residue so there's not much sanding required. Good luck.
|
|
#8
09-27-2011, 08:07 PM
|
||||
|
||||
|
I got the stain on yesterday. It is starting to look better.
 The area around the edge looks a bit splotchy but that's because it is going to painted black instead of stained. The only part that did not come out so well is where I burned through the finish. That wood didn't take the stain at all.  I tried using a wood stain marker also to no avail. I think I'll sleep on it one more day and see if I can come up with something to darken that area.
|
|
#9
09-28-2011, 11:08 AM
|
||||
|
||||
|
Quote:
I suspect a lot of the black trim on radio and TV cabinets was originally hand painted after the main finish was sprayed. Sounds tedious, but a trained factory worker could put that trim on in seconds. Back in the day people used to hand paint sign and vehicle lettering, as well as freehand pin striping. Last edited by Kevin Kuehn; 09-28-2011 at 11:12 AM.
|
|
#11
09-30-2011, 07:57 AM
|
||||
|
||||
|
I own an RA-103 in it's origional finish. It is definitely mahogany. The edges are painted a dark chocolate brown.
  When I sand a cabinet after stripping, the roughest paper I use is 220 grit. 80 is way too agressive. That's why you burned through the veneer. If that was an early RCA Victor cabinet, like that 721TCS I posted above, you would have burned right through it in about 5 passes. Careful! 
Last edited by M3-SRT8; 09-30-2011 at 08:03 AM.
|
|
#12
09-30-2011, 11:16 AM
|
||||
|
||||
 Quote:
Possibly they offered this set in a couple different colors? The original finish on this one appears way less red than the one M3-SRT8 has. Or possibly the camera and lighting are playing tricks with the color.
|
|
#13
09-27-2011, 09:56 PM
|
||||
|
||||
|
maybe some wood fill tinted to match the stain sloped into the "burned through" area could hide it.
I don't know much about refinishing though so that may be a dumb idea for all I know. Just thinking outloud. Tom C.
|
 |
|
|





 Hybrid Mode
