
|
|
|
#1
 04-04-2010, 06:44 PM
|
||||
|
||||
|
Motorola 16CK1 restoration complete
I am pleased to present the finished restoration of my Motorola 16CK1 to the collector community.
I acquired this set last fall from a couple in Naperville Ill. The set was purchased NEW by her father who worked for the railroad. He an avid techno geek during his day. He stored the set away for many years and when he pass away a couple years ago, the daugher kept the set from being tossed out. She had the set stored in her garage and decided to put it up for sale last fall and I was the fortunate person to acquire it. The seller had a sentimental attachment to her father's old tv set and so I promised that I would restore it to good as new condition; and that it would live on as an important collectable in my collection for many years to come, and long after I have passed on. So here it is. Now a little about the restoration. The cabinet was in good physical condition.. No damage to the veneer but the finish was very poor. So first order of business was to dismantle everything down to the raw cabinet. Then I took the carcass to a fellow that I know who does furniture refinishing on the side. He hand stripped the set and refinished it. It is just beautiful. Cost $180 and worth every penny of that. Motorola sets always have had a bit of Glitz about them visually, and this set was no exception. On both the right and left side of the cabinet, there is a full length, zinc, die cast column. There is also a zinc die cast control door in the center of the set. All of these zinc castings were originally given a cheap finish. They were originally polished and then nickel plated and sprayed with a tinted yellow lacquer to simulate a "brass" like finish. Well to make a long story short, the fake brass finish was in very bad shape. So I sent the two side columns and the control door to a company that I use in a small town in Iowa. The company is The Antique Service Center. They have a web site and you can find them if you google the name of the company. They restore and refinish old hardware items like hinges, drawer pulls, lamps and other assorted antique hardware. I had them refinish the parts for the Moto in a beautiful satin brass finish. They turned out wonederful and look better than the day Motorola put them on the set. Cost $170. The horizontal aluminum panel behind the control door, was sprayed with a tinted lacquer too, and it had faded. I resprayed it with lacquer that I custom tinted to approximate the brass finish on the control door and the side columns. The knobs had the common knob fungus. I cleaned them and posished them with polishing compound. The left and right center knobs were missing the brass inserts. I plowed through 15 boxes of knobs and came up with some knobs that had the correct brass insert. I removed the inserts, stripped and posished them, and then transplanted them onto the original Motorola knobs. Then the knobs were sprayed with clear gloss lacquer (Ace brand in a spray can) and force dried with a blow dryer. The original grill cloth was very dirty and faded. But it was in otherwise good physical condition with no rips or tears. I was able to remove the cloth from the speaker board, and I cleaned it in hot water and concentrated Oxy Clean. A ton of brown liquid came out of the cloth. After that I blocked it to prevent shrinkage and let it air dry. Unfortunately it was badly faded and I needed to do something about that. I got several bottles of liquid Rit Dye in some colors that were appropriate and mixed up a batch that was sort of burgundy colored. I like the way it looks on the set, however the dye also stuck to the metalic threads woven into the material and now the sparkles are no longer visable. Oh well, you can't have everything, and it looks fairly nice in any event. And if you know me, I am not a stickler for originality. If it's original and looks like crap, I don't want it. It has to look great and I don't care if it isn't original. It was now time to tackle the usual re-cap of the chassis. It was a fairly easy re-cap job because this chassis is well laid out and has plenty of room to work. One nice feature is that the entire chroma section is on a verticle sub chassis that is easily removable from the main chassis. It made re-capping the chroma chassis a breeze. I also removed and restuffed all the cans. The chassis uses the old selenium rectifiers and I bypassed those and installed silicon diodes. Installing the diodes caused the original sub standard B++ of 362vdc, which the inefficient selenium rectifiers were producing, to go to over 475vdc. Because the only schematic of this set in existance has no voltages, John Folsom and I took a guess that somewhere around 425 to 430vdc was probably more appropriate so I added a 7.5 ohm 25W resistor in series with the output of the transformer to put us in the range of what we wanted. Ultor voltage regulation on this chassis was originally done with the infamous Victoreene Corotron gas voltager regulator tube. I sent the one from this set off to my buddy John Fosom and he put it on his high voltage DC power supply and found it to be regulating at around 16KV, 3 KV to low. Of course Victoreene Corotrons are pure unobtanium, and so I needed to develop a work around for this issue. I decided that I would rob the circuit design from the RCA CTC2 and use a 6BK4 for the task of regulating the HV. Fortunately there was some extra room in the HV cage where I could mount an elevated socket and there was a nice spot on the rear of the chassis inside the HV cage where I could mount a control. I also created a new HV shield around the 3A3 rectifier and corona cup made from Plexiglass. I mounted the 160 meg resistor from the high voltage divider network in a small length of plexiglass tubing and mounted it along side the flyback. The flyback was in good operating condition and runs cool cool cool. After bringing the set up on the variac I was getting a raster. I set the new voltage regulator pot for 19KV at zero brightness, which is spec for the 15GP22. At 19KV I was getting lots of corona hissing from the crt. I later found out that it was caused by being dirty. I eliminated the corona hiss all together by simply removing the crt and the protective plastic HV insulator from around the crt, and cleaning both the crt and the inside and outside of the plastic insulator with lacquer thinner and paper towels. The lacquer thinner removed a heavy layer of brownish residue (possibly cigerette smoke), and after I put it back together ALL the HV hissing was gone. From here on in it was a lot of tweeking of the traps and transformers to get a good picture. Convergence is acceptable, but not perfect, but it is as good as it is ever going to get on this particuar set. Another nice feature is that the crt is mounted on a crt truck which allows the removal of the crt from the cabinet. The chassis is removable from the crt truck and so you can have the chassis and the crt sitting on your bench side by side with extender cables running from the chassis to the crt truck. This seperation of crt and chassis, make it very easy to work on the chassis LIVE with the crt right next to you, as if you had a 15GP22 color crt test jig. After I was satisfied that it was working pretty well I hauled the crt truck up to the living room and installed it in the cabinet. Then I followed it with the chassis and hooked it all up. I did some last minute tweeks and hooked up a converter box outputing chanel 4 and with some final adjustments (about 3 hours worth) I was finally happy. And I am not a person that is easily made happy. All in all I have to say that the effort was well worth it. It is producing a very pretty picture. The screen shots don't do it justice. I tuned in a golf match on NBC this afternoon. The colors were "Knock your Socks" beautiful. And even the graphics are readable if they are of decent point size. So I guess that's it. I hope you enjoy the photos and if you are ever in Milwaukee, I will be happy to demo the set for you. See ya at the ETF Convention! Bob FRONT VIEW AS RECEIVED 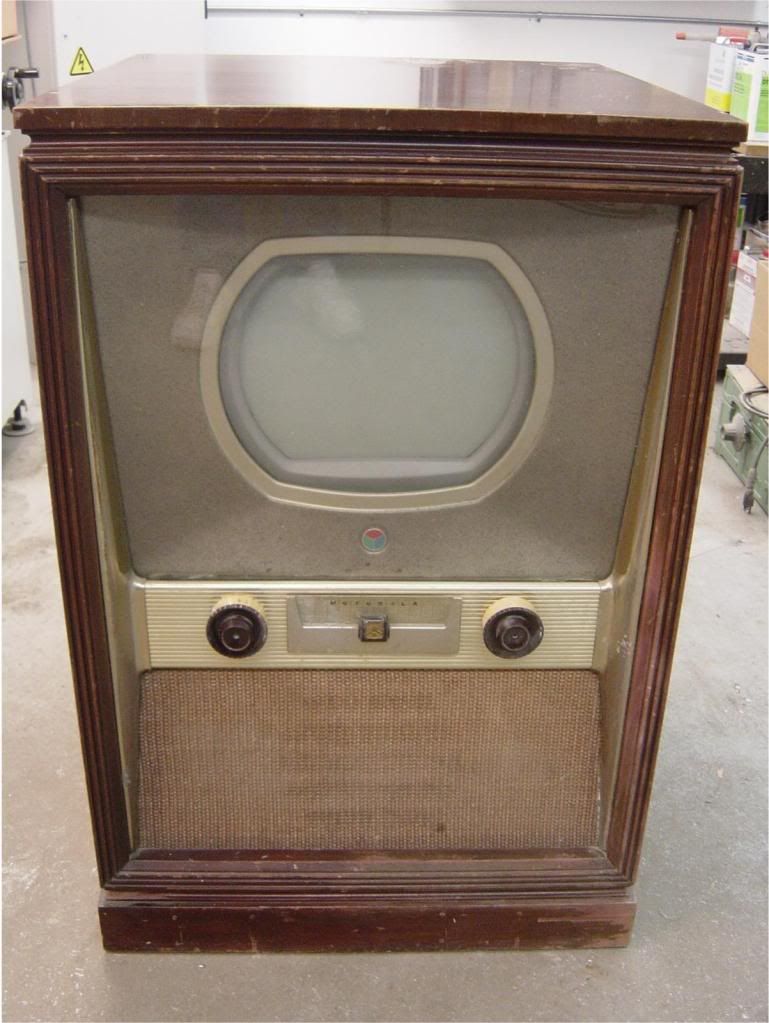 TOP VIEW AS RECEIVED 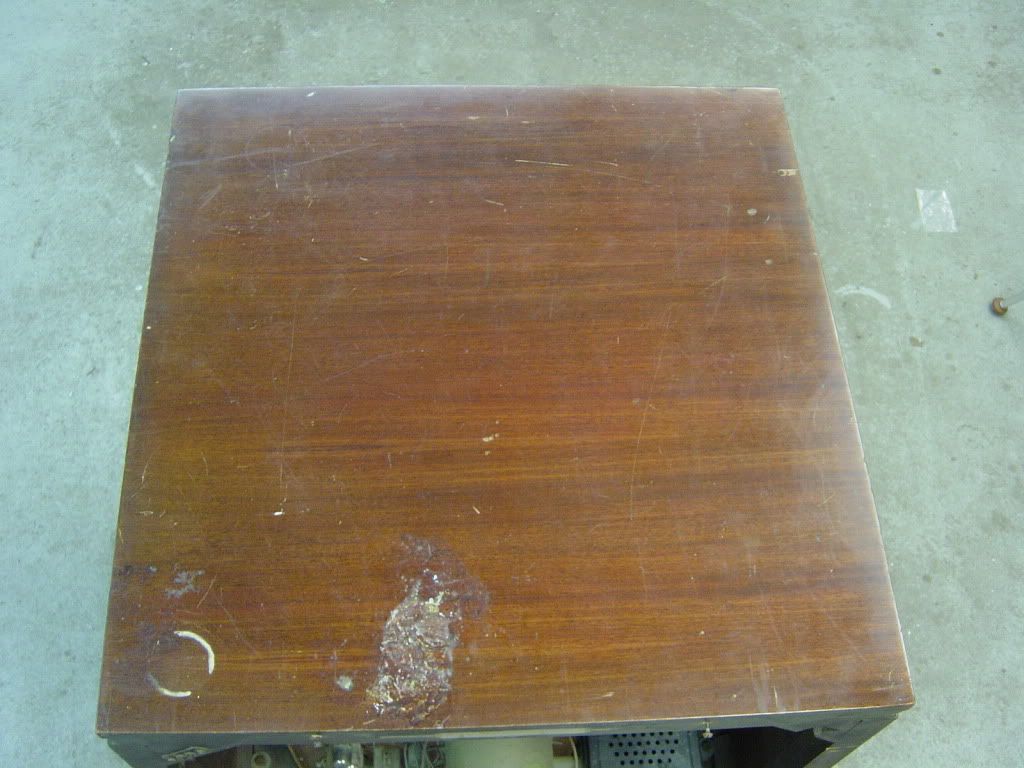 CONTROL DOOR AS RECEIVED 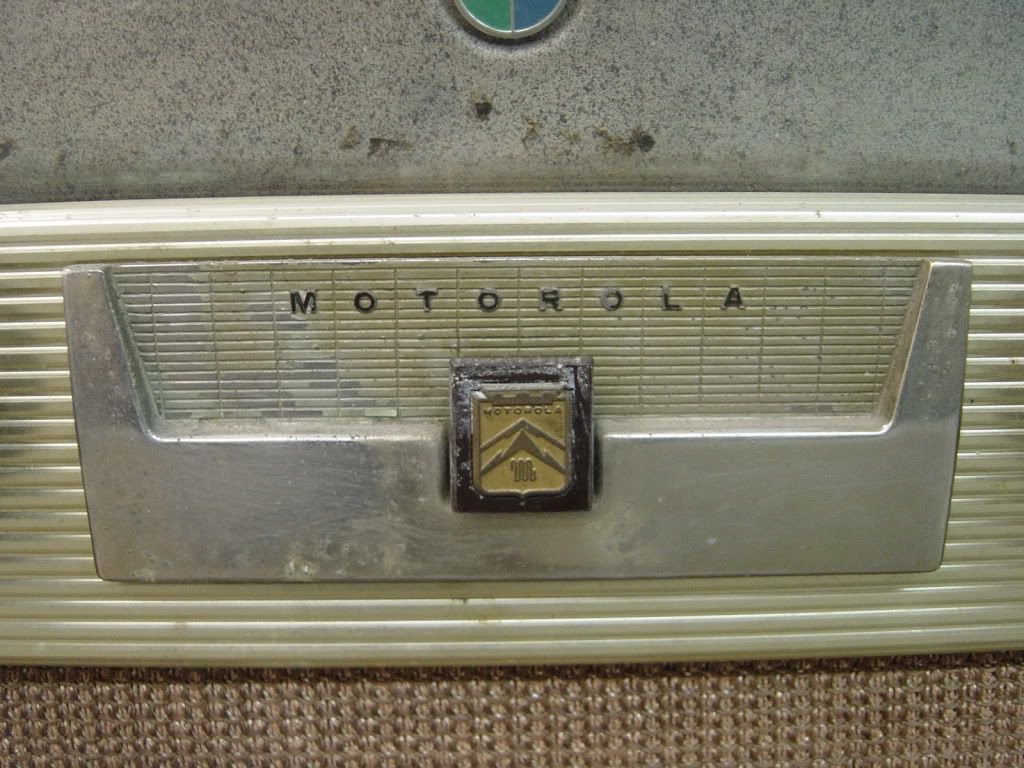 SIDE VIEW AS RECEIVED 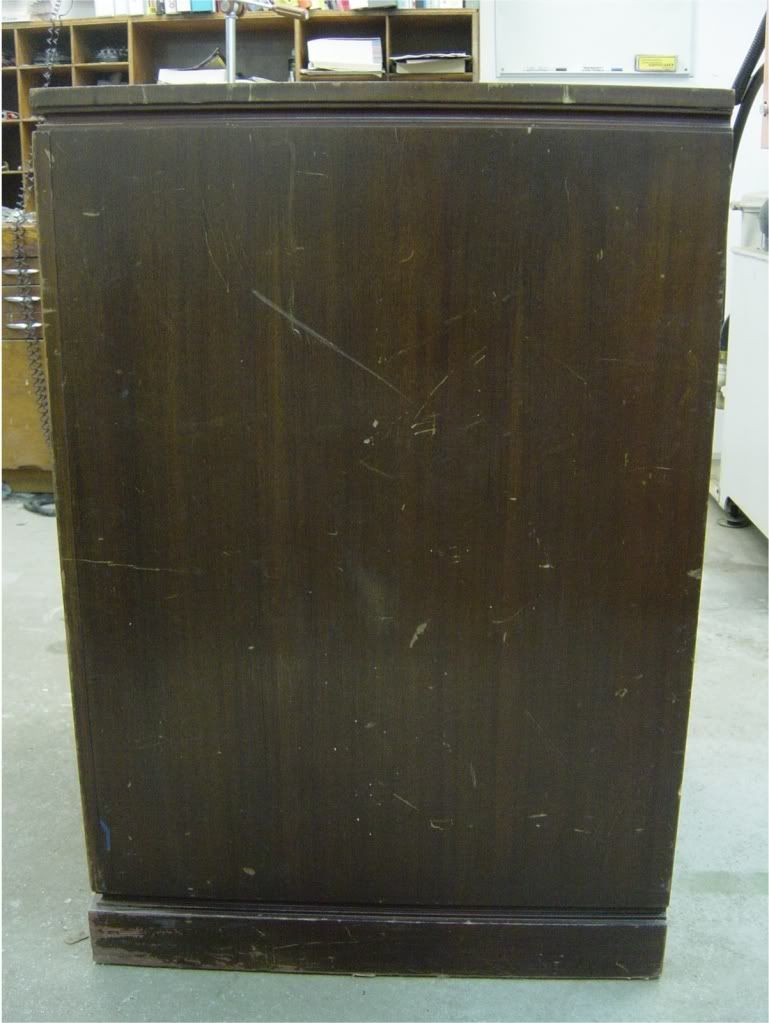 RE-CAPPED CHASSIS ON THE BENCH 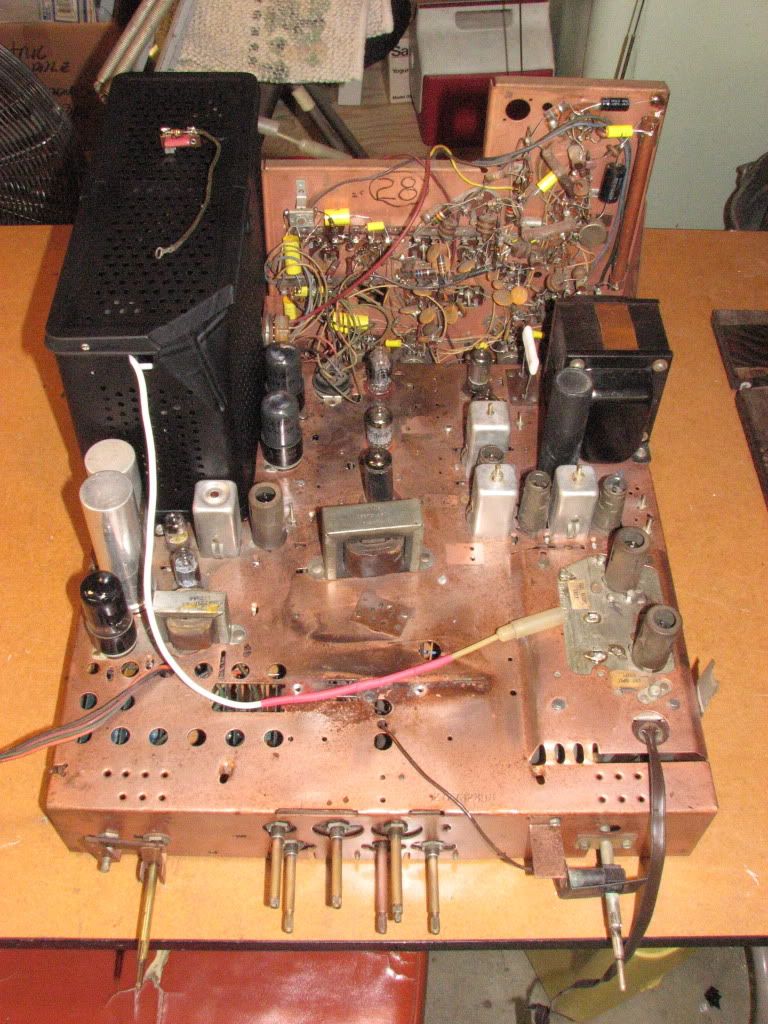 TOP VIEW OF 6BK4 MOD 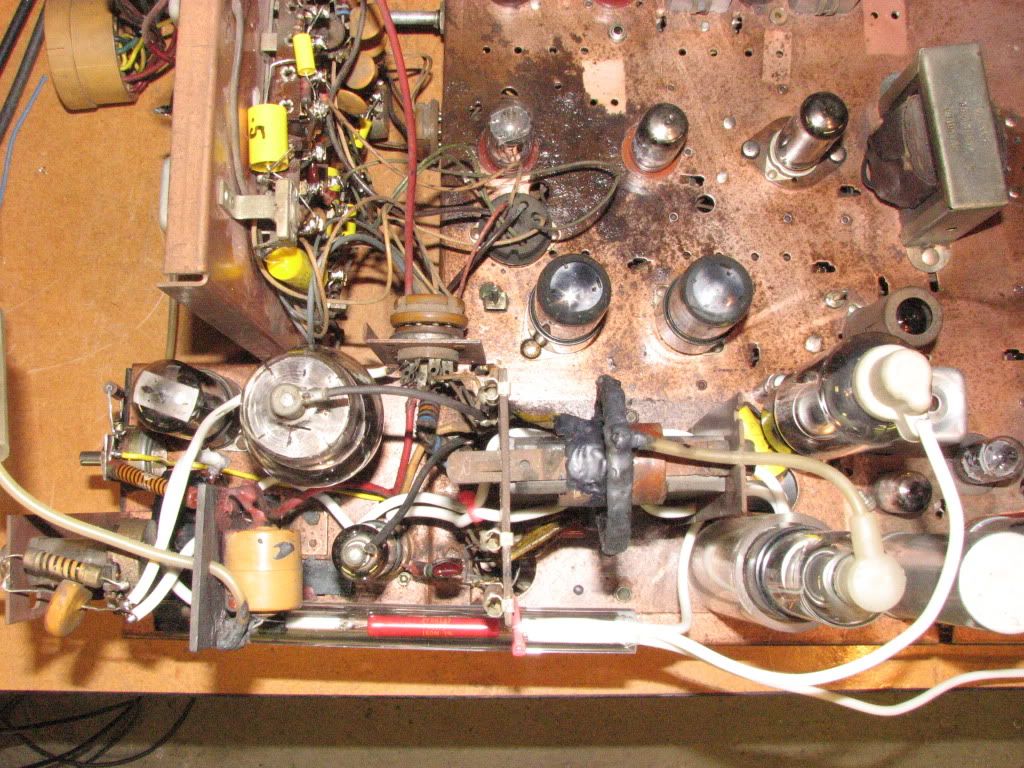 SIDE VIEW OF 6BK4 MOD 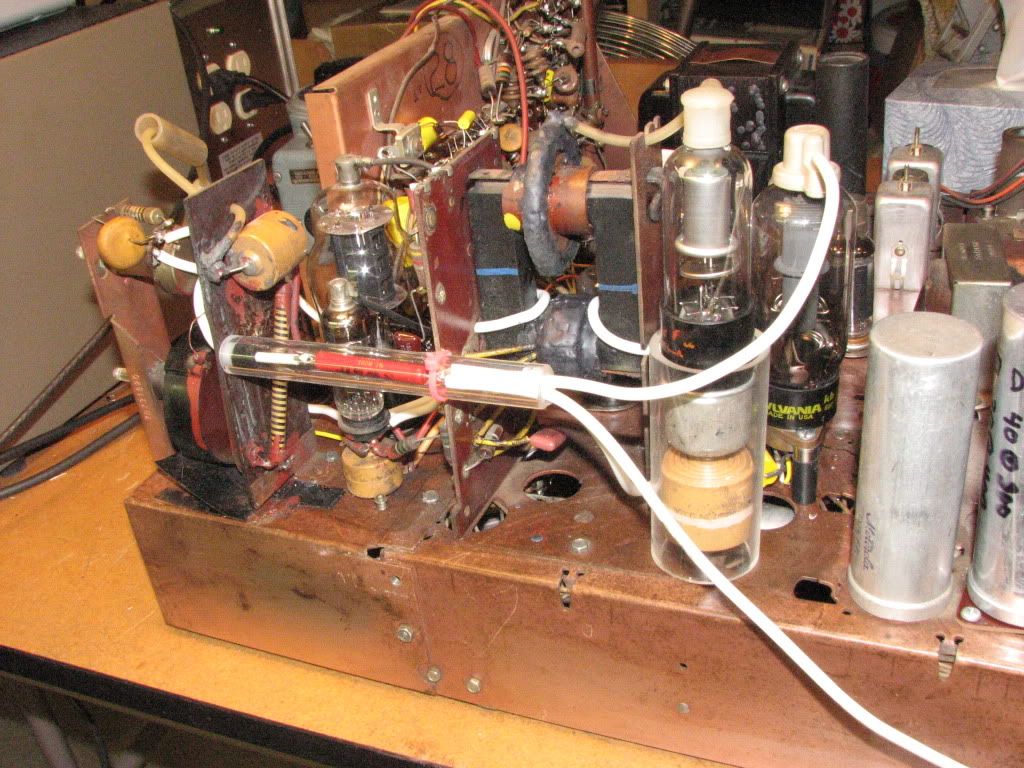 FRONT VIEW OF CRT TRUCK 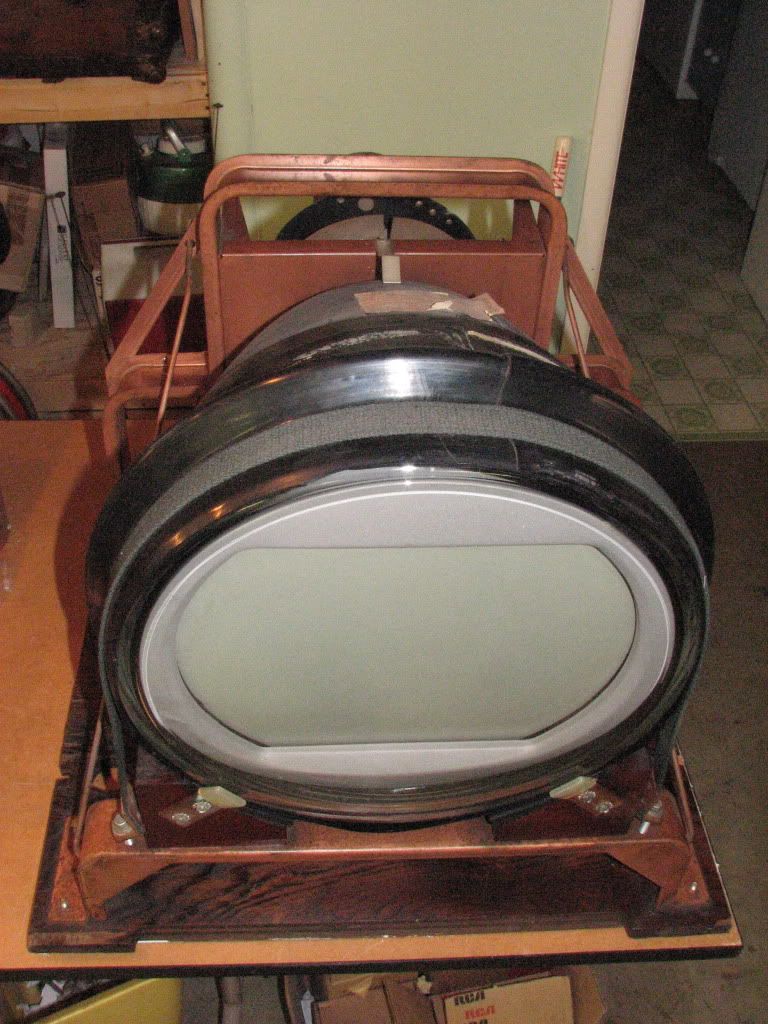 SIDE VIEW OF CRT TRUCK 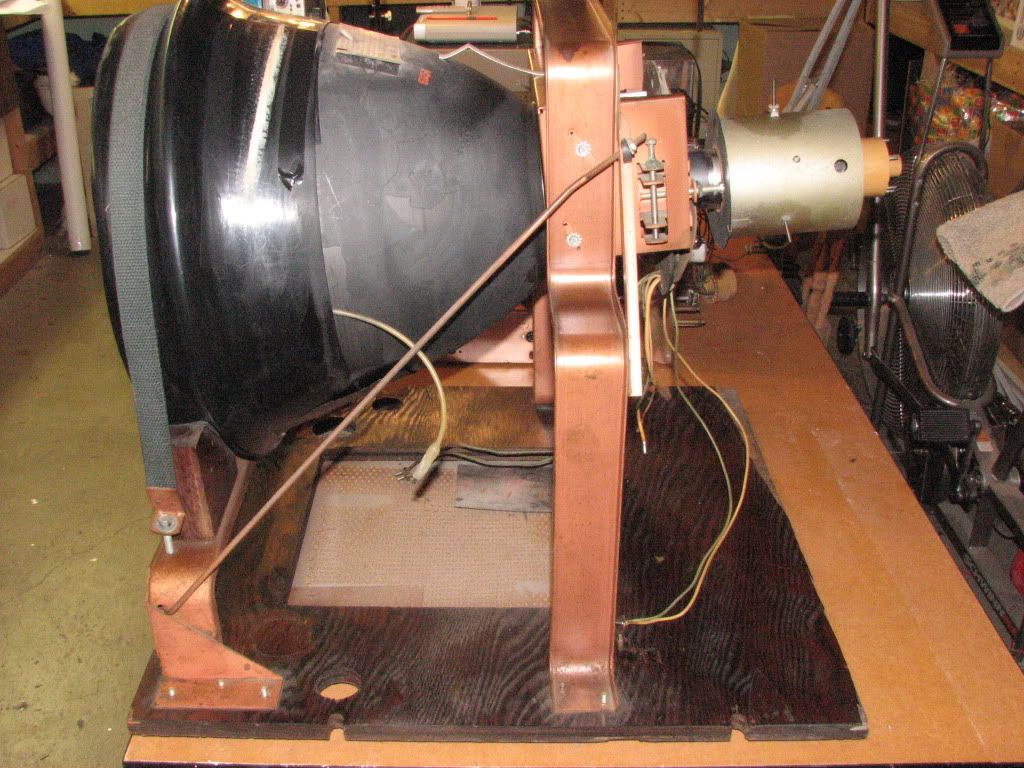 COMPLETED SET REAR VIEW 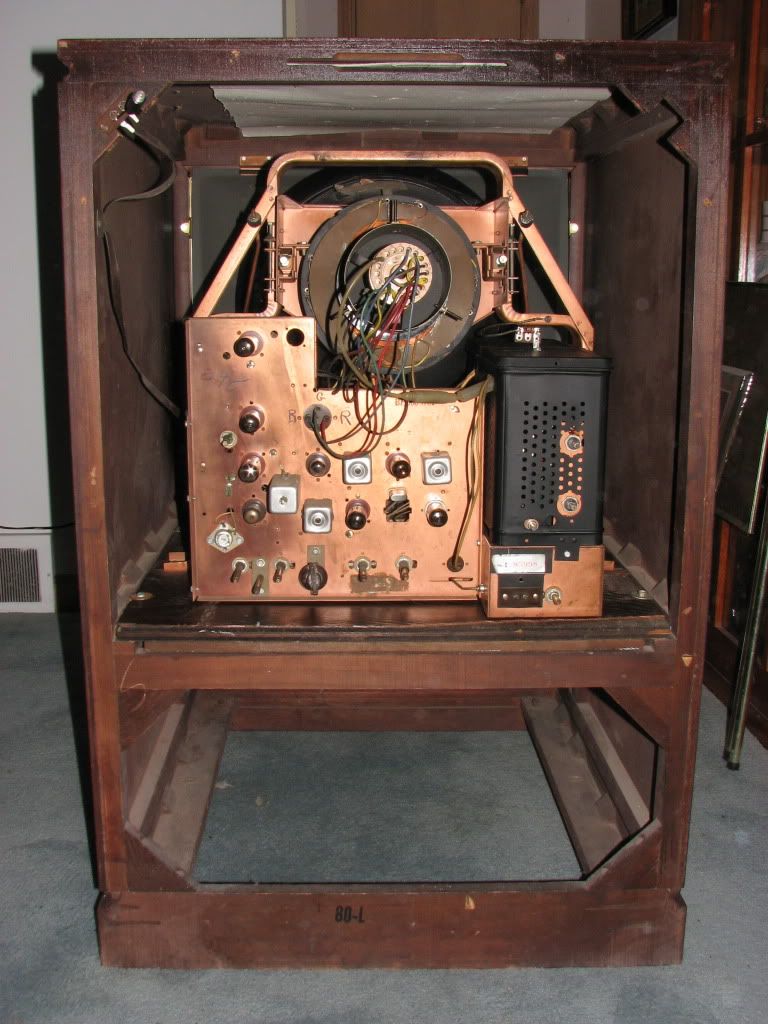 COMPLETED SET FRONT VIEW 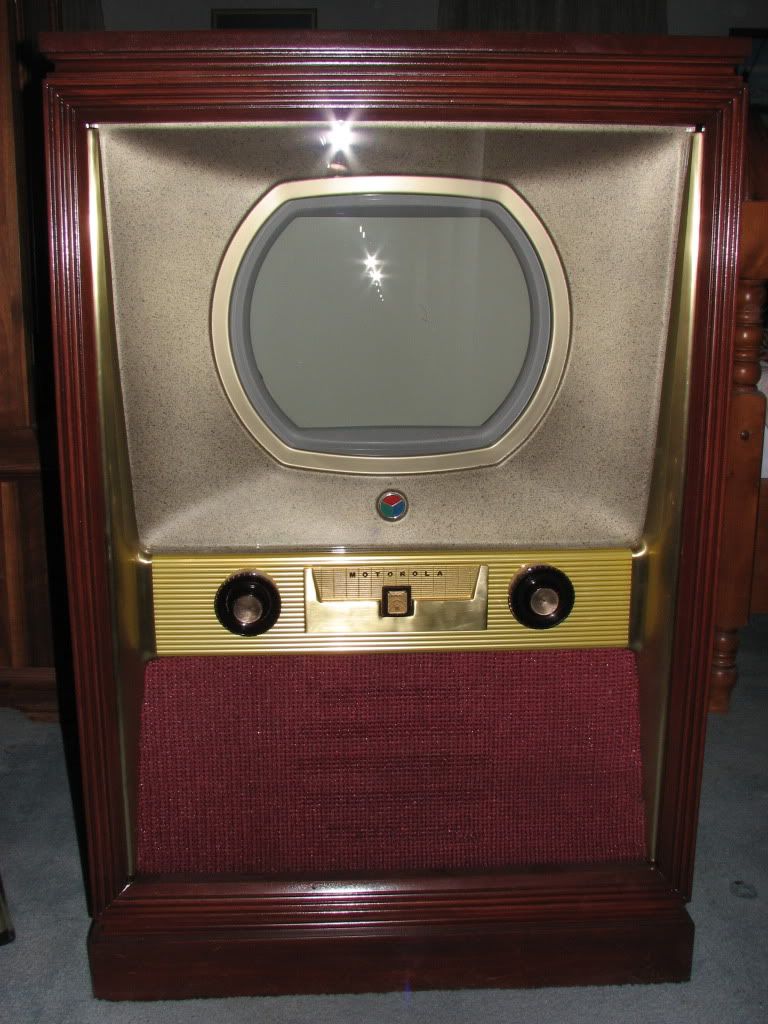 OPERATING WITH COLOR BARS 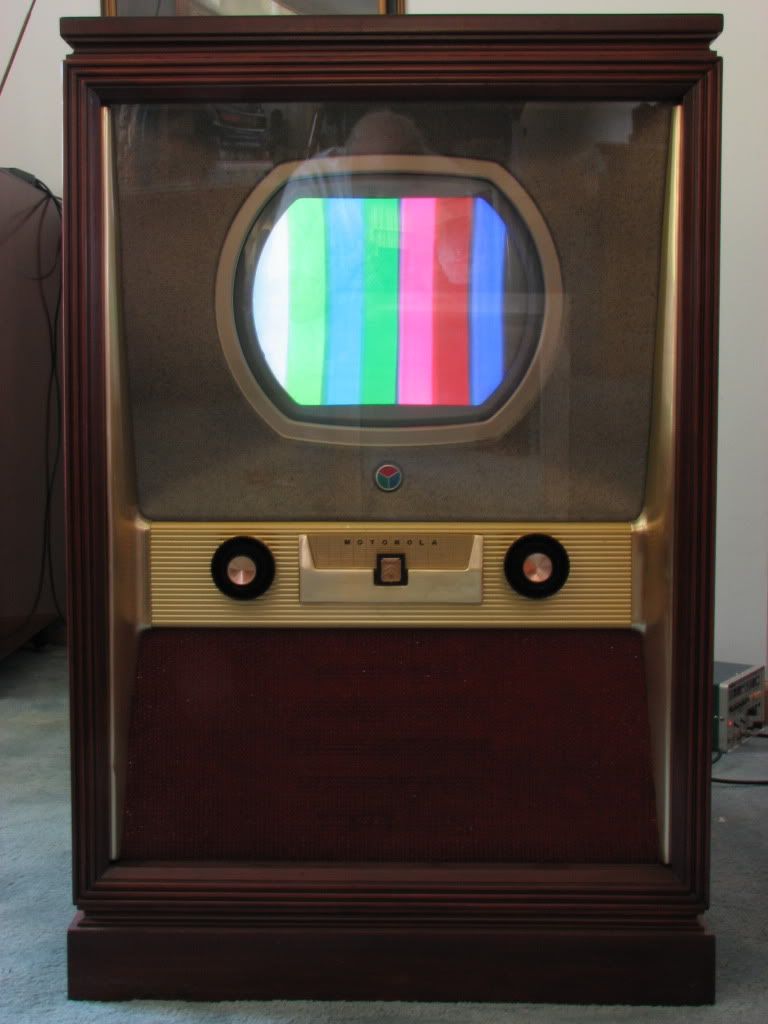 OPERATING WITH CROSS HATCH 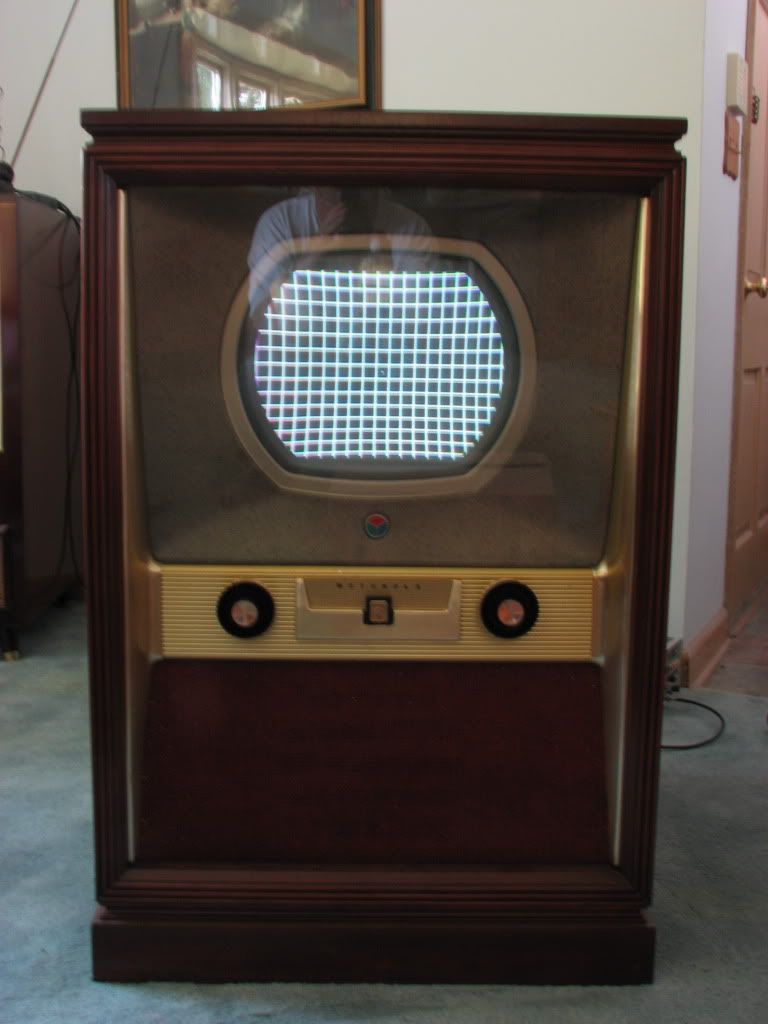 SCREEN SHOT WITH LETERING DETAIL 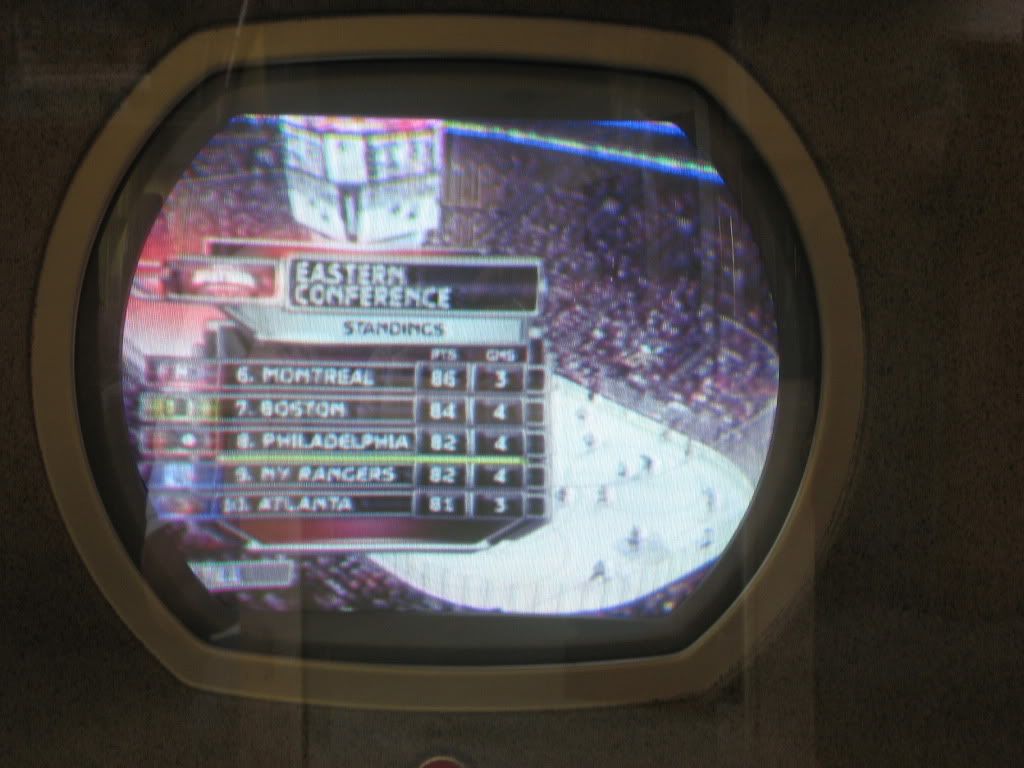 SCREEN SHOT OF NBC LOGO 
__________________
Vacuum tubes are used in Wisconsin to help heat your house. New Web Site under developement ME http://AntiqueTvGuy.com 
|
| Thread Tools | |
| Display Modes | |
|
|


 Threaded Mode