
|
|
|
#106
 02-08-2014, 02:42 PM
|
||||
|
||||
|
Let me chime in and agree that your picture looks pretty darned good. 60-year old TVs are not like modern plasmas. They were watched in subdued light, not bright sunlit rooms.
It's possible that you are very nearly done. As old_coot88 recommends, I'd be very cautious about turning any adjusters unless you have identified them in the manual and you have a clear plan in mind. The video IF adjustments are critical and you should not touch them unless you have specialized equipment and the experience to use it. Part of restoring a vintage TV is learning how a TV from those days actually works (for better or worse). You might want to sit down in the evening and watch the TV for a while -- give it a little shakedown cruise. How is the stability? Are you constantly jumping up to adjust something, or can you basically sit back and enjoy the show? What's the audio like? How does the TV audio compare to audio in FM mode? (The audio is usually louder in FM radio mode on this particular TV, but the quality should be about the same.) Take some time to get used to the continuous tuner, so you know when you have found the spot where you get the best picture and the best audio. If the best-audio spot is far away from the best-picture spot, then perhaps it would help to tweak the audio adjustments. And so on . . . . Regards, Phil Nelson Phil's Old Radios http://antiqueradio.org/index.html 
|
|
#107
02-11-2014, 09:26 AM
|
||||
|
||||
|
I do agree that I would have preferred to not have to adjust any of the IF cans. But that ship sailed decades ago. When I brought home the set from my grandparents house decades ago, the adjusters had already been tweaked, possibly many times. I found some were turned all the way out, some turned all the way in (hence the one the "fell" into the can a couple of times. It apparently no longer has the "stop" the others do). As a result, the initial picture was not as good as it is now. It was "blocky", and had a lot of "ghosts". My grandfather was a big "do-it-yourselfer", and my mother confirmed a few nights ago on the phone that he tried to fix it himself back in the 1960's, but I doubt he ever had the SAMS or Rogers references to start with. I spent a lot of time with grandfather, and worked with him in the construction biz back in the late 70's through mid 80's. I credit my grandfather for my "gumption" to tackle new tasks. When I was young, faced with some seemingly insurmountable task, and would ask "Can we really do it?", he would say "Somebody built it." or something appropriate, and we would dig in.
I would love to have the equipment to "set it and forget it". I'm hoping to have access to an oscilloscope and signal generator eventually, perhaps borrow them if I can find someone who has them, or even if it means buying them myself. Then I can follow the alignment directions in SAMS and be done with it. In the meantime, in order to get the picture I have, I've had to spend hours looking for the "sweet spots" and learning how the IF adjusters affect picture and interact with each other. Admittedly not the best way, but right now, it's the only way I've got. I also followed the "AGC" adjustment and horizontal sweep adjustments in the SAMS (sans the equipment for the horizontal sweep, thus relying upon my best judgment of picture, of course) and it's all been good. In fact, that alone brightened the picture immensely. It will be interesting to see, eventually, how close I got.) One of my frustrations has been that the test pattern DVD made with files downloaded from the internet works great in the computer's DVD player, but won't play in any of the actual DVD players I've tried it in, so I'm having to make adjustments with static images from shows. We watched a few hours of "Get Smart" last night and I did notice some bright white "blips" along the "scan lines" that faded away with warm up. But after a couple hours, during an episode that had much brighter backgrounds than others, they reappeared. Looks like I've got some more tweaking to do. Also, it seems the "scan lines" appear, quite faintly, against a dark background even when the brightness is turned down quite a bit. Interestingly, in the copy of the original "SAMS" folder I have, on the schematic someone had used a pencil to circle "C2" 50uf cap, and wrote "vert jitter retrace lines". I know this is a long shot, but are there any "old time" do-it-yourself" processes for video alignment for folks who didn't have scopes and signal generators and such? I'm kind of having to make this up as a go along, but maybe I'm "re-inventing" the wheel. And check out that brand-spanking-new eye tube! It's action seems correct, in that it does move maybe a quarter inch up and down when it's slightly "off signal". However, when it's not on a channel at all, it lines up pretty good as well. As I get to a a video signal, it moves either up or down, and then lines up again, apparently when I reach "center" of the best signal. Is that normal? I've read where the action of this particular eye tube is not very "intuitive"..especially considering the left bar's BOTTOM edge is the one that is supposed to move up and down...and I have to agree it's pretty funky.
|
|
#108
02-11-2014, 09:42 AM
|
||||
|
||||
|
I didn't get a photo of the lines on my TV, but they remarkably look a lot like this photo that I found on the 'net. I've now read that they appear to be a symptom of the old set trying to process all the info contained in a more "modern" TV signal. Is it just something to "live with"?
|
|
#109
02-11-2014, 09:53 AM
|
||||
|
||||
|
I think your set is looking pretty good. I didn't notice smearing on the picture of the GET SMART title. It's reasonably clear and sharp.
I can only hope that my RA-113 will look as good as yours. It's basically untouched, other than a screwy looking audio output transformer being installed in the past.
__________________
Bruce
|
|
#110
02-11-2014, 10:17 AM
|
||||
|
||||
|
Quote:
And I've even taken a couple pretty "zings" off the metal cone of that danged 19AP4 metal cone CRT! I'm glad our floor is well ABOVE ground level on a foundation. While not nearly enough to "knock me across the room", it certainly got my attention and evoked a couple of decidedly NOT "family friendly" exclamations. Maybe another thing I inherited from my grandfather is that we aren't very good electrical conductors. I once watched him test a light socket to see if it was "hot" by sticking his finger in it...and after he declared it was NOT hot...I screwed a light bulb into it and it lit up. On your set, was the audio transformer an "aftermarket" replacement? Or was someone trying to boost the audio or run an external speaker?
|
| Audiokarma |
|
#111
02-11-2014, 10:29 AM
|
|||
|
|||
|
Quote:
Back in the day there was a shop that had a proficiency test for new hires. The boss would take a set and deliberately throw the vid IFs off. The applicant was expected to re-align it using the full suite of equipment (sweep genny, scope etc.) The fact that you've got a watchable picture on the set is nothing short of a miracle and testament to your Granddad's indomitable spirit and admonition to "dig in and do it." It's virtually fulfillment the Sea Bees' motto: The difficult we do immediately The impossible takes a little longer. My hat's off to you Sir. I would never have even attempted it. The usual symptoms of misalignment are loss of fine detail in the pic, smearing-out and ringing of the vid signal. The best advice at this point would be to not try to "improve" upon what you've got.
|
|
#112
02-11-2014, 10:42 AM
|
||||
|
||||
|
Quote:

Last edited by Kevin Kuehn; 02-11-2014 at 01:42 PM.
|
|
#113
02-11-2014, 01:09 PM
|
||||
|
||||
|
PM sent to CaryLee.
__________________
Bruce
|
|
#114
02-11-2014, 04:46 PM
|
||||
|
||||
|
Quote:
 The lines disappeared completely when I played a non-copy protected DVD. To confirm that's what you have, play a non-copy protected DVD or hook up some other source (VHS player?) using non-copy protected material. Retrace lines look different; they slant all the way from one side to the other. Here's one of my TVs with and without visible retrace lines (I'm using a little test CRT, not the TV's native picture tube): 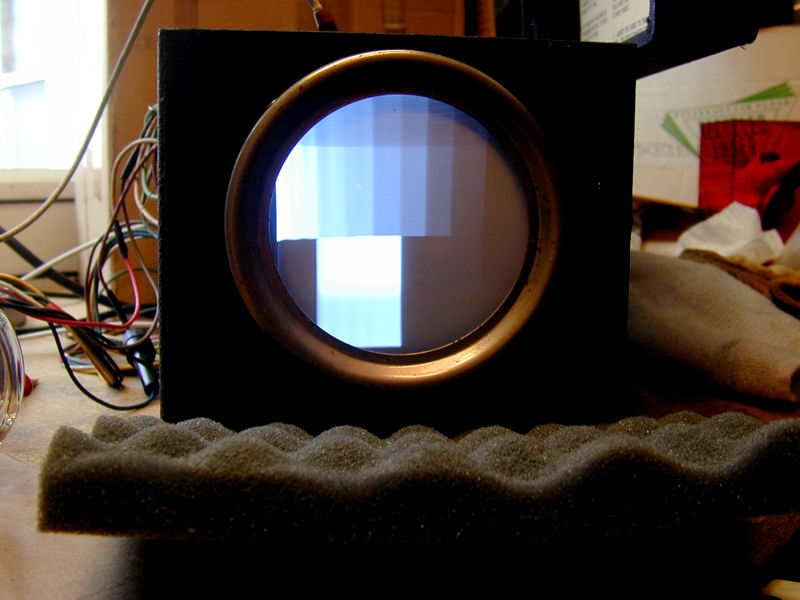 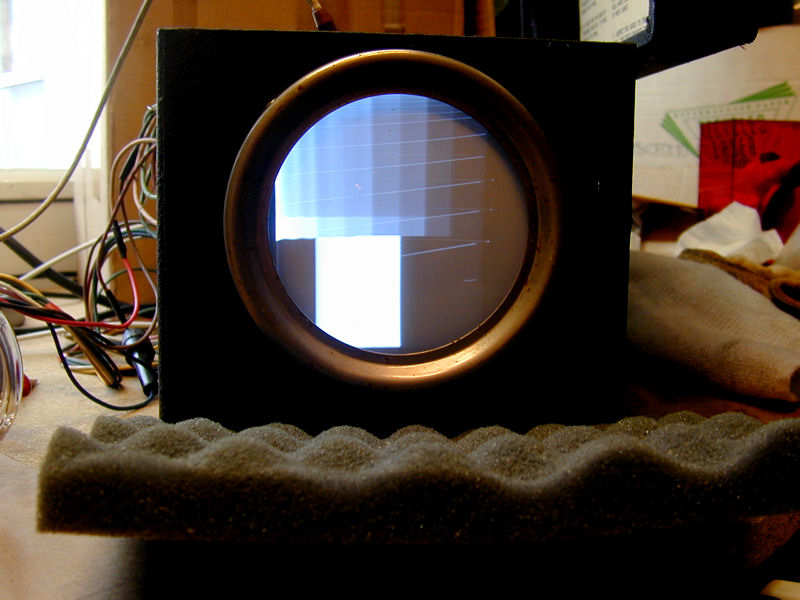 Retrace lines generally disappear when you turn the brightness down beyond a certain point, while Macrovision lines are less affected. Phil Nelson
|
|
#115
02-11-2014, 06:17 PM
|
||||
|
||||
|
Quote:
A slightly better cheat (if you no gots test equipment) was IIRC was originally described for the Sencor VA-62. One can attempt to visually align the video IFs of a set if it is displaying a 'multiburst' test pattern which is basically a pattern of black and white vertical bars that become thinner from left to right. If you align your set with that pattern (and a audio test tone to make sure you don't kill the sound while working on the picture) I believe the procedure is something to the effect of get the thick bars clear, then try to get progressively thinner bars clear while keeping previous ones good. The thickness of the bars basically corresponds with the frequency they produce so the thinner the bar the higher the frequency (it is often used to test video response in home theater applications). You could probably buy or burn a test disc with a 'multiburst' pattern cheaper than you could get the right equip for the factory proceedure. Personally I tend to agree with coot on not messing with it any further, but if you are not worried about messing up your progress trying to get more or just want a yard stick of how good you did then the multiburst method may the thing for you...
__________________
Tom C. Zenith: The quality stays in EVEN after the name falls off! What I want. --> http://www.videokarma.org/showpost.p...62&postcount=4
|
| Audiokarma |
|
#116
02-11-2014, 06:38 PM
|
||||
|
||||
|
Macrovision is inserted in the vertical sync space as a series of white video dashes at about 140 units of video. They time in and out on the insertion which explains why your set wonks out and then returns to normal for a bit. When your ancient set sees it, the AGC kicks in and collapses the video to take the 140 down to 100 units of video. This in turn collapses the underlying 40 units of sync down to something unuseable by your set. About 20 units or so and not enough to give you a good pic.
One old cheap solution is to find an old Betamax. Very old. They inserted new sync on the output and that will help the issue. Send your air/cable/video signal to the Betamax and use its output as RF 3/4 for your set.
__________________
Once you eliminate the impossible...whatever remains, no matter how improbable, must be the truth." Sherlock Holmes.
|
|
#117
02-11-2014, 09:02 PM
|
|||
|
|||
|
Quote:
 If i really wanted to pursue barefoot alignment techniques, i'd get a beater set rather than risk doing it on an irreplaceable family heirloom.
|
|
#118
02-11-2014, 09:12 PM
|
|||
|
|||
|
Quote:
Last edited by TV'S&MORE; 02-11-2014 at 09:24 PM.
|
|
#119
02-12-2014, 10:35 AM
|
|||
|
|||
|
if your still having line issues and brightness issues I'd still say the crt needs to be checked or a brightner added to see what you get , my ra-109 has a weak crt and will function without a brightener but you have to push the brightness to get a decent image and the retrace lines appear , with a brightener it takes less to push the brightness , the lines do not come in as easily and the whites are brighter along with blacks that are blacker , also you don't lose focus as easily either when brightener is added , since I have a crt tester I can see what the emissions are so this told me what to do, this it too why I added a resistor so the brightener isn't pushing its full voltage into the crt because at 7 volts emissions rise making it a decent picture , it does require a couple minutes of warm up before the focus and brightness come up but it is better to not over push the crt and have a warm up then to hit it with full voltage all the time.
so without a crt tester you don't know whats going on but you could try the brightener , it wont hurt , me and a friend have tried them on good crts in the past and saw no difference but when added to a weak crt a difference is seen , this is just a suggestion , I recently tried one on a color crt that tests good just to confirm a couple guesses from others that maybe an issue I had was the crt , it made no difference to its performance and was removed.
|
|
#120
02-12-2014, 11:32 AM
|
|||
|
|||
|
Well, I'm still pretty new to all this and I've never even touched a DuMont before, so I can't comment on anything techical here. Following this thread has been really interesting and I admire Cary for all that he's done. It's a great job to get this far and an inspiration to newbies everywhere.
The discussion is starting to remind me of what happens with a lot of car guys. They get their car repainted and then worry over a minor imperfection because they're so close to it and want it to be totally perfect. However, nobody else ever notices and can barely see it even when it's pointed out to them. The truth of the matter is it's impossible to get something totally perfect and it wasn't even that way when it was new. Just go to a new car lot today and really look over the cars and you'll see lots of flaws. Of course I'm not seeing the DuMont in person so I might change my mind if I did, but the pictures look pretty darn good even if it is a little darker. I would say a few things to keep in mind are: A) This set probably wasn't perfect when new. B) It was designed to pick up weak over the air signals that an owner in 1950 might have only been able to get with a huge antenna, a lot of static, and only at night if they were far enough out. They would have considered it good if you could even see a face. C) They ain't makin' parts or CRT's anymore, so I say unless it's for daily use, get all you can out of the existing stuff. D) I bet everybody you show it to will oohh and aahh over it, congratulate you on a job well done, and never even notice the imperfections. And, if somebody does, just mention points A through C above, or tell them to go buy their own DuMont and see if they can do better! Finally, somebody above mentioned just sitting down and watching the set for a couple of hours and see how you like it. Watch it as if it was a regular tv, not a family heirloom. If it's still objectionable to you, then try tweaking it. I think a good test might be to throw in a Girls Gone Wild tape and after the end of it you're still noticing the lines, it might need adjusting. Last edited by egrand; 02-12-2014 at 11:39 AM.
|
| Audiokarma |
 |
|
|


 Linear Mode

