
|
|
|
#1
 09-29-2010, 10:20 AM
|
||||
|
||||
|
Crosley 739A
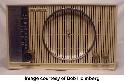
Went to Kutztown looking for knobs for my Electrola. After an hour of wandering around drooling, I found the exact three I needed plus a pair of spare 24A's, so I was a happy camper. Then as I was fixing to leave, this little fella made puppy eyes at me, and I just had to take it home:
 It's a Crosley 739A. bc/sw 7 tube transformerless The case is in quite decent condition as are the dial and pushbuttons.  The back cover is missing and with it the loop antenna.  I can replace the loop, but if anyone has a picture of the original back they could post it would help me in making a replacement. There is a bit of surface rust on the chassis, and seriously thick dust everywhere, along with lots of spider egg cases. I wonder where it was stored.   I've already removed the speaker and put it aside for safekeeping. It has a couple small tears I need to repair. Tubes all check out ok. 5 of the 7 bear the Crosley label. The coils all ohm out reasonably. Here's the bottom.  There appear to have been a couple of ham handed repairs. One of the solder joints on the new power cord is not a thing of great beauty.  And there are a couple of caps just soldered to wires floating in space unsupported by any sort of solder lug.  I figure I should put a polarized plug on the line cord to force the chassis to ground, fuse the hot side, and move the switch there too. That way if the cap across the mains goes the chassis won't be hot with the power switch off and will blow the fuse when it's turned on. So, while I wait for the caps to arrive, its time to drag out the naval jelly and attack the rust on the chassis, then make some decisions about the cabinet. Intellectually, I understand the idea of preserving the old finish, but with a little sanding and detailing and some laquer it could just look so nice. Anyone have any thoughts about how best to clean the dial without damaging it? Also, some of the white stripes on the bakelite buttons have lost their whiteness. What could I fill them with to bring the whiteness back? Paul Last edited by PaulOF; 09-29-2010 at 11:20 AM. 
|
|
#2
09-29-2010, 11:21 AM
|
||||
|
||||
|
Hi, that'll be a fun radio to fix up. There were a lot of radios at Kutztown that called out to me, but I have too big a pile already waiting.
After you wash the pushbuttons with a toothbrush, you can paint some artist's acrylic paints over the grooves. Just paint across; no need to try to keep it in the groove. Let it dry a minute and then with a slightly damp cloth or paper towel, wipe across. Let dry more and polish off with a soft cloth to make the lines sharp. At a crafts store you'll find various shades of white and ivory in small bottles, in case you think that bright white might be too...bright.
__________________
Reece Perfection is hard to reach with a screwdriver.
|
|
#3
09-29-2010, 05:45 PM
|
||||
|
||||
|
That's a nice little radio. Interesting how the frequencies increase from right to left. You might consider cleaning all the old dirt, wax and oil from the old finish and coat it with some new lacquer. That way you'll save you self the hassle of stripping, grain filling, toning, etc.
|
|
#5
10-01-2010, 08:35 PM
|
||||
|
||||
|
Ugh. Have you tried sliding heat-shrink tubing over the old wires ?
|
| Audiokarma |
|
#6
10-01-2010, 09:00 PM
|
||||
|
||||
|
Quote:
I didn't realize until then what a heck of a time bomb I had on my hands as far as shock and/or fire hazards were concerned. The last time I worked on anything with a cord this bad was back in the early 1970s, when the interlock cord on an old GE 16-inch console TV shorted out  and kicked out the circuit breaker in the fuse box. This TV had belonged to my grandmother (who gave it to me after getting a color set in 1969 or '70), and apparently was in her apartment for decades without ever having been moved. By the time I got the GE set the cord was taped up near the molded interlock plug, and the tape was falling off (dried out, no doubt, after 20+ years). The old cord probably had rubber insulation, like the original cord on my Zenith radio; since the TV set was a console, it was put in one place and left there 20 years, with no concern for the condition of the cord. This is, of course, an accident waiting to happen. I consider myself lucky that I wasn't shocked to death when the cord shorted out; however, I was nearly scared out of my wits by the spark from the interlock plug. and kicked out the circuit breaker in the fuse box. This TV had belonged to my grandmother (who gave it to me after getting a color set in 1969 or '70), and apparently was in her apartment for decades without ever having been moved. By the time I got the GE set the cord was taped up near the molded interlock plug, and the tape was falling off (dried out, no doubt, after 20+ years). The old cord probably had rubber insulation, like the original cord on my Zenith radio; since the TV set was a console, it was put in one place and left there 20 years, with no concern for the condition of the cord. This is, of course, an accident waiting to happen. I consider myself lucky that I wasn't shocked to death when the cord shorted out; however, I was nearly scared out of my wits by the spark from the interlock plug. 
__________________
Jeff, WB8NHV Collecting, restoring and enjoying vintage Zenith radios since 2002 Zenith. Gone, but not forgotten.
|
|
#7
10-02-2010, 12:55 AM
|
||||
|
||||
|
My '42 Zenith 14H697 cutdown has the deteriorating rubber wires. When I had the chassis out I was careful not to exasperate the situation. It works satisfactorily as is - I imagine one day I'll give it a good going over and replace the wiring when I recap it.
__________________
AUdubon5425 Youtube Channel
|
|
#8
10-02-2010, 12:47 PM
|
||||
|
||||
|
I rewired a Philco 40-115. What a messy job but I road-mapped the wiring, started at one end and worked to the other. I duplicated the insulation colors as much as possible and it turned out quite well and is a good player. Yes, all the wires went back where they belonged the first time too! That '42 Zenith should be a piece of cake with all that room under the chassis!
What hack jobs most of these old radios have seen, except for maybe having a tube or two changed, the cord may have been cobbled in as well as the electrolytics. At least most of the time they'll play and power right up with no issues....unless someone really knew what they were doing and de-tuned the whole thing.... It is amusing seeing some of these soldering skills and hack repairs, and kinda scary too!!
|
|
#9
10-02-2010, 03:31 PM
|
||||
|
||||
|
Quote:
 Link to 14B1 chassis pics
__________________
AUdubon5425 Youtube Channel
|
|
#10
10-03-2010, 02:03 AM
|
||||
|
||||
|
I've never been a big fan of the '42 models but I'd make an exception with your set! Being a fourteen tuber it will take a while to do. I don't think that I would disturb the wiring around the band selector switch much as some of those short runs will be fine with a lack of insulation, plus some of those wires are cloth covered(?).
I did my 10-S-567 doing the filament wiring first, followed by the power supply B+ then the rest of it as needed. I enjoyed the progression and took my time.
|
| Audiokarma |
|
#11
10-03-2010, 08:03 AM
|
||||
|
||||
|
What I did with the last chassis as dirty as this Crosley was put some duct tape over the top of the IF transformer, remove the speaker, and take it out in the back yard, soap it up all over using a toothbrush, and then give it a good hosing down. Then I used a blower on it right away to get out the water and cleaned any part that didn't get clean enough yet by hand. Sat it in the sun all day, lubed the tuning cap, and a day or two later started recapping it. A good hosing won't hurt them if you're careful about IF's, other coils, mica trimmers, speakers, etc.
__________________
Reece Perfection is hard to reach with a screwdriver.
|
|
#12
10-03-2010, 11:31 AM
|
||||
|
||||
|
Thanks for the idea Reece. I'm a little leery of the hose, but
after a couple hours of soapy water and a toothbrush, in company of a can of air, the chassis now looks pretty good. The dial is etched glass and all of the dirt is on the side without paint, so I've been able to clean that up pretty nice too. It has a couple weird resistors that look like thick, fuzzy wires. One of them fell apart in my hand and its just a coil or resistance wire covered by thick, fuzzy insulation. At this point, I'm about 1/2 way through recapping and replacing bad wire. I am not looking forward to trying to figure out how the dial threading works. Paul
|
|
#13
10-04-2010, 10:11 AM
|
|||
|
|||
|
Regarding the lack of soldering skills, I also see a lack of intelligence. Who in their right mind would install the cord without running it thru the strain relief. Just copy what was done before. I used to just splice the cord under the chassis and cover the connections with tape. That was before I owned a soldering iron.
|
|
#14
10-17-2010, 08:13 PM
|
||||
|
||||
|
Well, I'm finally pretty much finished with this little guy. I finally got all the decaying wiring replaced, finished the recap, put on a polarized plug, moved the switch to the hot side and added a fuse. Also added a cute little loop antenna from Antique Radio Supply to replace the missing original.
Plugged it in, turned it on, and.... nothing. Turns out the switch was bad. Found a good 1 meg pot with power switch in my parts box. Had a round shaft instead of a half-round, but a few minutes with a file fixed that. Turned it on again and a little hum, a little a lot of noise, but nothing that sounded like radio. A little investigation revealed that the tone control had only intermittant continuity on the wiper. This time I had to dig into the box of parts I inherited from my dad to find a suitable 1/2 meg pot. Soldered it in, turned the set on and found both bands now working. There is a little 120 cps hum. (Sorry for the cps. Sometime in the late 1960's, QST's April issue included a nice nomogram for converting cps to Htz, but I have misplaced it.) Anyway, I would like to believe that the hum is coming from the 6C5G that someone substituted for the 6P5GT as the detector. The 6C5G is a reasonable substitution, but it may be more susceptible to hum than the 6P5GT. On the other hand, there are at least 5 or 6 different ground points on the steel chassis, and that might also account for the hum. Its not enough to be bothersome. Perhaps I'll try getting the right detector, but the 6P5GT seems to be running around 20 bucks so I am not in a hurry. Might try a 6J5. The dial pointer is missing, so I made a replacement out of a piece of an anchovy tin and a bit of bare copper wire. Restrung the dial (another of my favorite activities), and put it back into the case. I had cleaned the case up with Murphy's oil soap. Then sanded the old finish with 400 grit sandpaper. Applied a few coats of spray laquer and it turned out pretty nice. Preserved enough imperfections so that still has the look of a well used and loved friend. Here's the front:  And the top:  Detail of the dial showing my home-madey dial pointer and, of more interest, the indication on the dial locating WLW.  Crosley, of course, owned WLW in Cincinatti. At one time this was the only U.S. station licensed to broadcast at 500KW, though I think by this radio's time it had been reduced back to 50KW., I have to say that I miss wanting to listen to the old clear channel stations. I used to love WLW and KYW when it was still in Cleveland and my favorite WJR, the "great voice of the great lakes coming to you from the golden tower of the Fisher building." I can still hear them, of course, but they don't have any interesting programming any more. The back is completely bogus. It came with the back missing, and I have not been able to find any pictures of what it should look like, so I just made it up. The binding posts for the external antenna and ground are another find in my dad's old parts box. The brown discoloration is glue left over from whatever paper was originally pasted on. The three screws in the center are for hooking up a turntable to play through the radio.  So, not too bad I think. I bought it for 10 bucks, put maybe 6 dollars worth of caps into it and the little loop antenna was 4, so total investment about 20 dollars. Plus several hours of fun fixing it up. Now time to attack my sister-in-laws Zenith 8G005 Transoceanic.
|
|
#15
10-18-2010, 02:20 PM
|
||||
|
||||
|
Nice job
 Lucky you had those replacements pots on hand. I like that technique you used on the old finish. It really preserves that old look. P.S Don't cps = Hz ?
|
| Audiokarma |
 |
|
|




 Linear Mode

